

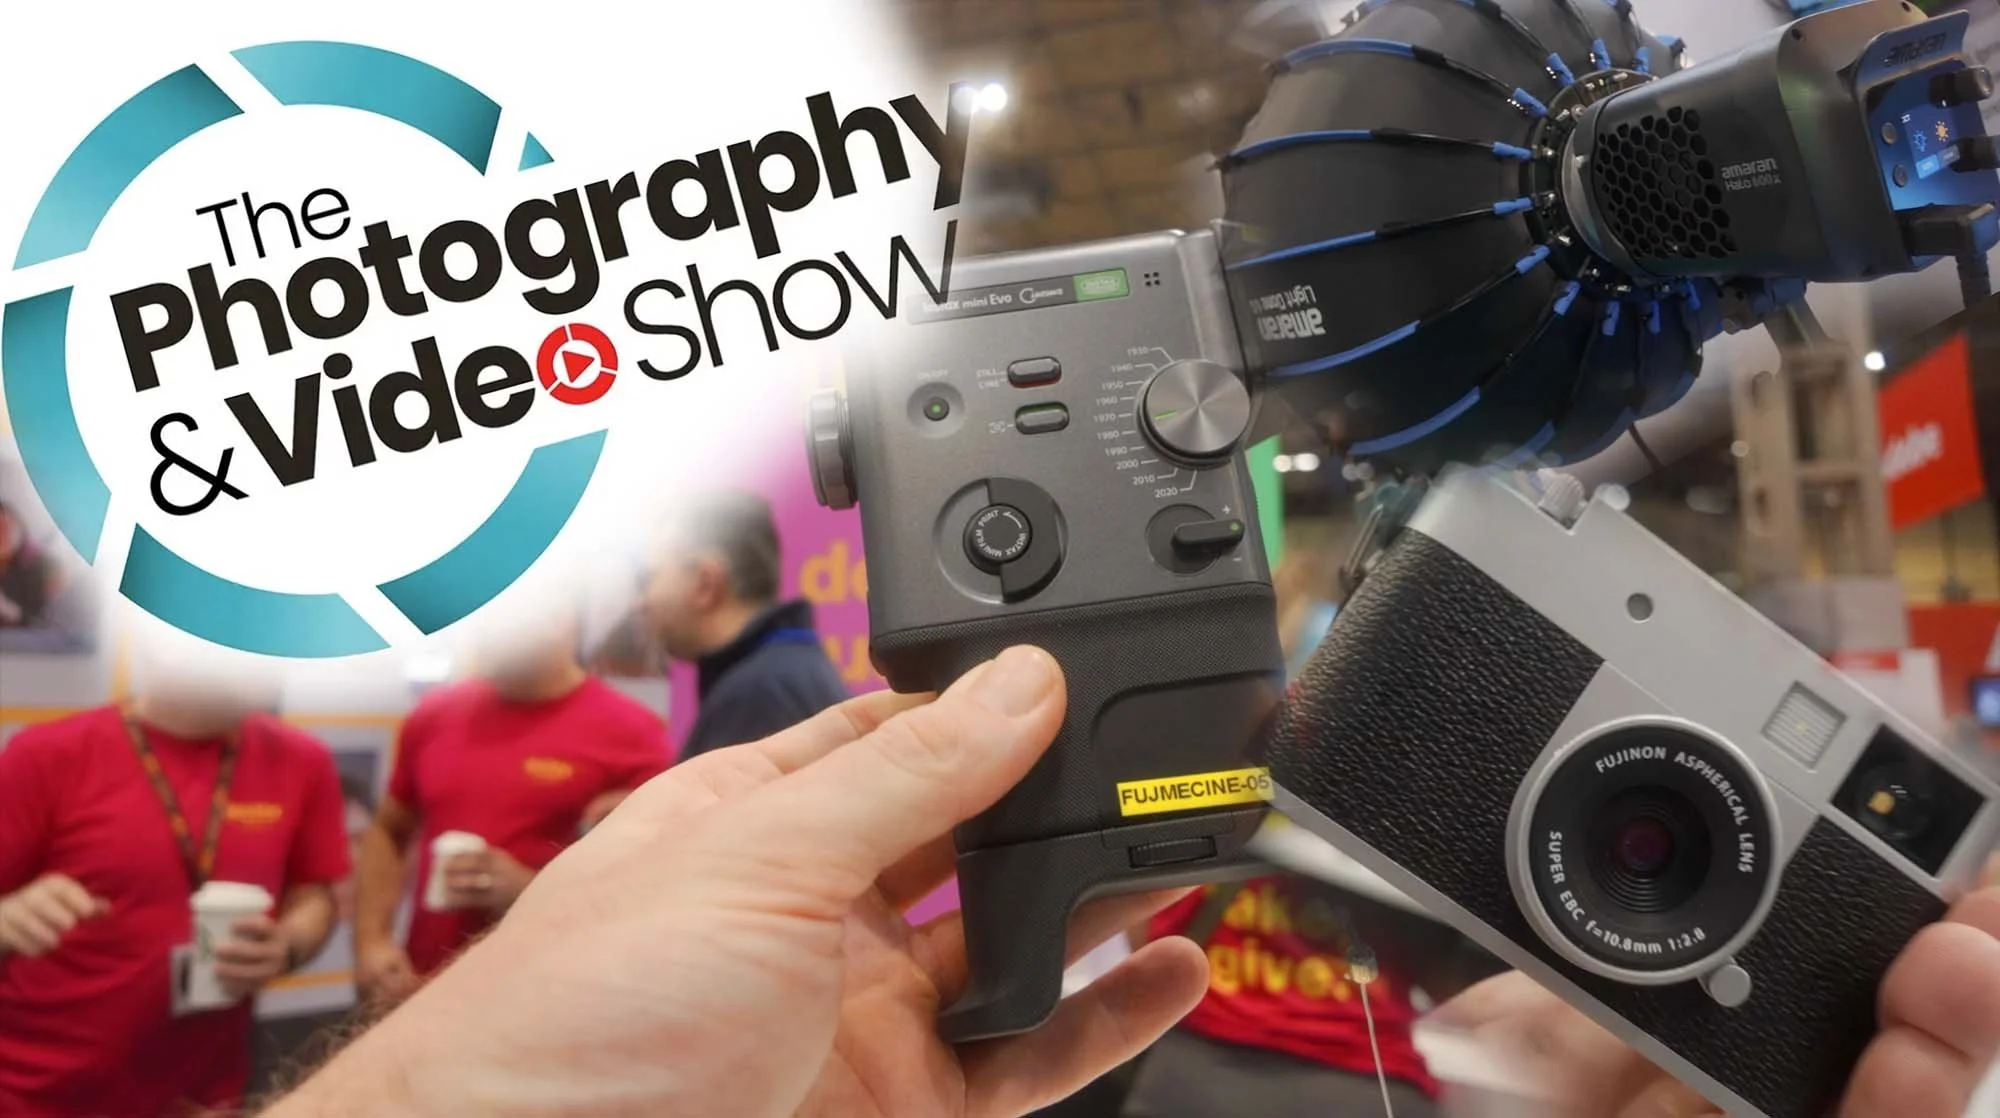
Canon Selphy CP1500 - Pocket Sized Powerhouse Printing!
While it might seem archaic to even have a printer nowadays when emails and DMs exist, for photographers, there might still be value in needing to quickly and easily print your photos, especially so in the case of the Canon Selphy CP1500.
🔴 UPDATED OCTOBER 2025 - CANON SELPHY CP1500
Since my original Review of the Canon Selphy CP1500, I have now had a lot more time with the Selphy CP1500. My key thoughts are that this is still an amazingly valuable little printer. I find myself using it on a weekly basis to make little test prints, gifts and reminders of trips and holidays. As a photographer, I find it a genuinely useful little tool to have around the office.
Originally, I think I saw the printer as a bit of a gimmick - after all, it is still relatively simple to get small images like these printed on the high street. However, I have grown to love the convenience of being able to print something in a matter of seconds. It has been invaluable for seeing how an image might look in print and making small mockups of zine ideas etc.
The only downside to the printer is there are not a lot of ‘cheaper’ options for replacing ink/paper. Canon prices are slightly higher than what I would like to be paying but overall, it still offers a good value for the convenience that it brings. In October 2025, I still recommend the little Canon Selphy.
Read the original post below :)

Although it might seem archaic in this day and age where we can beam documents and photos through the internet, it's still pretty handy to have a printer around. With Instagram and email, you may assume that photographers won't ever find the need for a printer. But, having used Canon's Selphy CP1500 mini-printer, I've come to appreciate keeping it about the office. Granted, it's a very particular form of printing.

For one, it's a very tiny machine, with its compact frame weighing in just 850g. Though chunky, it's lighter than many smaller laptops out there. Moreover, you also have to contend with the Selphy CP1500's odd printing format. At the very largest, it'll only produce 6.0x4.0-inch prints (or 148.00x100.00mm), with its max resolution of 300x300dpi. You'd likely get better value out of larger printers in its price range, depending on your needs.
PLEASE NOTE: I PURCHASED THIS WITH MY OWN MONEY AND NO PAYMENT OR CONTROL WAS EXCHANGED FOR PUBLISHING THIS UNBIASED REVIEW
Video Source - Camera Labs via YouTube
But for others, it's the ideal package. Canon's Selphy CP1500 is targeted towards a very broad audience, and includes both casual mainstream users, as well as professional photographers. Especially, if your use case values ease of use, convenience, quality of the print, and speed. I personally have used it in the studio to print photos and I can't recommend it enough, given that it's also fairly portable.
So, you could lug it about from one photoshoot to the next. Granted, doing this requires that you buy the optional £180 battery pack to power it. I don't personally recommend it, so you're better off plugging the printer into a regular wall outlet. Otherwise, the Selphy CP1500's battery will last you a claimed 72 6x4-inch prints per full charge. That aside, there are plenty of other reasons why you should get one...

👍 Convenience And Ease Of Use
As mentioned, effortlessness is a major highlight of the Canon Selphy CP1500. To start a print, you could pair the printer with the Canon Selphy app on your phone. It's more than just a mobile control panel, too. Using the app, you could upload your photos, create collages, or even make on-the-fly edits. This includes cropping your prints, adding filters, drawing over them, inputting annotations, or maybe writing some text.
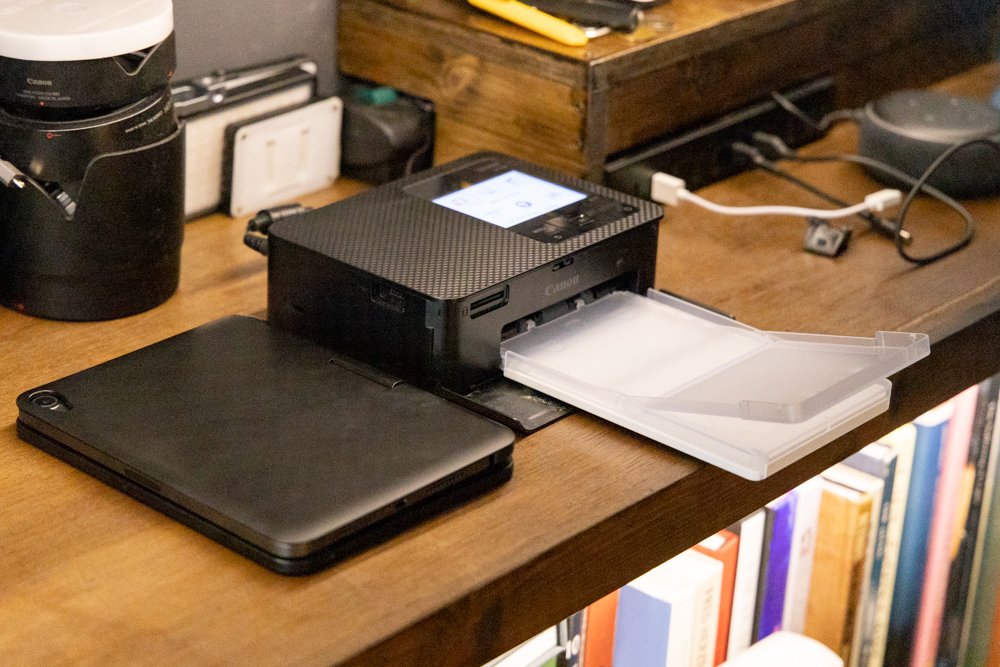
Then, once it all looks good in the preview, you can then print it out. Speaking of convenience, the Selphy CP1500 doesn't even require you to physically plug in your computer to it. Instead, you'll load the photos and prep a print via Wi-Fi or Wi-Fi Direct. And for anyone asking, it unfortunately doesn't have Bluetooth. Another option includes plugging it in via USB-C, or printing it out from an SD/SDHC/SDXC memory card.

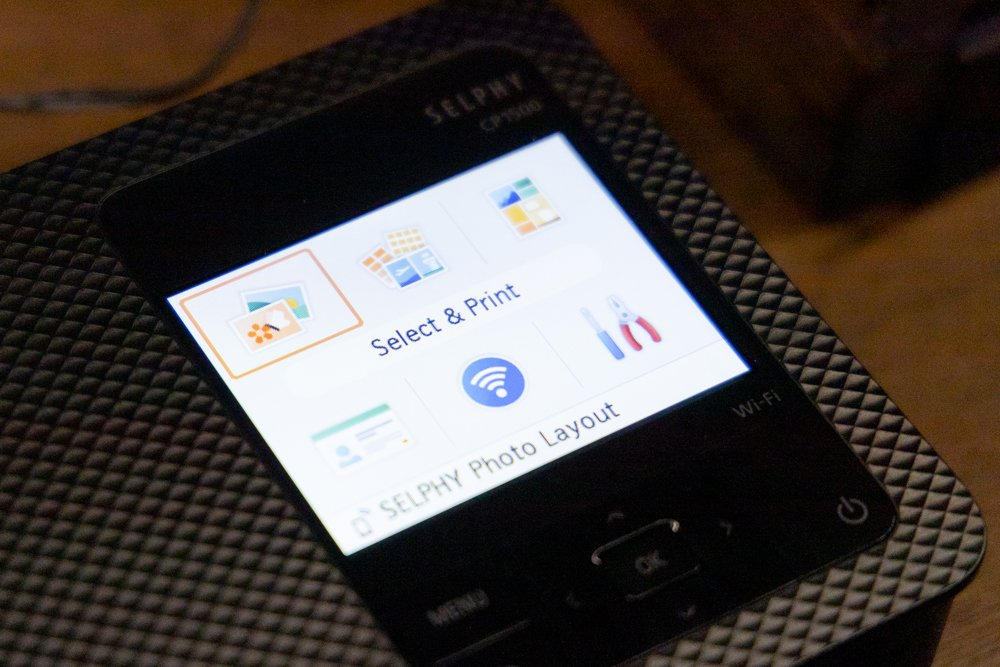
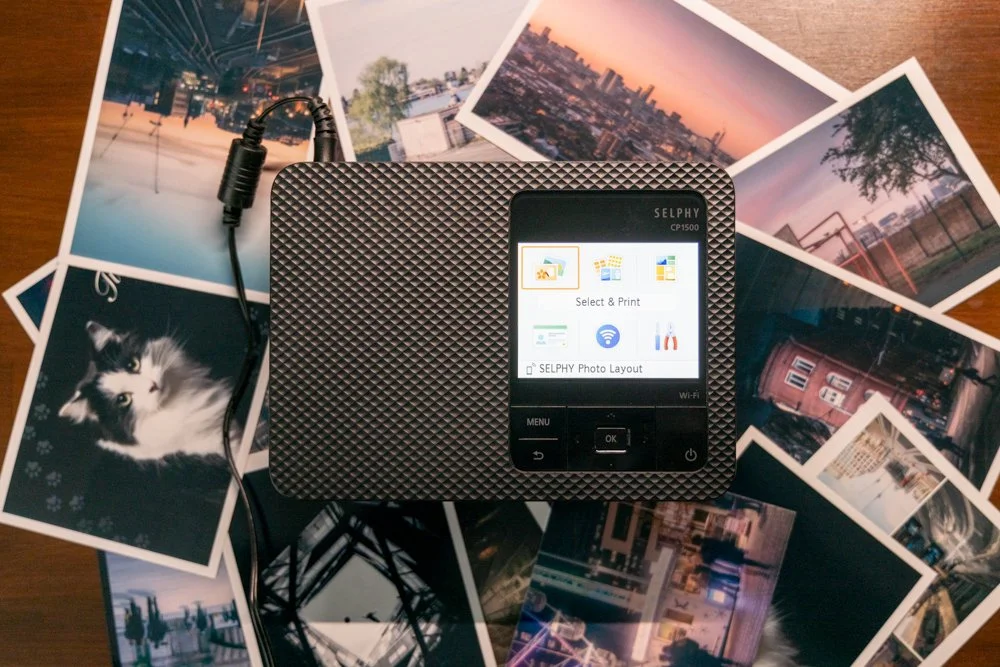
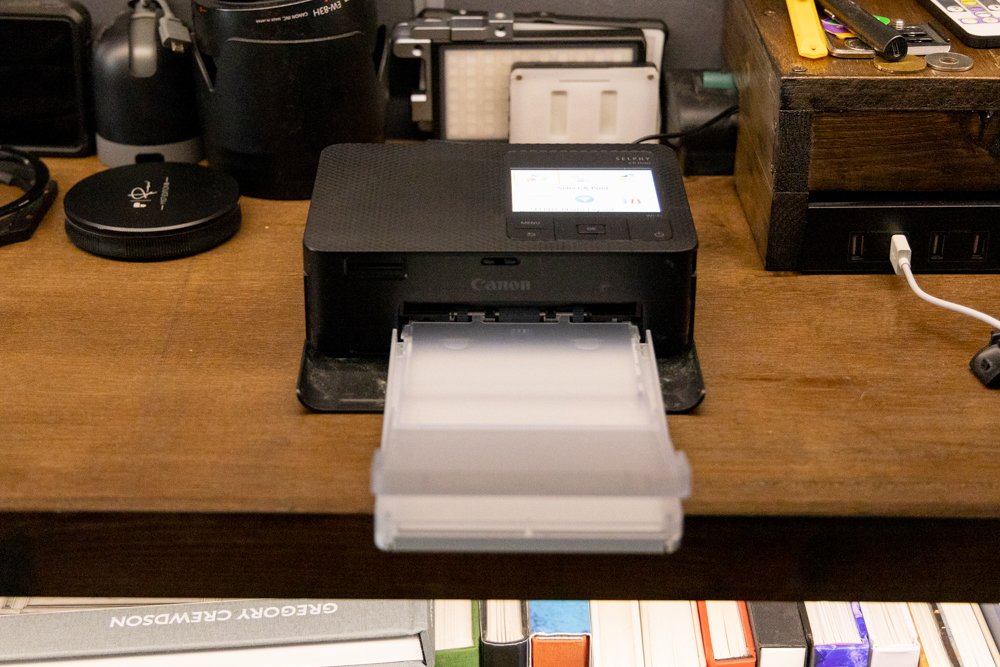
Besides using the Canon Selphy app, the CP1500 can be controlled through its built-in 3.5-inch colour LCD display. It's not a touchscreen, but at least the physical buttons are clicky, tactile, and easy to operate. In addition, Canon has revised the paper feeding mechanism from its predecessor, the CP1300. That makes the process of supplying the CP1500 with fresh paper easier and sleeker. Oh, and then there's the ink.
For now, I'll mention that feeding the dye-sub cartridge (much more on that later) is quite easy. So, if you need to replace the cartridge, all you need to do is pop out the filler flap on the side of the printer and it's done in a jiffy. At this point, we'll now get into not one, but two unique aspects of what makes the Canon Selphy CP1500 quite a bit different compared to most other printers, even small-format ones.
“A fantastic and useful addition to any photographer’s studio or office”
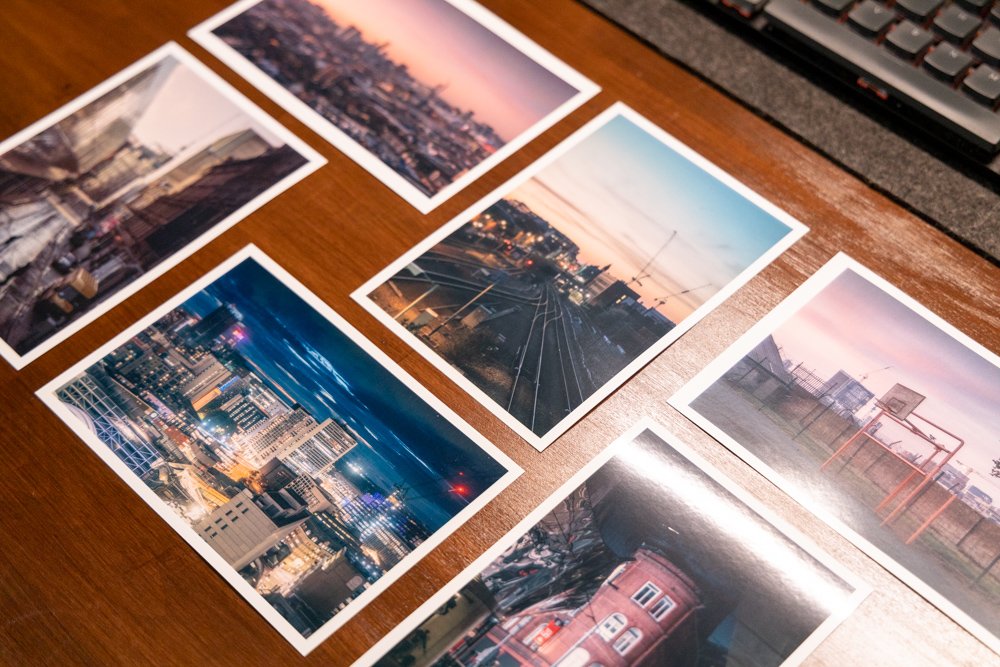
🔍 Small (Prints) Can Sometimes Be Better
The first noteworthy element of the Selphy CP1500 is those small postcard-sized prints. In the case of a Canon Selphy CP1500, it's a double-edged sword. It's a huge downside for some, as the distinct format is unique compared to what most are used to working with. Again, the largest possible print size is 6x4 inches. So, if you need anything bigger, you're left having to send your photos to a lab or print shop, anyway.
Although, there are additional formatting options to choose from - but, smaller. There are papers sold in Canon's catalogue for the CP1500 in sizes as small as a credit card. Moreover, there are varying types of paper sold, like sticky paper (used for stickers), or 6x4-inch print papers with tear-off tabs on either side. Size-wise, there are papers for the CP1500 sized in 4.7x3.5 inches, 3.4x2.1 inches, and 2.1x2.1 inches.


Still, there are a few neat tricks that these small print papers can pull off. For example, you'll note that it mostly prints out in a glossy finish. But, at your discretion, you can print out from the Selphy CP1500 in a selection of semi-gloss and satin finishes. What's cool is that these differing finishes can all be printed on the same type of paper. Nonetheless, the paper alone isn't what makes the Selphy CP1500 worthwhile.
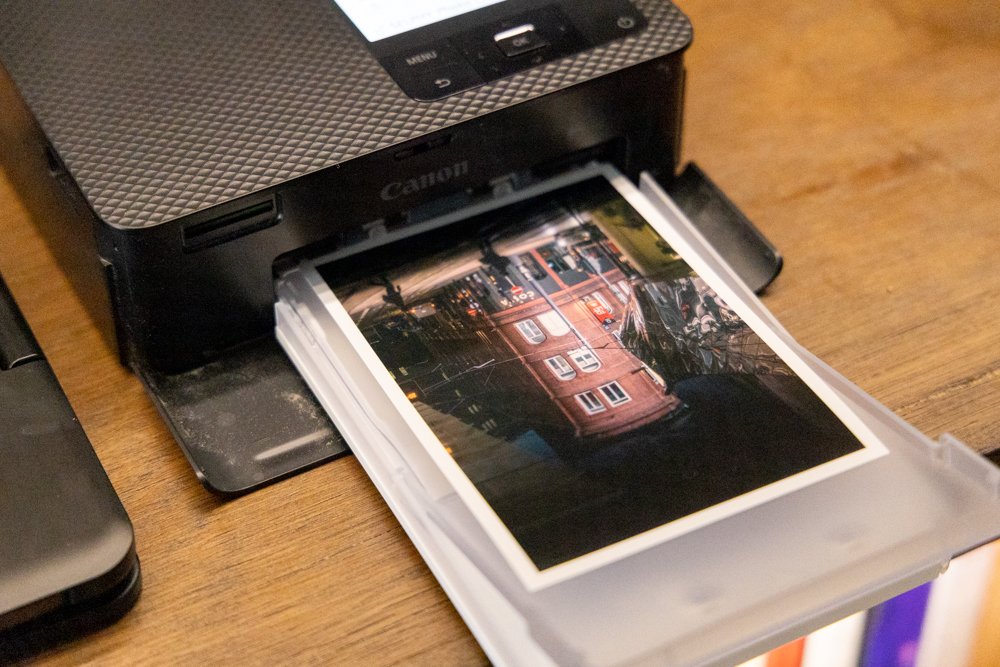
It's only when it starts printing, and ink is applied to the paper that you now realise why this printer is all the rage. For context, Canon uses its own format of printing style, rather than the more ubiquitous inkjet or Giclée that many comparable printers on the market use. They call this dye-sublimation (or dye-sub, for short), and one that allows your prints to truly pop and showcase impressive image quality.
🎨 A Unique Approach To Printing Colours
Canon's dye-sub paint technology, as used in this Selphy CP1500, is well-regarded for its bright and vivid colours. Altogether, it excels in providing a great amount of depth, and visual clarity, not to mention properly highlighting a wide range of colours... From subtle changes in shading, to brighter variations in hue. This can't truly compete on the same level as costlier, bigger, and high-tech inkjet printers, of course.
But for a compact package, the Canon Selphy CP1500 is one of the best mini-printers that you can get on the market today, as far as quality is concerned. On top of that, it'll print out rather speedily, too. Thanks to its dye-sub-inking system, a single 6x4-inch print in the highest quality will take just 41 seconds. That's a noticeable 6-second improvement from the old CP1300. But, how does this dye-sub thing work?
Video Source - Feral Publication via YouTube
Well, Canon's dye-sublimation inking works by running each sheet of special printing paper, as we noted, and feeding them through the printer four times. Meanwhile, individual layers of cyan, magenta, as well as yellow dyes are applied on top of one another. Lastly, the final, protective layer is printed on top of its other coloured layers. This upper layer is resistant to both smudges and fingerprints, which is nice.
And apparently, Canon claims that this upper coating is able to last for up to 100 years. Notably, unlike a competing inkjet system, you won't have to worry about any messy or runny ink. Furthermore, despite its resolution being "just" 300x300dpi, the quality of the final print pops more than a lot of other printers. It's thanks to the coloured dyes being applied on top of one another, rather than adjacent in the same layer.
📸 A Handy Tool For Any Photographer
Still, you might be wondering... What does any of this have to do with me, a photographer? Well, I believe the Canon Selphy CP1500 can be a fantastic and useful addition to any photographer's studio or office. In one scenario that I've come across many times before, you're able to leverage the Selphy CP1500's speed, reliability, and consistency to print out a bunch of photos at once. What would you use it for, I wonder?
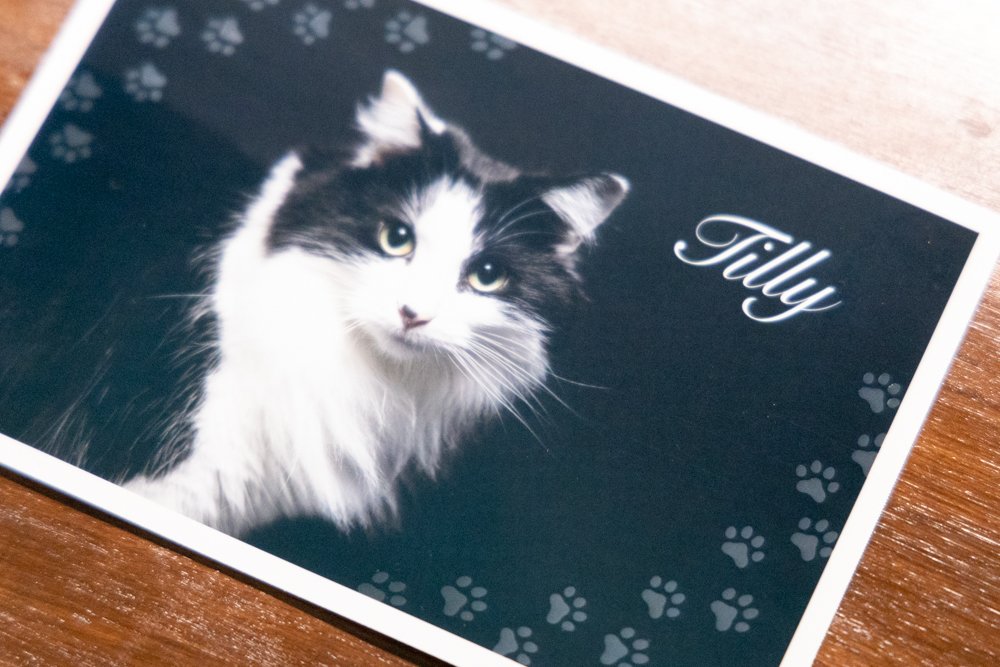
Well, how about mocking up projects, such as a photobook? You could print out a load of pictures, and move them around while working out how and where the pictures should go... Before finalising a design which you can commit to. Or, perhaps you could use the Selphy CP1500 to print out memories. No doubt, you'll surely have at least one picture from the past year's efforts that you'd have a fond memory of.
Some prints are just for fun, though the templates and overlays really add to the experience!
With a tiny printer on hand, you could keep a collage of your favourite pics, to look back to when you're done with a photoshoot. For a more business-minded use case, a printer is, I feel, a must-have. You can print out a ton of your best photos, and share them with others to promote your work. If you're lucky, you might attract some new clients. The easier route to doing this, naturally, is sending over an email.
But, it can be nice to pass on something physical and palpable to grasp onto. If you're going to an event, for instance, you may consider printing out some extra samples of your finest work. Then, hand them around to showcase your services, or simply as a gift to any passer-by. It may seem old-fashioned, but a creative photographer, like you, will surely spot some innovative ways of using those diminutive prints.

✅ Worth It For The Expense?... Some Final Thoughts
So, using the Canon Selphy CP1500 to print out memorabilia, sampling mock-ups, showcasing your work, creating postcards of your own, or printing out an ID photo for a passport. These are only a handful of the use cases where mini-printers like the Selphy CP1500 could prove useful. To be fair, if you want super-high-quality (and bigger) prints done, you'd be best to trust a lab or printing service.
This thus leads us to another disadvantage of Canon's baby printer - cost. If you're printing stuff in large bulks... And combined with the cost of the printer, dye-sub ink, and specialised printing paper... The final tally can sometimes be costlier than beaming over your photos to a print shop. Roughly speaking, it adds up to around £0.32 for each 6x4-inch print. The Selphy CP1500 itself retails for an MSRP of around £139.99.
Video Source - Peter McKinnon via YouTube
Additionally, Canon only sells the dye-sub ink alongside the paper in bundles. And, it just so happens that each ink cartridge only has just about enough ink to run through the entire pack of printing paper before you need a top-up. So, it's up to you whether the ease and convenience of being able to print out photos anywhere and at any time, without delay, is worth the premium. To me, it certainly is worth the cost.
Even though, as discussed, you need to buy Canon-specific dye-sub ink cartridges and printing paper. So far as I've searched, there aren't any cheaper, third-party dye-sub inks or paper that you would use as a more attainable and cost-effective substitute. Though, despite the high cost of running it, I still think it's one awesome little printer to have in your office or studio, even if you're only using it once in a while.

About the Author - Ross Jukes is a professional Photographer and Videographer with over a decade of experience. Working in both Digital and Analogue formats, Ross has worked with international clients, had his worked published numerous times and exhibited his work extensively. With a passion for all things photographic, Ross combines his experience, enthusiasm and dedication to his art form to create engaging and educational content for the photographic community.

Disclaimer: All links to Amazon UK/US are affiliated links - you will still pay the same price but I will receive a small commission for providing the link. All information provided in this blog is intended either for educational or entertainment purposes and is accurate to the best knowledge of the author. However, further research/professional advice should be sought before making purchases/implementing any advice given and no responsibility is taken by the author or parties mentioned here within.

My Photo and Video Editing Desk Setup for 2026
Having a good desk setup is critical for Photographers and Videographers to produce their best work. It might not be as sexy as talking about the latest cameras or delving into vintage lenses because you want to create something organic! However, having a cluttered, poorly organised setup is not just bad for your creative process, but you could even be causing yourself long term health issues! With all of this in mind, I felt it was time to sort out my setup. Hopefully, it will also give you a few ideas of how you can change your own setup!
Having a good desk setup is critical for Photographers and Videographers to produce their best work. It might not be as sexy as talking about the latest cameras or delving into vintage lenses because you want to create something organic! However, having a cluttered, poorly organised setup is not just bad for your creative process, but you could even be causing yourself long term health issues! With all of this in mind, I felt it was time to sort out my setup. Hopefully, it will also give you a few ideas of how you can change your own setup!


I’ve always ensured that I have somewhere suitable for my editing process, but there were always little pain points that just annoyed me enough to make editing feel like a chore. Some of those were simple changes, like having a little more desk space. Others would require a bit more investment of time and (painfully) money!
❤️ PLEASE NOTE - No AI was used to make this article. I will try to add product links or alternatives where I can and they will be Amazon Affiliate links - you still pay the same price but I receive a very small commission. If you would like to support the blog, please consider making a small donation.

✏️ Best desk for photo & video editing (IKEA Karlby setup)
Like many, many other professionals, I have always turned to Ikea to solve my furniture problems. My previous desk was an Ikea table top and although it is perfectly fine for what I use it for, I found myself repeatedly having the same problem - it was just too big! Well more accurately, it was too deep and thanks to my poor eyesight (a story for another day!) I was constantly dragging my monitor forwards so that I could see it properly!
Also, I had always loved having my scanner off to one side to make sure there were less barriers to the scanning process - but it was always on a shaky stand! This is a massive ‘no no’ for scanning for a fairly obvious reason. The solution to all of this, another Ikea classic - the Karlby counter top! I went for the longest available size (I still had to trim a bit off though!), added my favourite square legs and a couple of additional legs to help with flex and I was away - a solid base to build from, literally!
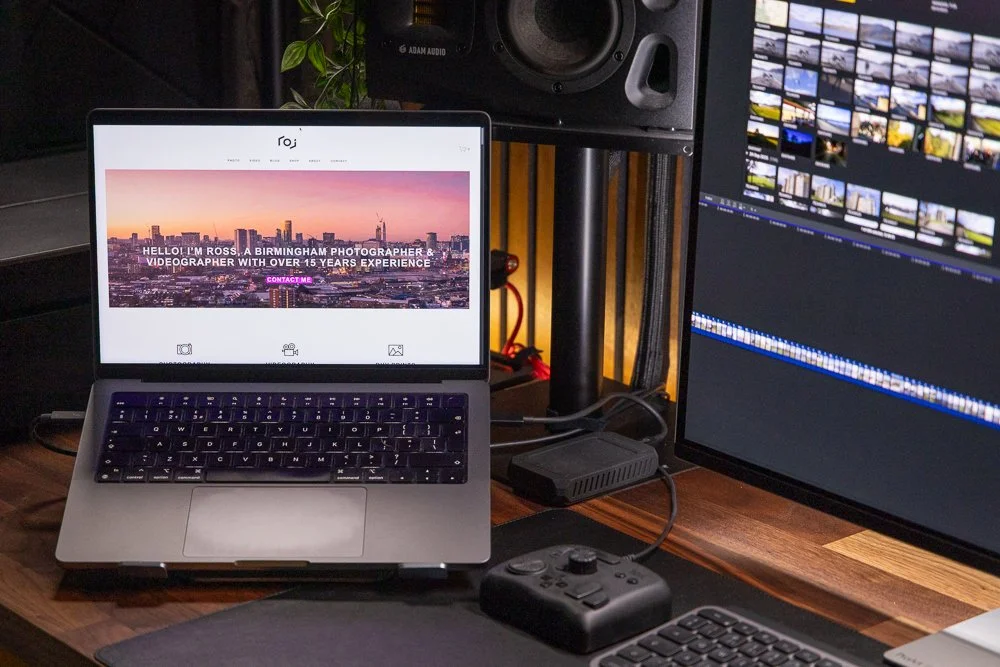
💻 A POWERHOUSE Computer (Macbook Pro Desk Setup)
The heart of any editing setup is obviously the computer. For years, I have flitted between using a laptop or having a more permanent solution. In the past couple of years, I have ditched a PC and gone to a solely Mac setup. I recently retired my M1 Mac Mini and have since been using the Macbook Pro M2 Max - more than enough horsepower to handle my level of photo and video editing.
Why go purely laptop? Well I do travel for work and having the ability to edit on the go is a must! This might not be the same for everyone but being able to edit on the go is a non-negotiable for me. This does have one downside, the laptop takes up a bit of desk space. Yes, I could use it in clamshell mode for a cleaner setup but in honesty, I like having a second screen when I’m editing to dump slightly less crucial windows such as emails (or cough, ‘Spotify’, cough…). Talking of screens, let’s have a look at the monitor situation…

🖥️ Best 32-inch 4K OLED monitor for editing (Asus ProArt PA32UCDM)
This was one of the main reasons for rebuilding my setup. I have been using the BenQ SW320 which is a fantastic monitor but it was starting to feel it’s age. It had developed a weird green line across the screen which was distracting and despite regularly calibrating the monitor - I just never felt confident with the colours I was seeing on it. It was time to upgrade - up step the Asus Pro Art PA32UCDM!
At £1600, this was a massive investment but the big 32”, 4K, OLED monitor certainly had some impressive specs and piqued my interest enough to give the Credit Card a bit of a beating! Was it the right choice, well it looks nice… Do I have some buyer's remorse? A little… but I’m going to save that for the full review which you can expect in the next few weeks - if you can’t wait, it’s great but the factory calibration is questionable… Anyway, let’s have a look at audio (that sounds odd!).

🔊 Studio monitors + audio interface for video editing (Adam Audio + Focusrite)
One thing that does not sound odd is my audio setup - which in truth I'm pretty happy with! My studio monitors are the incredible Adam Audio A4V’s which provide fantastic sound quality. I have added the 7 inch Sub (discontinued and replaced with the Sub8) for a bit of extra low-end reach. If there is one weak point, it would arguably be the Topping DX3 Pro+ DAC - Not that it’s particularly bad quality but I always feel like it might not be the best for monitoring audio, adding its own distinct feel to the audio - but I could be over thinking that.
One new addition to the setup is on the input side - a FocusRite Scarlett Solo is now my chosen input method for recording voiceovers for YouTube videos and tutorials. Another area for concern is my budget condenser microphone - Would I like a Shure SM7B? Yes! Can I afford one? No! So this will be something to address in the new year…
📹 Other ESSENTIAL EDITING Peripherals…
Scattered across the desk are some other crucial devices that help my day-to-day workflow. However, I’m going to start under the desk, where I hide all of my secrets… well, storage and other devices. Starting with a big Sabrent Docking Station crammed with 24TB of SeaGate Ironwolf NAS disks. This acts as a project dumping ground and short term backup to my main NAS (hidden in another room!) a 36 TB QNAP NAS that operates as my long term storage - not the perfect setup but it works for me.
CalDigit TS4 is a must for these kind of setups
On the subject of storage, I use two ‘working’ drives that hold current projects that are live. The two drives are the incredible Oyen U34 Bolt and a custom built Acasis drive - these both have 4TB of incredibly fast storage that can travel with me if needed. Let me know in the comments below if you would like me to do a full run through of my data management system!
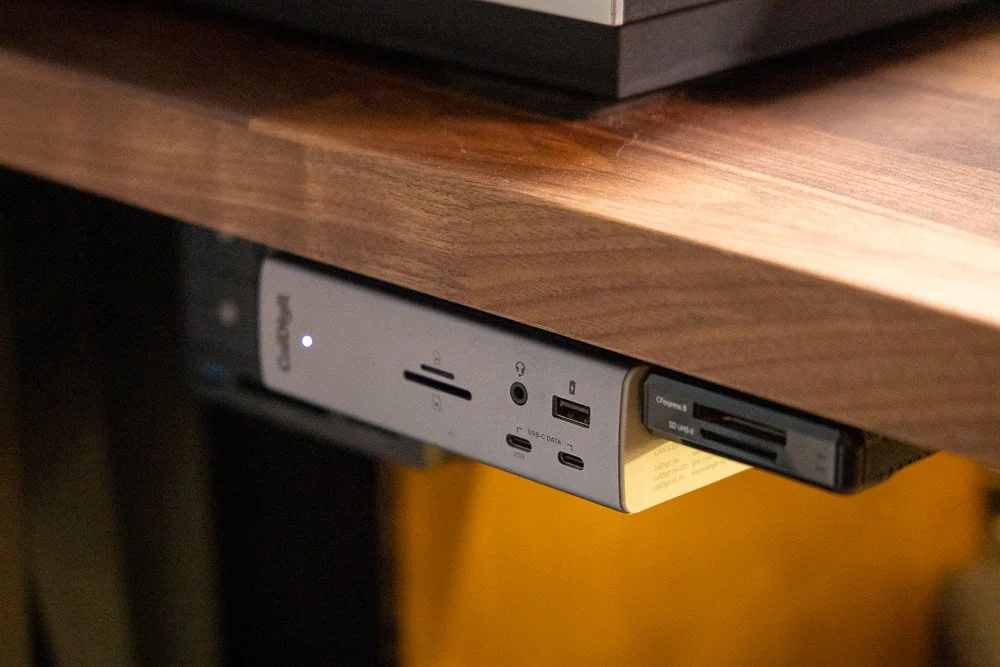
Also below the desk, along with power bricks, LED lights and other fire hazards is the excellent CalDigit TS4 Dock - This little beauty handles all of the inputs/outputs for audio/visual meaning I only need one cable plugged into the MacBook Pro to charge and operate all peripherals - a really neat way of working and reducing the hassle of connecting everything when you need to get to work quickly.

The Epson is an excellent scanner for film photographers
Back topside of the desk and I have my aforementioned film scanner, the Epson V850, An excellent flatbed scanner that handles all of my 35mm/medium format film needs and now, it sits on the solid desk to reduce any shake issues!
I want to give a special mention to the TourBox Lite - an excellent little controller that I have previously reviewed. This helps make editing photos and videos so much faster! The TourBox was provided to me for free to review but I can honestly say, I use it every single day and would have no concerns buying another, it really has made my life so much simpler - well, even easier now that I have upgraded the mouse as well!

The TourBox Lite really is one of my favourite editing tools
I use both Logitech keyboard and mouse - the keyboard is the Logitech MX Keys S and whereas it is an excellent keyboard with zero usability issues, I do wish I chose something a bit smaller. The mouse is the amazing MX 4 Master - I won’t go too far into this as I have recently reviewed it so check that out. Above the monitor you will find the BenQ ScreenBar and Elgato Key Light for, well, illuminating everything. Mixed with the cooler temperature bias lighting behind the desk, these all provide a really nice ambience that is perfect for long editing stints.
Things have changed a bit in the last five years!
I will also draw attention to my little iPad Mini 6 - which is more than useful to have around but this has now been pretty much converted into an Elgato StreamDeck by using Elgato’s StreamDeck Mobile. It’s actually much cheaper than buying one of their devices if you already have a compatible device lying around. It offers some amazing customisation and I use it to help launch and control software as well as some hardware accessories - again, I’ll probably create a separate post about this.
Simple things like a cutting pad can really protect your desk
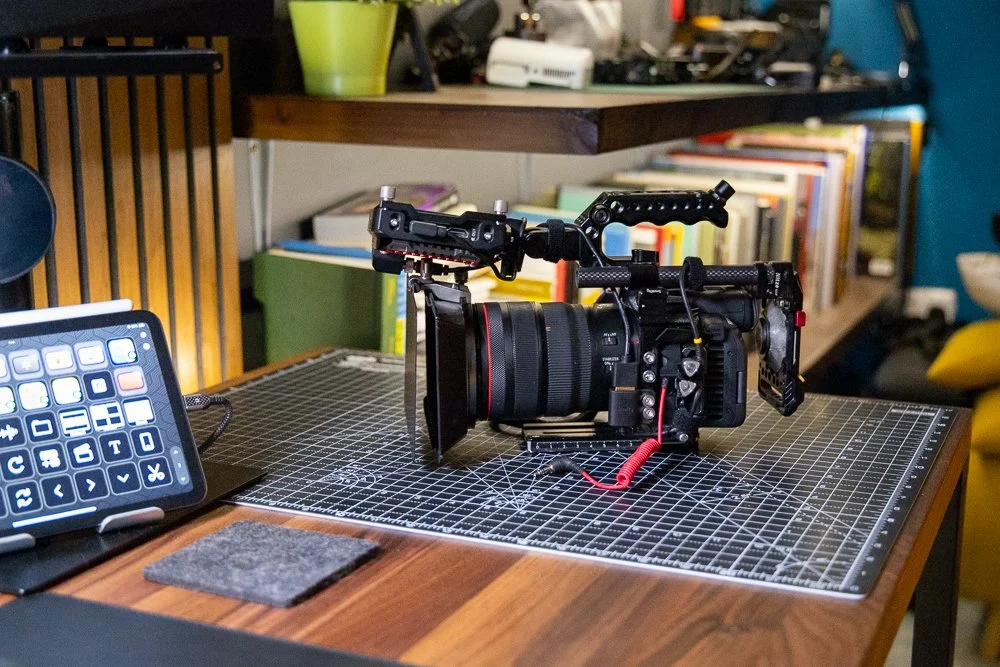
Finally, I have both a (fake) leather pad to protect the desktop and a rubber cutting pad as a space for assembling camera gear when I go out on shoots - this is a much better solution than sitting on the floor trying to put camera rigs together! I should mention the chair which is something basic from Amazon - it’s comfortable enough but again, I probably need a better solution (Herman Miller if you’re reading this, hit me up!).
🔴 Five Quick tips for YOUR editing space
Write down the ‘pain points’ the things that stop you from want to edit or that slow you down and address those first!
Make sure your space is comfortable including a suitable chair, desk and footpad if you need one! Doing your own DSE Assessment will help with poor working arrangements.
Don’t overlook lighting! Having well balanced bias lightning and avoiding reflections and glare on your screen are essential for the editing process.
Think about sound treatment. If you are working with video and audio is crucial, consider treating your room to ensure you can hear and isolate any audio problems.
Take your time - I’ve built my setup and adjusted it countless times over many years. Concentrate on making subtle changes rather than spending thousands on things that might not work for you!
✅ Final Thoughts
I fully appreciate that not everyone has the time, money or patience to build a desk setup like this - it’s all been a bit of a stretch to me! However, I cannot stress enough the importance of having a space that allows you to be creative, concentrate on the editing process and most importantly of all - remove all of those little annoyances that stop you from wanting to and enjoying the editing process!

I’m pretty happy with this setup, we’ll see how long it stays like this 🤣
Is this my final setup ever? Absolutely not, there are still plenty of changes to be made. What it does for now is allow me to go into 2026 with the ability to focus on producing the best work that I can - both for paying clients and you guys that read my blog and watch my YouTube videos - expect to see more of this setup over on my channel. What I want to know now, is what you would change about your own setup? Leave a comment below and tell me what is stopping you from producing your best work?
FAQS + MORE TIPS TO IMPROVE YOUR WORKSPACE
-
A “clean” setup starts with a desk that fits your workflow without forcing you to stack gear. For most editing setups, depth matters more than length:
Too deep = you end up dragging the monitor forward (and clutter creeps in).
Aim for enough depth to keep the monitor at a comfortable viewing distance, with space in front for keyboard/mouse and one “working zone” (not a dumping ground).
If you use a scanner/printer, plan a stable side zone so it’s not living on a wobbly stand.
-
The winning combo is: under-desk power + one main data cable + labelled runs.
Mount a power strip under the desk (not on the floor).
Use Velcro ties (not zip ties) so you can adjust later.
Add a cable tray/basket under the desk for bricks and excess cable.
Label both ends of key cables (tiny tags save hours later).
Try to route everything to one “exit point” so you don’t get spaghetti creeping across the desktop.
-
If “clean” is the priority, clamshell helps — but it’s not always the best workflow.
Clamshell = cleaner + more space (pair with a dock, external keyboard/mouse) and watch for overheating!
Laptop open = second screen for email, music, bins/timelines, etc.
A nice compromise: keep the laptop open but on a stand, so it uses vertical space instead of horizontal.
-
Prioritise:
Colour accuracy & calibration support (hardware calibration is a bonus)
Resolution (4K is a sweet spot for photo + video timelines)
Panel type + consistent viewing angles
Glare/reflections control in your room
Also: don’t assume factory calibration is perfect — it’s common to still need calibration to feel confident in colour.
-
The trick is separating “working drives” from “archive/backup”:
Keep 1–2 fast working drives accessible (active projects only).
Everything else goes under the desk (or off-desk entirely via NAS).
Use short cables and route them down immediately (no “drive snakes” across the desk).
A dock/enclosure under the desk can keep storage powerful and invisible.
-
A Thunderbolt/USB-C dock is usually the cleanest upgrade you can make:
Monitor, audio interface, card readers, drives, ethernet, etc. all plug into the dock
Your laptop connects via one cable for data + charging (depending on the dock/laptop)
It reduces clutter and makes packing up / reconnecting fast.
-
For a clean setup, most people prefer:
Wireless keyboard + mouse (fewer cables)
A slightly smaller keyboard if desk space is tight (full-size can dominate)
A mouse that’s comfortable for long sessions (ergonomics beats aesthetics)
If you edit a lot, consider a control device (dial/controller) to speed up workflow without adding visual chaos.
-
If you want clean and usable:
Use a monitor light bar for task lighting (no big desk lamps)
Add a key light if you record tutorials/meetings
Consider bias lighting behind the monitor to reduce eye strain and add a tidy “studio” feel
Also: position lights to avoid screen glare (glare is the enemy of colour work).
-
If you’re doing video, audio matters more than people think.
If you can, use nearfield monitors positioned symmetrically.
If the room is lively/echoey, even basic soft treatment (rugs, curtains, panels) helps you hear problems sooner.
If you can’t treat the room, good headphones + a consistent monitoring routine can still work.
A tidy desk helps here too — fewer reflective surfaces and random objects around the speakers can reduce weird reflections.
-
Monitor height and chair comfort usually give the fastest quality-of-life boost:
Top of screen roughly at eye level (reduce neck strain)
Chair that supports long sessions (and consider a footrest if needed)
Keep keyboard/mouse at a neutral wrist angle
If you’re in the UK, a quick DSE-style self-check is a good sanity test for posture and screen placement.
📸 Are you a photography/videography brand looking to showcase you products? Take a look at my Media Pack and Contact Me to discuss how we can collaborate on a sponsored review.
Posts you might also like…
About the Author - Ross Jukes is a professional Photographer and Videographer with over a decade of experience. Working in both Digital and Analogue formats, Ross has worked with international clients, had his worked published numerous times and exhibited his work extensively. With a passion for all things photographic, Ross combines his experience, enthusiasm and dedication to his art form to create engaging and educational content for the photographic community.
Disclaimer: All links to Amazon UK/US are affiliated links - you will still pay the same price but I will receive a small commission for providing the link. All information provided in this blog is intended either for educational or entertainment purposes and is accurate to the best knowledge of the author. However, further research/professional advice should be sought before making purchases/implementing any advice given and no responsibility is taken by the author or parties mentioned here within.
Five Tips for Choosing an Event Photographer in Birmingham
As we hurtle towards 2026, I suddenly realised that I am heading into my 16th year of being a photographer. In that time, I’ve learnt a lot about the technical aspects of photography but also a lot about the photography and videography industry as a whole. Now, I want to share some of my insights to help customers and fellow professionals get the most out of the opportunities on offer. To start this off, I want to look at five tips that can help clients choose the right event photographer for them and how to avoid some common mistakes when selecting a photographer.
As we hurtle towards 2026, I suddenly realised that I am heading into my 16th year of being a photographer. In that time, I’ve learnt a lot about the technical aspects of photography but also a lot about the photography and videography industry as a whole. Now, I want to share some of my insights to help customers and fellow professionals get the most out of the opportunities on offer. To start this off, I want to look at five tips that can help clients choose the right event photographer for them and how to avoid some common mistakes when selecting a photographer in Birmingham.
Just to be very clear, this is not an advert for my own services! As we will see, every photographer brings their own unique skill set and attributes to every job. That also means that others might not be able to deliver the right style or quality of image to fit your needs - this also includes me!
I am always upfront and honest with every client on what I can and can’t do - regularly turning work away if I don’t feel I am best placed to deliver the right results. The following tips will help you seek out the right providers for your event photography and get the results you want to showcase your event.
📝 Have a solid brief for your event
My first recommendation before even reaching out to any local Birmingham event photographer is to have a solid brief. Knowing the basics in terms of times, dates and venue are a given but having a breakdown of the day in terms of where you want the photographer to be and at which times is essential. Some events may have multiple activities happening at the same time so being clear with the photographer over where they should be is a high priority.

I strongly recommend arranging a call prior to the event to run through the schedule for the day and outlining the deliverables in terms of style and quantity of images. I always suggest to clients trying to find a few examples of event photography they like (even if it’s not from their particular sector) to allow the photographer to get a feel for the kind of images they want.
The brief should also include budget, turnaround time and any other specific delivery details. For instance, are you clear on whether the photographer will edit the images and any specific sizing requirements and how they will get the images to you? Clarifying these items sets the photographer up but allows the client to cover off all of their requirements to make the day run that little bit smoother.
🏢 Consider your Venue and Logistics
As a photographer, one of my main concerns when attending an event is how bright the space is and how easy it is to move around. These are not commonly things a client will think about when choosing a venue and obviously, shouldn’t be the deciding factor when selecting a space. However, they are fairly critical aspects that a photographer will need to take into account. The darker the space, the more difficult it is to get nice, sharp images that showcase your event to the best of your ability.


Another frustration when it comes to spaces is the lack of space - awkward table layouts and trip hazards can make it particularly dangerous for a photographer to move around the room. Again, this might not be the clients first thought but the safety of guests is always a high priority. Ensuring walkways are clear allows the photographer to move around and ensure they can get multiple angles of both speakers and audience. Now these key logistics are sorted, let’s consider the budget.
💰 Know your Budget
As we all negotiate a ‘cost of living crisis’ - any conversation about money always feels a touchy subject. However, as with many industries right now, it feels like there is increasing pressure to reduce costs in terms of suppliers undercutting each other to bag clients. This does not always ensure the best work.

Sometimes spending a little extra can really go a long way. After all, with the price of venues, speakers, catering etc. documenting your event shouldn’t be an afterthought or something you cut corners on - the images should literally show your event in the best possible light!
Whilst on the thorny subject of budget - make sure you really take some time to evaluate multiple photographers portfolios so that you get a good understanding of what your money is getting you. When evaluating their portfolios, think about if their style of photography matches your brand guidelines and the aesthetic you are going for. Also, does their photography show a variety of event photography from different locations, is it all interior or exterior as well? Do they offer editing services and if video is important, is this something they can offer?
📍 Do you need an event photographer from Birmingham?
It may seem counterintuitive, seeing as I am a Birmingham Photographer - but is it easier to find a photographer from somewhere else? I commonly shoot events in London, Manchester, Liverpool and well, all over the country.
The main reason for this is that I have repeat clients from all over the UK - once clients find a photographer they know and trust, they tend to stick with them! So do you already know a photographer who may be willing to travel to Birmingham?
On the flipside, I also shoot a lot of events in Birmingham for national clients. Birmingham has some fantastic offerings in terms of event spaces and due to its central location and good public transport - it is very appealing to national organisations looking to bring attendees from all over the country. So even if you are a larger organisation with multiple locations, having a centrally based event photographer can often be a very useful contact.
⏰ Don't leave booking a photographer until the last minute
Again, this might seem like a glaringly obvious statement but I can’t tell you the amount of times I get contacted to shoot an event that is happening the same week! Birmingham boasts an incredible pool of talented photographers but availability can still be an issue. I personally tend to book jobs at least a couple of weeks in advance so booking a photographer last minute can be a headache for clients.

Most event organiser will have the venue and catering etc. booked months in advance so booking a photographer shouldn’t really be a last minute thing. One other consideration is to maybe have a back-up should the worst happen and you get let down by a photographer - again, this is something that should be discussed in an initial conversation so that you know what the photographer's policy is if they are unable to attend an event.

🔴 Quick Summary
Have a well defined brief explaining your needs
Check portfolios and experience
Compare prices and see who offers package details
Read reviews and ask for referrals
Consider the photographers personality and if they will fit your event
Book early and clarify your requirements upfront
✅ Final Thoughts
There are a lot more considerations to make when looking for a Birmingham based event photographer but hopefully some of these tips give you a better understanding of how to book a photographer, some of the key questions you should be asking them and what will help you get the most from working with them. I’ve previously written about how much to pay for a photographer which you might also find useful.


This is genuinely not meant to be an ‘advert’ so I’m not going to push my own services - but if you do need any further advice on booking a photographer I am always happy to help. As mentioned, Birmingham has a wealth of very talented photographers but I also appreciate how difficult it can be to understand who is actually right for you and your event. All the best for your search!
What’s your biggest challenge when hiring photographers? Share your thoughts below :)
Posts you might also like…
About the Author - Ross Jukes is a professional Photographer and Videographer with over a decade of experience. Working in both Digital and Analogue formats, Ross has worked with international clients, had his worked published numerous times and exhibited his work extensively. With a passion for all things photographic, Ross combines his experience, enthusiasm and dedication to his art form to create engaging and educational content for the photographic community.
Disclaimer: All links to Amazon UK/US are affiliated links - you will still pay the same price but I will receive a small commission for providing the link. All information provided in this blog is intended either for educational or entertainment purposes and is accurate to the best knowledge of the author. However, further research/professional advice should be sought before making purchases/implementing any advice given and no responsibility is taken by the author or parties mentioned here within.

How To Create Cinematic Looking Photographs
Over the past few years, there has been a real shift towards photographers wanting their images to look more cinematic. It’s not necessarily something you will see in commercial photography but on social media, there are countless accounts dedicated to the cinematic aesthetic, and they are incredibly popular! So how do you make your images look cinematic? I took an evening stroll to see what I could create.
Over the past few years, there has been a real shift towards photographers wanting their images to look more cinematic. It’s not necessarily something you will see in commercial photography but on social media, there are countless accounts dedicated to the cinematic aesthetic, and they are incredibly popular! So how do you make your images look cinematic? I took an evening stroll to see what I could create.


It’s important to understand that this look isn’t for everyone and it will not make a bad photograph look better, it’s very much just a matter of taste. The good news is that the look is very desirable and even better, it can make very mundane scenes seem, well like a still from a gritty Hollywood movie, what’s not to like!


At this point, I’m sure many photographers will be rolling their eyes and thinking ‘it’s all been done before’ and I’ve certainly been guilty of wishing an early demise of the ‘Social Media’ fad of basically, trying to make images look like something they are not! However, maybe it’s my old age or my general love for any type of photography, but I’ve actually come around to quite like the cinematic look. So with my camera, a warm coat and a healthy dose of optimism - I set out around the dark streets of Birmingham to get some film-like photographs.
In all honesty, I’ve received compliments on my photos in the past, ‘Looks like something from a film’! Which is always nice to hear, but I really wanted to be more intentional and delve even deeper into the cinematic feel. I knew that there are certain elements that give an image a more ‘film scene’ feel. As I roamed the streets, looking for the perfect subject matter, those elements were running around my mind!
🌅 Getting the right Colour Grade
It is impossible to talk about cinematic feeling images without speaking about the most predominant element that gives an image a cinematic feel, the colour grade. Many photographers, both amateur and professional alike, will be very aware of the importance of colour and the potential that editing software can give us to manipulate those colours. Before anyone attacks me, yes black and white photography is by its nature, the absence of colour - but even black and white can look very cinematic!

However, we will be focussing on colour photography here and referring to the art of adjusting those colours as colour grading. The term itself can be applied to still or moving images, but more commonly used in the world of cinematography. Grading simply means the ‘feel’ that is given to a video or image in post production by using certain colours to elicit certain emotions. OK, so that’s a lot to wrap our heads around, let’s be a bit more specific.
Basic colour theory can tell us how certain colours may affect our emotions and perceptions of a scene. For instance, it’s pretty common to depict a warm scene using oranges and yellows, to imply heat and a cold scene - you guessed it, blues. Colours such as red can imply danger and greens can be calming and relaxing. We can also use multiple colours together to add interest to a scene, splashes of red in a blue scene will draw the viewer's interest to that point. The same red accents may be lost in an orange scene or lose impact.

The art of grading is, in its most simple essence, the choice the creator makes to convey the overall feeling of the narrative for that image or video. But why is grading our images so popular these days? Surely we want to create a true representation of the scene in front of us? Well, my very unscientific take on this is ‘blame social media’. Many of us can list our inspirations not just in the photography world, but that of the world of cinema and social media is awash with people claiming inspiration from the likes of Wes Anderson, Roger Deakins and countless other directors and cinematographers.
Possibly the most enduring ‘grade’ of modern times is the Teal & Orange look - no prizes for guessing the primary colour scheme there and a quick Google search will show thousands of examples of it! This particular look creates depth and can draw the viewer's attention to important aspects of a scene. However, it’s important to remember that just because this is the most popular, doesn’t make it the only scheme we can use and neither does it imply that we need to use such extreme grades, as with everything, less is often more.

So we have established the importance of colour and its impactfulness of setting a mood for our image. But there is more to creating a cinematic feel than simply ramping up certain colours and hoping for the best! Next we will look at choosing the right subject matter in the first place and making the seemingly mundane, well, look magnificent!
🎥 Choosing Cinematic Feeling Subjects
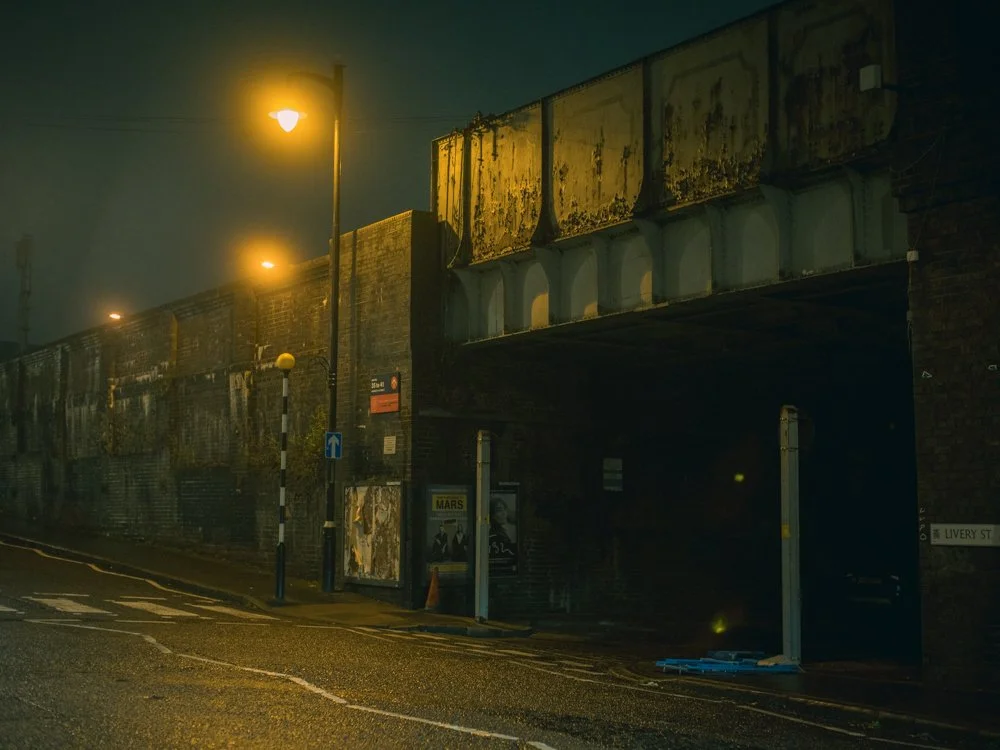
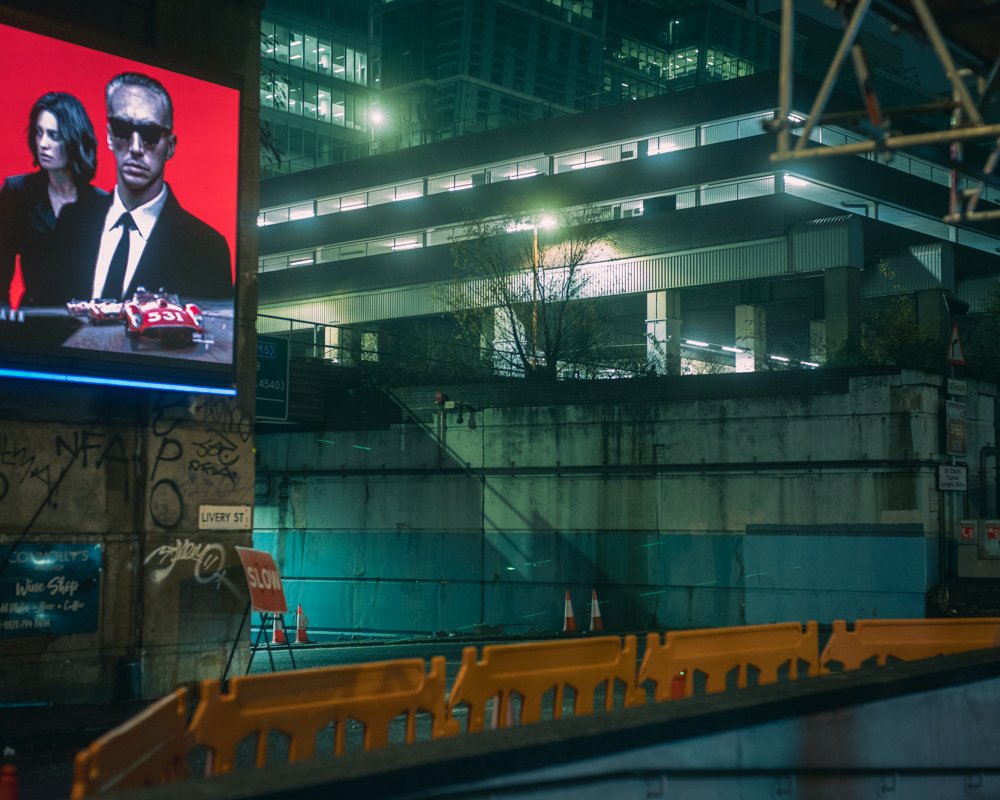
As I continue my walk around Birmingham, I find my eyes are constantly drawn to construction yards, car parks, street lights and any pools of light in the otherwise dreary night. This is where personal taste and opinion play a huge part in choosing the right subject (and where my particular love of the Sci-Fi and moodier feeling films comes into play!) but the mix of metal, flood lights and concrete give me very ‘Blade Runner’ like feels! It’s a stretch, but I did say I was venturing out with a healthy dose of optimism!

Finding scenes that feel cinematic is no easy feat. For a start, one person’s cinematic scene is, well, another’s ‘picture of a crane in rainy Birmingham on a cold, wet Tuesday night’. If cinema has taught us anything, it’s that almost any scene can look cinematic, it is all in the vision of the person creating it. I’m certainly not adverse to photographing on warm sunny days, but I do find I lean towards darker, moodier settings on a regular basis so choosing what time of day and in what weather conditions, is equally as important.
Unless we are heading out with the intent to create one single image, we usually will have a series of images in mind. This can again have an impact on choosing what and where we shoot. Thinking in even broader terms, we will normally be trying to add images to a portfolio and will want to keep a consistent look and feel across those images, this again will influence the kind of subject that we choose to shoot on a regular basis.
🚦 Seeing the light
As I loop around the dark streets and start to head home, I find I’m drawn even more towards the dark corners, single points of light and the soft puddles of illumination glowing on the wet streets. This is no accident, with cinematic feeling images, it’s often what we choose to leave in the shadows that help create mystery and can give the viewer a slightly uneasy feeling of what might be lurking there.


After years of shooting with film cameras and having a particular love of Cinestill 800T (a derivative of a film stock used in motion pictures) I’ve learnt to seek out artificial lighting and to try to replicate the subtle glow or halation created by such film stocks. This certainly was my intent as I walked around, crown to the lamppost and lights from buildings like a crazed photography moth!
Light is the most fundamental part of any photograph but using light to create a cinematic feel is often about the subtraction of that light. I’ll have a friendly bet with you that if you Google the word ‘cinematic’ the kinds of images you find will lean towards the darker, rather than bright sunny days. Again, it’s not to say that bright and light can’t be cinematic, that’s simply not true. But there is definitely a skew towards the notion of a cinematic image having a darker, moodier overall feel.
📸 Bringing the elements together
As I get home, make myself a drink and sit down to edit the images, I feel engrossed in how all of the elements actually come together to create a look, feel and emotion. I frantically move sliders in Lightroom, a little here, a lot there and slowly concoct my interpretation of something I feel has a cinematic feel. Though it won’t be to everyone's taste, for a brief stroll around the streets of the second city, I feel quite happy with the overall impact of the images.

The choice of subject matter, the light and most importantly, the colour grade all come together to give the images a certain feel. Now I am not saying they are anything special, they’re no ‘In the Mood for Love’ - Wong Kar-Wai’s masterpiece! But they have very distinct stylisation that helps the viewer imagine that they could be a still from a film, and I think that is the goal here.

Yes, there are certain aspects that don’t fit so simply into a ‘cinematic’ feel - for instance, I've still stuck with my love of the 4:5 aspect ratio, where a more widescreen ratio would have helped sell the cinematic look. However, photography is all about compromises and I’m afraid I am a little too stuck in my ways!

✅ Final Thoughts
I hope you found some aspects of this useful - there are no groundbreaking techniques here and nothing that hasn’t been done a thousand times before. However, even for someone as stubborn as I am, it’s still nice just to spend an evening trying something a little different and broadening our photographic horizons!
🔴 FAQ: How to Create Cinematic-Looking Photographs (10 Common Questions + Top Tips)
-
It’s rarely one magic slider. The cinematic feel usually comes from a combo of mood, light direction, depth, colour choices, and a frame that feels like a film still — not just “nice photography”.
Top tips:Think scene > subject (what’s happening, what’s about to happen, what just happened).
Prioritise directional light and controlled shadows (mystery sells the story).
Keep the frame intentional: remove the “random clutter” that screams snapshot.
-
Settings help, but they’re not the whole film. If you want the classic cinematic separation, you’re usually chasing shallower depth of field and controlled highlights.
Top tips:Shoot wider apertures when it makes sense (don’t nuke the scene into blur for no reason).
Protect highlights (a slightly darker exposure often grades better for mood).
Use longer focal lengths when you want compression + subject separation.
-
Cinematic lighting is often about shape: where the light falls, where it doesn’t, and what that contrast says. Contrast ratios matter more than “brightness”.
Top tips:Look for single sources (street lamps, window light, doorway spill, car headlights).
Separate subject from background by adding depth (don’t glue them to a wall).
Embrace shadows—cinematic isn’t allergic to darkness.
-
Nope. It’s popular because it can create colour contrast and make subjects (especially skin tones) pop — but it’s not the only way to achieve a cinematic look.
Top tips:Pick a primary mood first (cold, warm, sickly green, sodium-vapour amber, etc.).
Keep grades subtle—a heavy hand can turn “film still” into “preset demo”.
Aim for colour separation (subject vs background), not just “more saturation”.
-
Wide crops help because we associate them with cinema but it still depends on a lot of other things such as subject matter and framing.
Top tips:Try 16:9, 2:1, or 2.35:1 crops and see what fits the story.
Compose with the crop in mind (don’t just chop heads off later and call it cinema).
Use negative space deliberately — it’s powerful in widescreen frames.
-
One of the keys to a cinematic look is the edit. This is where preset packs can help but look to build your own visual style with your edits. Think about the mood that you want to convey.
Top tips:Start with exposure/contrast, then move to colour (don’t colour-grade a mess).
Use curves to shape contrast more gently than the basic Contrast slider.
Use local adjustments (dodging/burning) to guide the eye like a DP would.
-
If it looks like the colour is doing all the work… it’s probably doing too much work. The cinematic feel usually comes from light + composition first, then a supporting grade.
Top tips:If skin tones (or neutrals) look weird, pull it back.
Reduce clarity/texture strategically (don’t smear the whole photo).
Compare with the unedited shot: you want a film mood, not a new planet.
-
Whatever helps you tell the story — but generally, lenses that give you subject separation, pleasing falloff, and control over perspective make life easier. (And no, you don’t need “cinema glass” to be cinematic.)
Top tips:For portraits/scenes: try 50–85mm for separation and compression.
For environment + story: use 24–35mm, but watch edge distortion.
Don’t forget distance: stepping back and zooming in can look more “filmic” than standing close on a wide lens.
-
Film character is usually a light touch: subtle grain, gentle highlight roll-off, and a hint of glow when it suits the scene.
Top tips:Add grain last, and keep it believable (fine grain > sandstorm).
For glow/halation, target highlights only (don’t fog the whole image).
If you love night scenes, practical lights + a gentle bloom can be chef’s kiss.
-
The ones that already have mood baked in: strong light sources, texture, weather, reflections, and a sense of “what’s going on here then?”
Top tips:Hunt for pools of light (street lamps, shop windows, car parks, doorways).
Wet streets, fog, steam, neon, construction yards… all ridiculously cinematic if you frame them well.
Build a mini-series: 6–12 images with a consistent mood reads more “film” than one random banger.
-
One clear subject + one clear mood
Directional light and purposeful shadows
Depth (foreground / subject / background)
Colour palette that supports the story (not fights it)
Crop/composition that feels like a film still, not a happy accident
About the Author - Ross Jukes is a professional Photographer and Videographer with over a decade of experience. Working in both Digital and Analogue formats, Ross has worked with international clients, had his worked published numerous times and exhibited his work extensively. With a passion for all things photographic, Ross combines his experience, enthusiasm and dedication to his art form to create engaging and educational content for the photographic community.
Disclaimer: All links to Amazon UK/US are affiliated links - you will still pay the same price but I will receive a small commission for providing the link. All information provided in this blog is intended either for educational or entertainment purposes and is accurate to the best knowledge of the author. However, further research/professional advice should be sought before making purchases/implementing any advice given and no responsibility is taken by the author or parties mentioned here within.

Canon PowerShot V1 Review - Compact Power in your Pocket
When I started out, over 15 years ago, I would never have believed all of the features that we take for granted in a consumer level camera. Incredible autofocus, high resolution stills, 4k video with effective wide-dynamic range (Log) - With the Canon PowerShot V1 launched in April 2025, we now have all of that and much more in our pocket. When I think about it, it really is mind blowing. However, it does all come at a cost, let's find out if it’s worth it… Oh, and I will have a video review coming soon so be sure to check out my YouTube Channel…

When I started out, over 15 years ago, I would never have believed all of the features that we take for granted in a consumer level camera. Incredible autofocus, high resolution stills, 4k video with effective wide-dynamic range (Log) - With the Canon PowerShot V1 launched in April 2025, we now have all of that and much more in our pocket. When I think about it, it really is mind blowing. However, it does all come at a cost, let's find out if it’s worth it!
⏰ TL;DR
If you don’t have time to read the full article, my ‘Too Long; Didn’t Read’ take on this is…
The Canon Powershot V1 is an excellent compact camera. Yes, it has a premium price tag but it is an incredibly capable little camera. Whereas some of it’s counterparts make up for their high price tags by offering a myriad of features and specs, the Canon is simple to use yet powerful enough to get great results in an all but the most challenging scenarios. It’s a great stills camera but for a vlogging/content creator, the video features make this camera a ‘no-brainer’…
Canon PowerShot V1 Review (Quick Verdict)
If you want a truly pocketable camera that’s built for high-quality vlog video and solid everyday photography, the Canon PowerShot V1 is a strong option — especially if you value Canon colour, quick handling, and a compact setup you’ll actually carry.
Best for:
Vloggers / creators who want better quality than a phone in a small setup
Travel + everyday carry (EDC) video and photos
Content makers who want a simple, fast workflow (shoot → share)
Not ideal for:
Anyone who needs weather sealing or a built-in EVF
People wanting the cheapest “vlogging compact” option
Sports / fast action shooters (small compact ergonomics + limitations vs ILC bodies)

PLEASE NOTE - No AI was used to make this article. It is my own work based on my experiences and created in my own time. If payment was received or any items gifted to me, it will be clearly stated in the article. If you would like to support the blog, please consider making a small donation.
🔨 Build Quality and Ergonomics
Straight out of the box (and I’m pleased to see Canon using mostly recycled packaging for their cameras) the camera feels like a premium camera. It has a little weight to it and feels dense - though at 426 grams, it’s certainly not heavy. That dense feel makes sense when you think of all of the technology crammed inside this thing! The package comes with a battery and wind cover for the mic, this camera is certainly targeted towards vloggers after all.
✌️ Ergonomics
The ergonomics of the camera are another standout feature. Canon have somehow managed to make this feature packed camera incredibly simple to handle and use. I’ve used my fair share of small cameras and there is usually a compromise when it comes to button layout. The PowerShot V1 focuses on being simple and fast to use. Startup time is quick, the buttons all makes sense in terms of placement and the flip out LCD touchscreen is a joy to use in all but the very brightest of situations.
🔎 What is missing?
I do have two very minor gripes with the body. Firstly, and probably most importantly is that the PowerShot V1 is not weather-sealed. Canon has obviously had to work thermal wonders to keep the issue of overheating at bay. However, that does come at the expense of not being able to use the camera in wetter conditions - which is a shame for more travel focussed users. My other personal issue is the lack of EVF - though I really am stretching here as the camera is packed with other features - I really don’t know how they would have fit an EVF in, so its absence is understandable.

📸 Canon Powershot V1 for Stills Photography
I’m going to break the review up into the two main areas of use for this camera, stills and video. The 1.4 inch CMOS sensor crams in 22 megapixels which helps deliver fantastically rich images. I’m not going to bang on about ‘Canon colour science’ but if you know, you know. The PowerShot V1 delivers images that certainly have that ‘Canon Feel’ and as an owner of the Canon R5 MkII - in some ways I preferred the images out of the V1 but my mixed emotions towards the R5 MkII is a conversation for another day.
Source - Gordon Laing via YouTube
I’ll talk more about the 16-50mm equivalent lens in the video section but suffice to say it delivers wonderfully crisp images with little compromise and with Optical Image Stabilisation - it’s more than just a typical ‘point and shoot’ lens. There is a bit of distortion but nothing that isn’t very easily fixed and sharpness throughout the aperture range seemed decent from my own very basic testing - though YouTube is your friend if you want to find some very detailed examples. The lens has a maximum aperture of f2.8 at the wide end going to f4.5 at the longer end which is decent for a small camera like this.

🌅 Image Performance
The images have decent dynamic range and I was impressed with the lowlight performance. I really think we have reached a point where you would struggle to find a truly ‘bad’ modern camera for stills but I’m pleased to say that the PowerShot V1 is a good stills performer, even with its diminutive form factor. The Dual Pixel Autofocus performs very well. It's nice to see some of Canon’s new tracking features built in. An additional bonus is the built in ND filter which can help in some scenarios - the mechanical shutter maxes out at 1/2000 of a second but there is an electronic shutter that delivers up to an incredible 1/16000 of a second.

Overall, the PowerShot V1 delivers fantastic images from what is a compact camera. The lens is sharp and the sensor renders images with plenty of dynamic range. As a professional photographer, I would have no problem using this camera to deliver images for social media, websites etc. and for most users, they will not be disappointed with the image performance and more importantly, the usability of this camera to capture great images.

🎥 Canon Powershot V1 for Videography
There is no doubt that this little powerhouse is mainly focussed on the video side of things with its primary customer base being vloggers and content creators. However, to simply class this little camera as a ‘vloggers camera’ would be missing some rather large points. Most notably the 4K 60 P video and the fact that this camera has Canon Log 3 - a feature that up until only a few years ago was reserved mostly for Canon’s premium Cinema line of cameras. It shouldn’t be overlooked that this ‘pocket’ camera, if used in the right hands, is capable of producing some beautiful video.
➕ AdditIonal Features
Other key video features include Canon’s ‘Movie Digital IS’ - this worked well in the field but it does come with a small crop factor and call me old-fashioned, but I appear to be the only person that still likes a bit of ‘normal’ camera shake. The previously mentioned built-in ND filter is also a great feature though fairly commonplace in video oriented compact cameras these days. In addition to the 4K 60 P, this little beast also delivers Full HD 120 P which for a lot of content creators will be a great addition - for those looking to make more ‘cinematic’ content, the choices of frame rates have you well covered. The Dual Pixel Autofocus also appeared to work well with the lens and I rarely found the camera ‘hunting’ for focus - in particular when used as a vlog-style camera.

📽️ The Lens for video
One of the most crucial features for videography and in particular for the vloggers out there is the lens, and with a 16mm equivalent at the wide end - it really does have you covered. One of the main gripes for most vlog-style cameras is that you normally need the dreaded ‘selfie-stick’ to get the camera far enough away from the user so that they do not completely dominate the frame. The Powershot V1 is wide enough that this really is not an issue. The lens is slightly more compromised at the long end - the 50mm equivalent offers some degree of ‘zoom’ but from a personal perspective, I’d love to have seen this closer to 80mm or ideally, 105mm. I must caveat that with the fact that I don’t know the technical limitations of building a lens with that zoom range so it may not be possible!
🖥️ Video Performnace
Video quality overall is great and for most users, they will be happy with the results. The audio also sounds fantastic for a small camera and even though I’d always recommend using a wireless lav etc. the onboard audio sounds full and rich - just remember to use the supplied wind-cover when outside. For more advanced users, the addition of C-Log 3 is great to see. Lowlight performance was decent with noise present as you start to ramp up the ISO - but this is where I feel some people forget the basics of videography in terms of looking for good lighting scenarios, with balanced audio and good framing - it is only a camera after all and won’t make poorly shot video look incredible, so some user skill is required to get the absolute most out of this camera - but it is certainly easy to get good looking footage from it.
Source - PetaPixel via YouTube
✅ Pros
Pocketable and easy to carry daily
Strong video-first feature set (creator-friendly controls)
Canon colour and pleasing skin tones
Built-in ND filter is genuinely useful outdoors
Solid image quality for the size
🔴 Cons
Price is premium for a compact (around £959 at launch)
No built-in EVF (composition can be tricky in bright light)
Not weather sealed
Some video modes/features may involve crop / trade-offs (depending on settings)
🤔 FREQUENTLY ASKED QUESTIONS…
-
Yes — it’s very clearly built for creators: a wide built-in lens, flip/vari-angle screen, strong AF, and creator-focused video tools like 4K 60p, Full HD 120p and Canon Log 3. If you want something more “grab-and-go” than an interchangeable-lens setup, it’s a strong fit for YouTube-style talking head + travel footage.
-
Most likely, yes. The V1’s lens goes to 16mm equivalent at the wide end, which is wide enough that you usually don’t need to push the camera far away on a selfie stick just to fit yourself in frame. It’s one of the big reasons this camera makes sense as a “pocket vlogging” option.
-
It does shoot 4K 60p, but expect trade-offs depending on mode. Canon’s own specs list 4K 60p and also show 4K 60p (Crop) in its comparison table, and the detailed specs list “4K (cropped)” at 50/60. If you want the widest possible look, check which 4K mode you’re in.
-
Canon highlights an active cooling vent designed to prevent overheating on longer shoots. In the official specs, Canon also lists movie recording times up to 6 hours at standard frame rates (with the usual caveat that temperature, power and card capacity can limit this). Real-world results still depend on conditions, but it’s clearly designed for longer recording.
-
Yes — the V1 includes Canon Log 3, which is useful if you want more flexibility in grading (recovering highlights/shadows and matching other cameras). If you don’t grade, you can ignore it and shoot a normal profile; if you do grade, Log 3 is one of the key reasons this compact is “serious” for video.
-
Yes — it has a built-in ND filter, which is great for keeping motion looking natural in bright daylight (e.g., sticking near 1/50 or 1/100 shutter without cranking aperture/ISO). Some published specs list it as a 3EV ND filter—handy for outdoor vlogging and “cinematic” settings.
-
You’ve got Optical IS plus Canon’s Movie Digital IS. Movie Digital IS can help smooth handheld footage, but it commonly comes with some crop/field-of-view reduction — and you’ve already noted there’s a crop trade-off in the field. Best practice: use Optical IS for a wider look, and turn on Digital IS when you truly need the extra stability.
-
Audio is a big strength for creator cameras. Canon lists an external microphone input and a headphone socket for monitoring, plus a built-in mic with noise reduction. In your review, you also mention the onboard audio sounds strong and that Canon includes a wind cover — but for best results you still recommend getting the mic closer (e.g., wireless lav).
-
Yes — Canon lists UVC/UAC support (plug-and-play webcam style) and positions it for live streaming. That’s ideal if you want a clean, simple setup without extra adapters. Just remember that stream quality will still depend heavily on your Wi-Fi/upload speed and platform requirements.
-
It’s not “only” a vlogging camera. You mention strong stills performance, good dynamic range, and decent low-light results, and Canon’s specs confirm a 22.3MP sensor and RAW support. For everyday travel/EDC and content stills (social/web), it should be more than capable — especially if you value a compact you’ll actually carry.
-
No — and this is worth making very explicit because people search it. Canon’s official specs list no water/dust resistance, and you call out the lack of weather sealing as one of your main body gripes (likely connected to the cooling/thermal design). If you shoot outdoors a lot, plan around that (bag, cover, or choose a different camera).
-
No — there’s no built-in EVF. You mention this in your “what’s missing” section, and Canon’s own comparison table lists EVF as “None” for the V1. In bright sun you’ll be relying on the rear screen, so consider a shade/angle adjustment strategy if you shoot outdoors a lot.
-
Canon specifies 1× UHS-II SD card slot, and also recommends using a fast card for 4K recording. If you plan to shoot lots of 4K (especially higher bitrates / 4K 50/60), prioritise a reputable UHS-II card with strong sustained write speeds rather than the cheapest option.
-
It feels premium and “dense” but not heavy at 426g, and Canon’s official specs also list 426g. That’s heavier than some tiny compacts, but still very reasonable for what you’re getting (large-ish sensor + strong video features + cooling).
✅ Final Thoughts…
I’ve taken a slightly different approach to this review, without focussing too heavily on every technical detail. As I mentioned at the start though, I find it genuinely mind-blowing that a ‘pocket size’ camera can deliver all of these features and functions. More importantly, it delivers fantastic stills and video performance in a simple to use, well built and stylish form factor. If you know that this camera suits your needs as a user, it’s very difficult to find any downside to it. However, there is one…

My biggest downside to this camera is the cost, at £959 - it’s expensive. Shopping around may bring that price down a little but that price still places this camera very much in the ‘premium compact’ category. The strange thing is, I actually think it is worth the money - this camera is incredibly capable. My main issue with the cost is that it puts this camera very near the price point of some other very capable mirrorless cameras. I’m not going to start making comparisons as this isn’t an ‘A vs B’ review - but at nearly a thousand pounds, that's a large chunk of change to be spending on a camera. That’s before we even get into the ‘camera vs phone’ debate for making vlog style content (camera every time for me but again, a conversation for another day!).

If the price is not the deciding factor for you, then one thing is for sure - you’ll be hard-pressed to find a more capable little camera that can slip in your pocket. Canon have done their research and delivered a camera that will have 99% of its target market covered! I would have no issue using this camera as an ‘everyday carry’ or for travel. For content creators, I think the PowerShot V1 would be an excellent option. Please leave a comment below if you like the look of this camera or if you think there are better options out there, I’d love to get your thoughts…
Posts you might also like…
About the Author - Ross Jukes is a professional Photographer and Videographer with over a decade of experience. Working in both Digital and Analogue formats, Ross has worked with international clients, had his worked published numerous times and exhibited his work extensively. With a passion for all things photographic, Ross combines his experience, enthusiasm and dedication to his art form to create engaging and educational content for the photographic community.
Disclaimer: All links to Amazon UK/US are affiliated links - you will still pay the same price but I will receive a small commission for providing the link. All information provided in this blog is intended either for educational or entertainment purposes and is accurate to the best knowledge of the author. However, further research/professional advice should be sought before making purchases/implementing any advice given and no responsibility is taken by the author or parties mentioned here within.

REVIEW: Comica VM40 Combo Kit - A Budget Friendly Audio Beast!
As a self-employed videographer and content creator, finding the right tools for professional audio capture without breaking the bank can often feel like an uphill battle. Whether you’re shooting commercial videos, podcasts, or YouTube content, reliable audio gear is as essential as a good camera. Enter the Comica VM40 Microphone Combo Kit, a product promising high-quality audio at a relatively affordable price point. But does it live up to expectations?

As a self-employed videographer and content creator, finding the right tools for professional audio capture without breaking the bank can often feel like an uphill battle. Whether you’re shooting commercial videos, podcasts, or YouTube content, reliable audio gear is as essential as a good camera. Enter the Comica VM40 Microphone Combo Kit, a product promising high-quality audio at a relatively affordable price point. But does it live up to expectations?
DICSOUNT CODE: Use the link above to purchase the VM40 Combo kit and Comica have also provided a discount code - use ‘Q3LSUFVE’ - limited time only.
PLEASE NOTE: I WAS SENT THIS ITEM FOR REVIEW BUT NO OTHER PAYMENT OR CONTROL WAS EXCHANGED FOR PUBLISHING THIS UNBIASED REVIEW
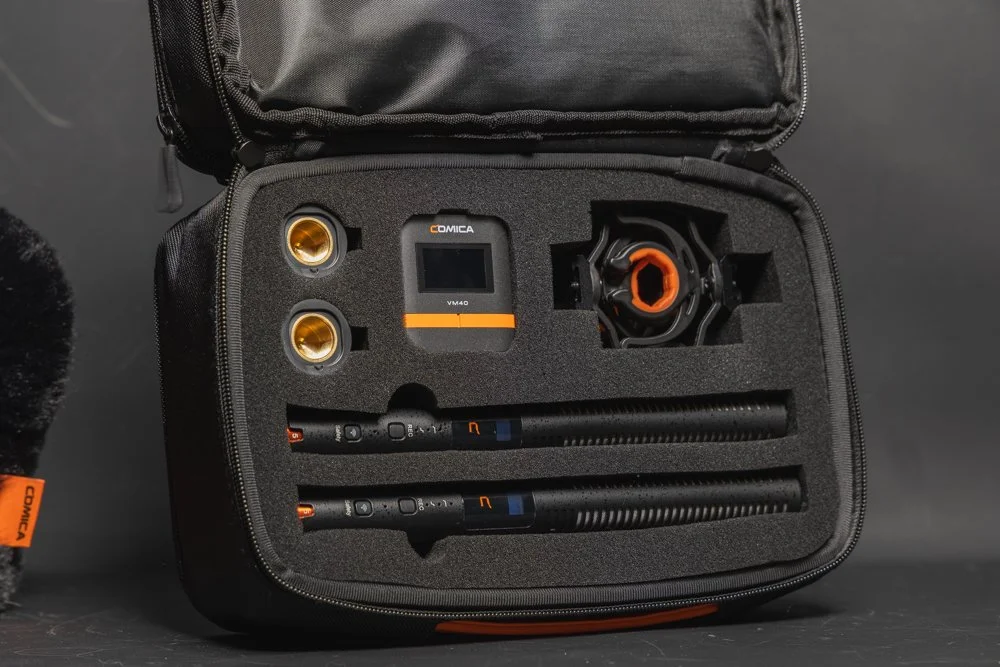
👀 Unboxing and First Impressions
Out of the box, the Comica VM40 Microphone Combo Kit comes across as a thoughtfully packaged product. The kit includes the VM40 condenser microphone, a sturdy shock mount, a pop filter, a foam windscreen, and necessary cables to connect it to most devices - Well actually there are TWO of each of those items! It also comes with a single wireless receiver that can pick up both mics! The kit is fully packed for a two mic setup that is ideal for video or podcast setups as well as a host of other use cases.

The build quality is solid, with the microphone’s metal body exuding durability and professionalism. The sleek black finish feels modern, and the overall design suggests that this kit is targeted towards semi-professionals and hobbyists alike. If you are working with commercial clients, the looks will certainly not give away the budget-friendly price!


For someone who juggles between recording interviews for clients and creating social media content, the included accessories provide a comprehensive setup for various use cases. The kit thoughtfully consists of all the things you need to get you started and it’s nice to see the inclusion of items like the shock mounts for both microphones - it would have been easy for Comica to skimp on these items but they have you covered!
🔊 Audio Quality
At the heart of any microphone review lies the question of audio quality, and the VM40 doesn’t disappoint. The microphone features a super-cardioid polar pattern, which is excellent for capturing sound from the front while minimising background noise. This makes it ideal for recording in less-than-ideal environments – something many self-employed creators can appreciate.

Testing the VM40 in multiple scenarios, from a quiet home studio to a moderately noisy office, yielded consistently impressive results. For voiceovers and podcasts, the microphone captured rich, clear audio with a warm tone, lending a professional quality to the recordings. When used for YouTube content, such as tutorials or vlogs, the clarity and directional focus significantly reduced the need for extensive post-production work to clean up background noise - though a little is usually required regardless of your given setup.

However, while the VM40 excels in controlled environments, its sensitivity can pick up unwanted sounds in noisier spaces, even with the cardioid pattern. The pop filter and foam windscreen do a decent job of reducing plosive sounds and minor wind interference, but they’re not a substitute for a properly treated recording space. Outdoor recording is certainly possible with these mics and the provided windscreens but avoiding wind is always the best prevention.
Source: YouTube - Dale Cambell
👍 Usability
The Comica VM40 scores high on usability. Setting it up is straightforward, even for those with minimal technical expertise. The microphone connects via a 3.5mm jack, making it compatible with most cameras, laptops, and audio interfaces. Alternatively, the kit comes with the wireless receiver and even more, both microphones have internal 32-bit recording - making capturing audio an absolute breeze in almost any scenario, regardless of your camera setup.

For those not in-the-know, 32-bit internal recording is an incredible feature to have at this pricepoint and in particular, on a shotgun mic. 32-bit is effectively a wide-dynamic range for audio allowing users to capture very quiet noise, through to very loud and be able to restore them in post-production, saving the all-important content. It is still possible to ‘overwhelm’ the microphone in extreme circumstances but for 99% of use cases(not an accurate stat but you get the point), 32-bit float can save misgained audio. With around 40 hours internal storage, these mics truly have you covered.


Another feature is the microphone’s gain control knob, conveniently located on the body. This allows for on-the-fly adjustments without needing to access software or external mixers. Whether you’re recording a soft-spoken podcast or narrating a high-energy video, having this level of control at your fingertips is invaluable. Some may be tempted to ignore this and just rely on the aforementioned 32-bit float - but best practice is always to set your gain appropriately!

In addition, users have access to the Comica Audio App - ideal for conveniently checking gain settings and recording status. The app, whilst fairly basic in it’s layout has the majority of features that users would need. I personally found that I didn’t need to use the app (I mean, 32-bit internal recording, that has you covered in most circumstances!) but having access to the app is a welcome addition. The presence of high and low cut filters are also welcome in particular for recording in more challenging environments.

The mics have a very useful OLED screen for quickly checking details. Another great feature is the reported 200m range - however, I haven’t personally tested the range as in most use cases, you would never be that far away from the subject. Also, with internal recording, the mic could be practically anywhere and as long as it’s recording, range is not an issue.
🎒 Portability
As a self-employed videographer who often shoots on location, portability is a significant consideration. The VM40’s compact design and included accessories make it a practical choice for creators on the go. Everything fits neatly into a small carry bag that is padded and allows you to conveniently carry all accessories. Personally, I just add what I need to my current backpack but always take care to protect the microphones from any shock or water damage.

🔨 Durability and Build Quality
Durability is another area where the VM40 shines. The metal body feels robust and capable of withstanding the wear and tear of regular use. The included shock mount and tabletop stand, while not top-tier in terms of materials, perform adequately for stationary setups. For more demanding shoots, you might want to invest in a heavier-duty stand or boom arm. Battery life is good at 32 hours when wired or around 10 hours when used wirelessly.
Source: Youtube - Comica
🙋♂️ Personal Experience
One thing that I didn’t mention in the ‘usability’ section was the controls for the mics and wireless receiver. When not ‘wired’ to a camera or transmitting to the wireless receiver, the microphones can be set to record internally. However, setting to record and using certain functions on the microphones requires some button combinations that are not always intuitive. Likewise, I personally had a few issues with the wireless receiver seemingly not connecting but this was almost certainly user error.

With that in mind, I’m a bit loathed to ‘knock’ the usability of the mics because some users may pick up the button combinations quickly, others may find them confusing but ultimately, there is a learning curve. I would have liked to have seen an easier setup or maybe more dedicated buttons but this really is just personal opinion and I’m sure others won’t have any issues with the usability of these mics. I would love to see some auto-recording options that can be set to user preference - like internal recording being triggered when the camera starts recording but in truth, I’m not even sure that is technically possible.
What I can say confidently though is that these microphones are almost ideal for people like me, who have to operate on their own or have the additional strains of producing YouTube content etc. The speed of set up and ease of use (once you’ve got the button combinations locked in!) is fantastic. The safety net that 32-bit float and onboard recording offer is almost priceless when you live in constant fear of missing a crucial piece of audio or having a file corrupt.
☝️ Who Is This Kit For?
The Comica VM40 Microphone Combo Kit is an excellent option for:
Aspiring Podcasters: If you’re just starting a podcast and want professional-sounding audio without investing in high-end equipment, the VM40 is a solid choice.
YouTube Content Creators: Whether you’re filming tutorials, vlogs, or product reviews, the VM40’s clarity and directional focus will enhance the audio quality of your videos.
Self-Employed Videographers: For those who need an affordable yet reliable microphone for client projects or personal ventures, this kit ticks many boxes.
Remote Workers and Online Educators: If you frequently host webinars or record online courses, the VM40’s user-friendly setup and sound quality will elevate your presentations.
🔴 Pros and Cons
Pros:
32-bit float and internal recording (approx 40hours) - these are top-tier features!
Wireless transmission for both mics - ideal for video, podcasts and much more!
Affordable price point without compromising quality.
Excellent audio clarity and warmth, particularly for voice recording.
Includes all necessary accessories for a complete setup.
Compact and portable design.
Easy to use, with a convenient gain control knob.
Durable metal construction.
USB-C Charging with approximately 10 hours battery life in wireless mode
Cons:
The included tabletop stand could be more robust.
Sensitivity to ambient noise in less controlled environments.
Fiddly controls and the wireless receiver seemed a little temperamental
Wireless receivers in particular feel very plasticky - functions fine but not great build quality.
Would love to see an XLR version but this would be a more ‘pro’ level model

✅ Final Verdict
The Comica VM40 Microphone Combo Kit is a versatile and budget-friendly solution for self-employed videographers and content creators. Its balance of affordability, durability, and impressive audio quality makes it an excellent choice for beginners and intermediate users alike. While it may not replace higher-end microphones in a professional studio setup, it’s more than capable of delivering quality results for podcasts, YouTube videos, and client projects.
If you’re looking to invest in a microphone that delivers solid performance without costing a fortune, the Comica VM40 should be high on your list. With a few minor upgrades – such as a sturdier stand and a dedicated carrying case – this kit could easily become a staple in any content creator’s arsenal.
FAQS
-
It’s a dual-microphone kit built around two VM40 mics and one wireless receiver that can pick up both mics, designed for creators who want flexible audio for video, podcasting, interviews, and content creation.
-
You get two of the key accessories (for a true 2-mic setup): the mics, shock mounts, pop filters, foam windscreens, and cables—plus the receiver.
-
Yes, testing notes highlight rich, clear audio with a warm tone, which works particularly well for voice recording and spoken content.
-
The VM40 uses a super-cardioid pattern, which focuses on sound from the front and helps reduce background noise—useful in home/office setups.
-
It can work, but you mention it’s sensitive—so in noisier spaces it may still pick up unwanted sound. The included pop filter/windscreen helps with plosives and light wind, but it’s not a replacement for good mic placement and basic wind control.
-
You note it can connect via 3.5mm, making it compatible with many cameras and devices, and it also supports wireless use via the receiver.
-
Both mics can record internally in 32-bit, giving you a much wider dynamic range safety net (recovering quiet vs loud audio in post). You also note roughly 40 hours of internal storage.
-
Comica claims up to ~200m range (you didn’t test it). Battery-wise you cite about 32 hours wired or ~10 hours wireless, with USB-C charging.
-
The tabletop stand could be sturdier, the mic can be sensitive in noisier spaces, and some controls/pairing steps have a learning curve; the receiver feels a bit plasticky even though it performs well.
Posts you might also like…
About the Author - Ross Jukes is a professional Photographer and Videographer with over a decade of experience. Working in both Digital and Analogue formats, Ross has worked with international clients, had his worked published numerous times and exhibited his work extensively. With a passion for all things photographic, Ross combines his experience, enthusiasm and dedication to his art form to create engaging and educational content for the photographic community.
Disclaimer: All links to Amazon UK/US are affiliated links - you will still pay the same price but I will receive a small commission for providing the link. All information provided in this blog is intended either for educational or entertainment purposes and is accurate to the best knowledge of the author. However, further research/professional advice should be sought before making purchases/implementing any advice given and no responsibility is taken by the author or parties mentioned here within.

A Walk Around The Photography Show 2025 London - My HIGHLIGHTS
The 2025 Photography & Videography show took place at ExCel London and I made the journey south and took a look around. In this video, I share my highlights from the show and give you a feel for what the event was like, My particular highlights were getting to play with the new Sigma BF - a beautiful new camera. I also got to try the Canon C400 and C80 video cameras which I am very interested in as well as a host of other really cool stands and exhibitions. Watch the video below for my full highlights.

The 2025 Photography & Videography show took place at ExCel London and I made the journey south and took a look around. In this video, I share my highlights from the show and give you a feel for what the event was like, My particular highlights were getting to play with the new Sigma BF - a beautiful new camera. I also got to try the Canon C400 and C80 video cameras which I am very interested in as well as a host of other really cool stands and exhibitions. Watch the video below for my full highlights.
Posts you might also like…
About the Author - Ross Jukes is a professional Photographer and Videographer with over a decade of experience. Working in both Digital and Analogue formats, Ross has worked with international clients, had his worked published numerous times and exhibited his work extensively. With a passion for all things photographic, Ross combines his experience, enthusiasm and dedication to his art form to create engaging and educational content for the photographic community.
Disclaimer: All links to Amazon UK/US are affiliated links - you will still pay the same price but I will receive a small commission for providing the link. All information provided in this blog is intended either for educational or entertainment purposes and is accurate to the best knowledge of the author. However, further research/professional advice should be sought before making purchases/implementing any advice given and no responsibility is taken by the author or parties mentioned here within.
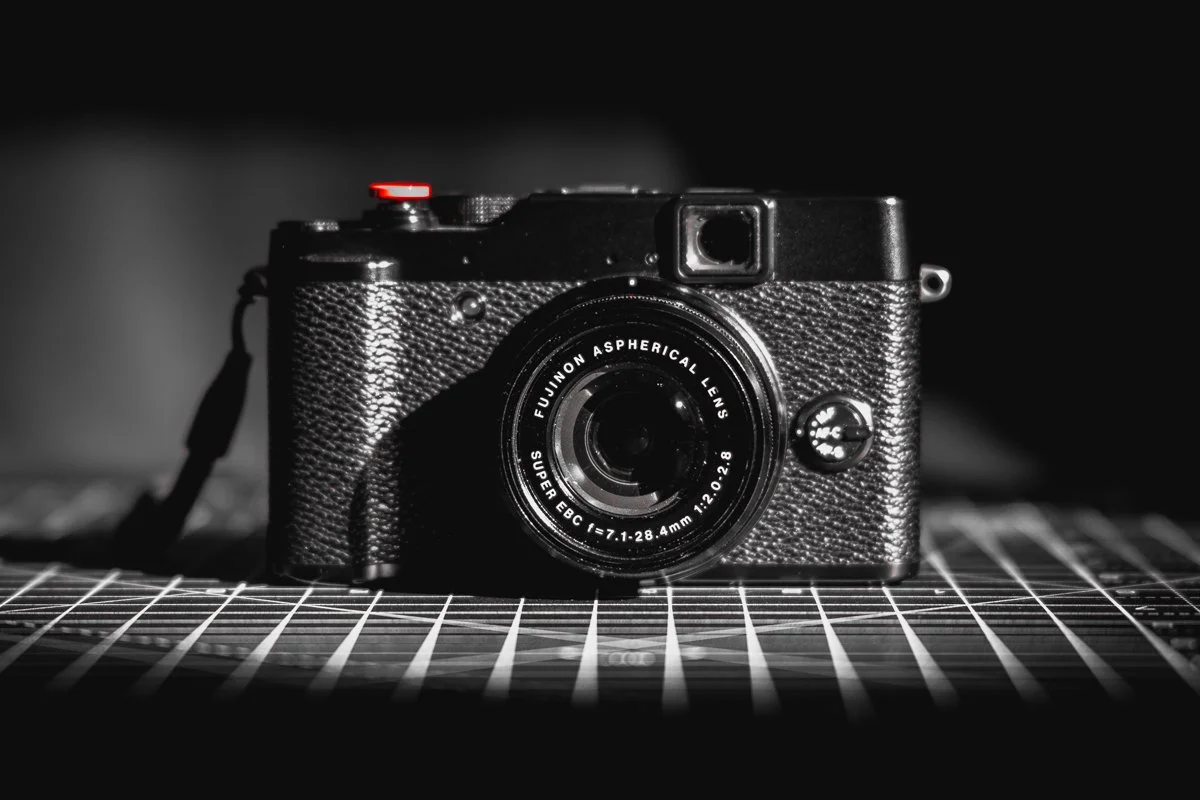
VIDEO: Fuji X10 in 2025! BEST Budget Fuji X100V Alternative?
The Fuji X10 could be one of the best budget alternatives to the legendary Fuji X100V and similar style cameras. However, can a camera from 2011 really compete with the modern day lowlight monsters? In this video I look at the pro’s and obvious con’s of comparing a camera over a decade older than it’s modern counterparts. I have previously written about the Fuji X10 and it’s fair to say I was a fan then, but has anything changed?

The Fuji X10 could be one of the best budget alternatives to the legendary Fuji X100V and similar style cameras. However, can a camera from 2011 really compete with the modern day lowlight monsters? In this video I look at the pro’s and obvious con’s of comparing a camera over a decade older than it’s modern counterparts. I have previously written about the Fuji X10 and it’s fair to say I was a fan then, but has anything changed?
Posts you might also like…
About the Author - Ross Jukes is a professional Photographer and Videographer with over a decade of experience. Working in both Digital and Analogue formats, Ross has worked with international clients, had his worked published numerous times and exhibited his work extensively. With a passion for all things photographic, Ross combines his experience, enthusiasm and dedication to his art form to create engaging and educational content for the photographic community.
Disclaimer: All links to Amazon UK/US are affiliated links - you will still pay the same price but I will receive a small commission for providing the link. All information provided in this blog is intended either for educational or entertainment purposes and is accurate to the best knowledge of the author. However, further research/professional advice should be sought before making purchases/implementing any advice given and no responsibility is taken by the author or parties mentioned here within.

REVIEW: DIGITALFOTO BOWENS MOUNT SNOOT LIGHT MODIFIER
As a self-employed videographer, the quest for tools that enhance creativity and efficiency is a neverending one. The DigitalFoto Bowens Mount Snoot emerges as a compelling accessory, promising to refine lighting techniques and introduce nuanced effects into videography projects. It is something that I long wanted to try in the hope of elevating my lighting techniques to the next level. So, I headed to the obvious retailer, whipped out the credit card and waited anxiously for my delivery!

As a self-employed videographer, the quest for tools that enhance creativity and efficiency is a never-ending one. The DigitalFoto Bowens Mount Snoot emerges as a compelling accessory, promising to refine lighting techniques and introduce nuanced effects into videography projects. It is something that I long wanted to try in the hope of elevating my lighting techniques to the next level. So, I headed to the obvious retailer, whipped out the credit card and waited anxiously for my delivery!

Design and Build Quality
The DigitalFoto Bowens Mount Snoot boasts a robust Aluminum alloy construction, ensuring durability while maintaining a manageable weight of approximately 2.1 kg. Its sleek black finish exudes professionalism, and the design is both functional and aesthetically pleasing. The snoot's dimensions are compact enough for easy transport, making it a practical choice for on-location shoots. I chose to leave it connected to my light of choice and couldn’t wait to try it on my next shoot.
Compatibility and Mounting
Designed with a standard Bowens mount, this snoot is compatible with a wide range of studio LED lights and strobes, including popular models like the Godox AD400 Pro and VL300. This versatility allows videographers to integrate the snoot seamlessly into existing lighting setups without the need for additional adapters. The mounting process is straightforward, ensuring a secure fit and minimising setup time.

Optical Performance
Equipped with a 37° lens, the snoot delivers a focused beam of light, ideal for highlighting subjects or creating dramatic lighting effects. The multi-coated optical glass ensures over 98% light transmission, resulting in even illumination with minimal distortion. Adjusting the focus is intuitive; a simple twist of the focus knob allows for precise control over the sharpness and size of the light projection.

Creative Enhancements
One of the standout features of the DigitalFoto snoot is its inclusion of 25 metal gobos, each measuring 5x5 cm. These gobos can project intricate patterns onto subjects or backgrounds, adding depth and interest to scenes. The set also includes four color filters (yellow, red, blue, and green), enabling videographers to infuse scenes with various hues without the need for post-production adjustments.

I found the lighting effects created by the gobos to be particularly pleasing. The ability to angle the light and focus the beam made creating different effects easy enough. However, it is worth keeping in mind you do need a bit of room if you want to project larger effects. I would like to have seen more practical gobos such as a range of window style gobos but there are still enough to get creative with.

Heat Management
It's important to note that the snoot supports continuous LED lights up to 300W. Prolonged use at higher wattages may result in the metal surface becoming hot to the touch. Therefore, it's advisable to handle the snoot with care during extended shooting sessions and allow adequate cooling periods to maintain optimal performance. I always proceed with caution when breaking my gear down and the snoot was particularly hot, it soon cooled down but it’s worth being conscious of.
Pros and Cons
Pros:
Durable Build: The aluminum alloy construction ensures longevity and resilience.
Versatile Compatibility: The standard Bowens mount allows for use with a wide range of lighting equipment.
Enhanced Creativity: The inclusion of 25 gobos and four color filters provides ample opportunities for creative lighting effects.
Precise Control: The 37° lens and adjustable focus offer meticulous control over light projection.
Cons:
Heat Generation: Extended use with high-wattage lights can cause the snoot to become hot, necessitating careful handling.
Weight Consideration: At 2.1 kg, it adds some weight to the lighting setup, which may be a factor for mobile videographers.


Client removed but you can see the window affect in the back right :)
Ideal Users
The DigitalFoto Bowens Mount Snoot is particularly well-suited for videographers and photographers who seek to introduce precise lighting effects into their work. It's an excellent tool for those specializing in portrait, product, or artistic videography, where controlled lighting and creative projections can significantly enhance the visual narrative. Additionally, studio-based professionals will appreciate its robust build and versatile compatibility.

Conclusion
In the realm of videography, lighting plays a pivotal role in shaping the mood and storytelling of a project. The DigitalFoto Bowens Mount Snoot emerges as a valuable asset, offering durability, versatility, and creative potential. While mindful handling is required due to heat generation during extended use, the benefits it brings to controlled and artistic lighting make it a worthy consideration for self-employed videographers aiming to elevate their craft.
Posts you might also like…
About the Author - Ross Jukes is a professional Photographer and Videographer with over a decade of experience. Working in both Digital and Analogue formats, Ross has worked with international clients, had his worked published numerous times and exhibited his work extensively. With a passion for all things photographic, Ross combines his experience, enthusiasm and dedication to his art form to create engaging and educational content for the photographic community.
Disclaimer: All links to Amazon UK/US are affiliated links - you will still pay the same price but I will receive a small commission for providing the link. All information provided in this blog is intended either for educational or entertainment purposes and is accurate to the best knowledge of the author. However, further research/professional advice should be sought before making purchases/implementing any advice given and no responsibility is taken by the author or parties mentioned here within.

VIDEO: My Favourite Cameras That I have Used in 2024!
I love using different cameras and whether they are film or digital, photo or video focussed - every one of them brings something unique. I thought I would share my favourite cameras that I have used throughout 2024 and there may be a few in there that surprise you. Take a look at the video and let me know in the comments what your favourite camera of 2024 has been!
I love using different cameras and whether they are film or digital, photo or video focussed - every one of them brings something unique. I thought I would share my favourite cameras that I have used throughout 2024 and there may be a few in there that surprise you. Take a look at the video and let me know in the comments what your favourite camera of 2024 has been!
Posts you might also like…
About the Author - Ross Jukes is a professional Photographer and Videographer with over a decade of experience. Working in both Digital and Analogue formats, Ross has worked with international clients, had his worked published numerous times and exhibited his work extensively. With a passion for all things photographic, Ross combines his experience, enthusiasm and dedication to his art form to create engaging and educational content for the photographic community.
Disclaimer: All links to Amazon UK/US are affiliated links - you will still pay the same price but I will receive a small commission for providing the link. All information provided in this blog is intended either for educational or entertainment purposes and is accurate to the best knowledge of the author. However, further research/professional advice should be sought before making purchases/implementing any advice given and no responsibility is taken by the author or parties mentioned here within.