

Trying Three Lomography Films!
When it comes to film, I have a pretty simple palette. My ‘go-to’ film of choice has always been Portra 400. Recently, I’ve had a brief love affair with Fuji Pro 400H but falling in love with a discontinued film is a bad idea!

When it comes to film, I have a pretty simple palette. My ‘go-to’ film of choice has always been Portra 400. Recently, I’ve had a brief love affair with Fuji Pro 400H but falling in love with a discontinued film is a bad idea!
As you can probably tell from my Vanilla film choices (and Vanilla happens to be my favourite Ice Cream - my middle name is definitely not ‘Danger’!) I tend to keep things simple. Every now and then I might experiment with an expired film if I’m feeling particularly adventurous! However, in my instant hunt for reasonably priced film, I stumbled across Lomography.
If you’ve even stepped foot in the film world, you will have come across Lomography. Their dedication to analogue photography and commitment to quit is pretty much unmatched! Despite having a great range of affordable cameras to explore (I myself had a Dianna-F for many years and in part, it was that camera that got me back into shooting film!) they also have an amazing range of film!
PLEASE NOTE: I WAS SENT THESE ITEMS FOR REVIEW BUT NO OTHER PAYMENT OR CONTROL WAS EXCHANGED FOR PUBLISHING THIS UNBIASED REVIEW

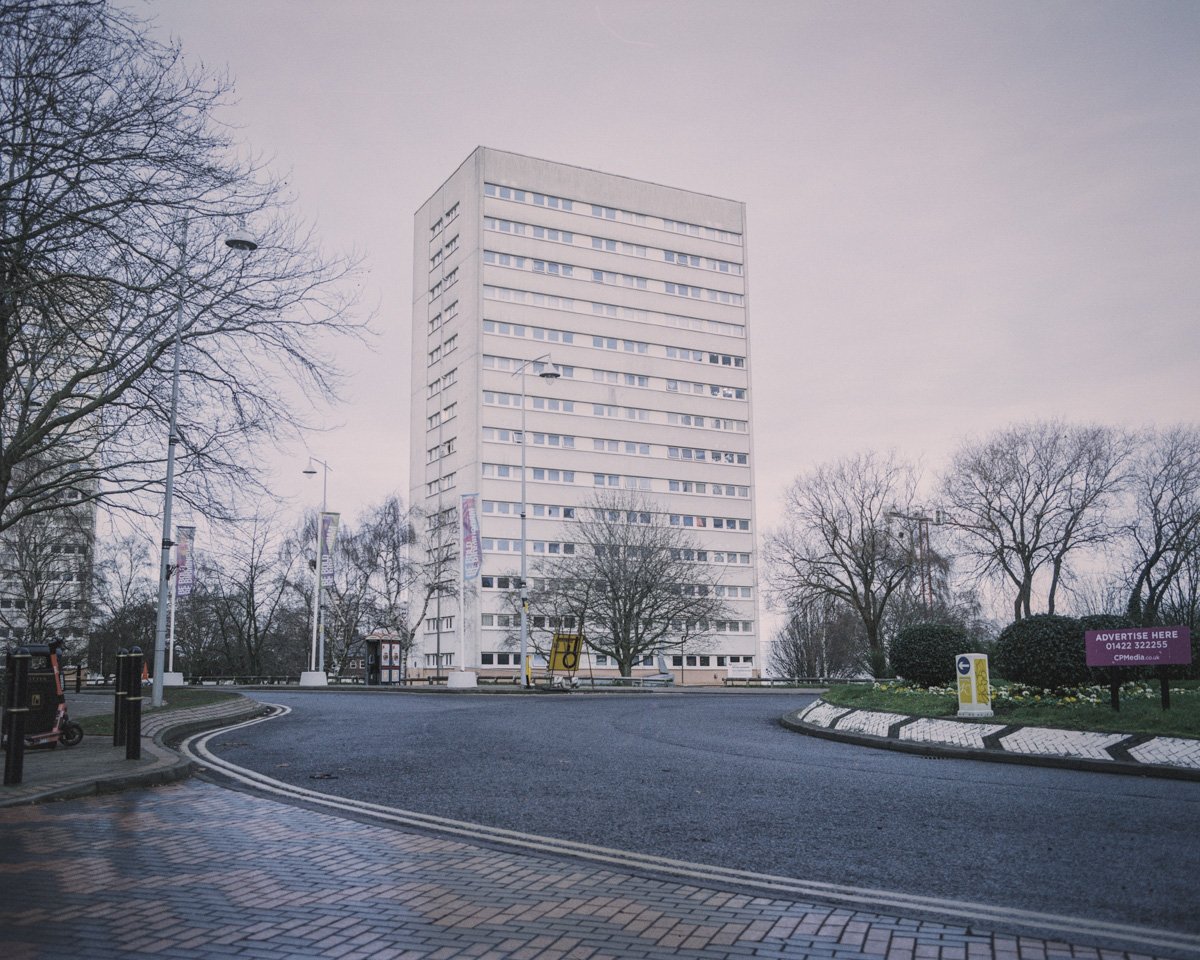
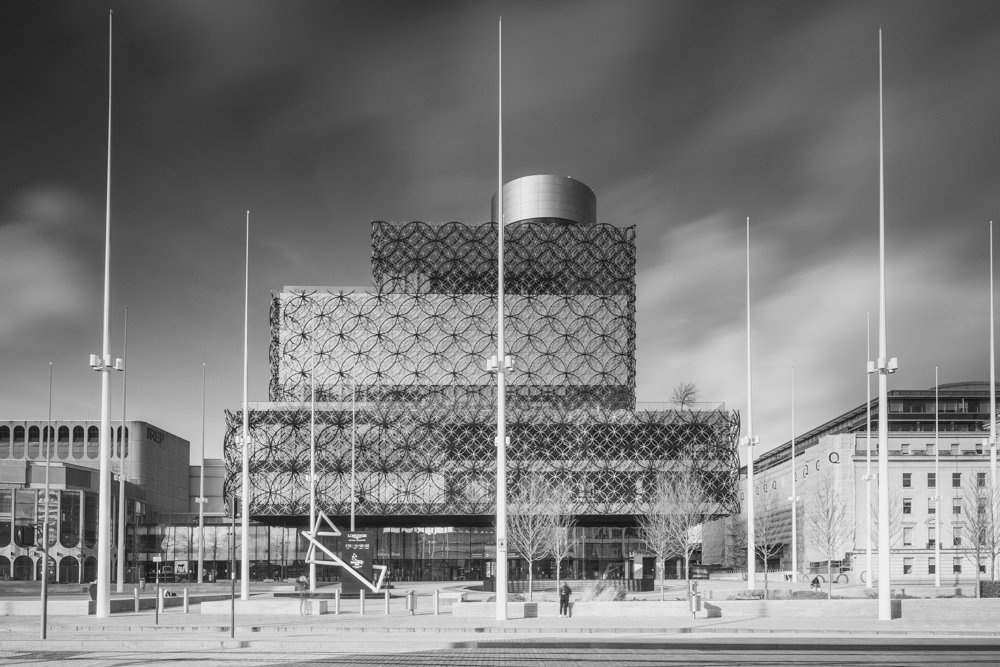
My ‘typical’ film look and feel…
It was their more experimental offerings that got me interested though and after exploring the options, it was time for me to ‘Break Bad’ and ditch the Portra for something a. Little more exciting - I was going full Rum Raisin!
There were a couple of caveats, I pretty much only shoot Medium Format and it must be C41 development so that I could develop the film myself. Fortunately, Lomography had me covered with a great range of 120 colour negative film. The three I would be shooting with were Metropolis, Lomo Purple and Lomo 800.
“If you’ve even stepped foot in the film world, you will have come across Lomography.”
The only real stipulation that I put on myself was that I was going to shoot all of the films on the same camera and lens setup. It’s not that I would be drawing a direct comparison between the films, we’’re dealing with three very different beasts here! It was more to keep the process straightforward. So the Bronica GS-1 and 65mm lens were my weapons of choice!
My developing would all be done at home so your results with these films may very, but I tried to be as consistent in my approach as possible! That included editing the images - all images have only had a very light edit and I have tried to keep the colours/tones somewhat representative of how the film looks. The only slight caveat being the Lomo 800 were I did use a Black Pro Mist ¼ filter - just to soften the lights at night.
LOMOGRAPHY METROPOLIS
Metropolis is probably most famous for its muted, desaturated look with a good kick of contrast. As a Portra shooter, the desaturated look sounds like it should be right up my street. However, this was probably the film I was most suspicious of. I tend to go for warmer, more wholesome tones and this felt like it might be a little, dystopian…
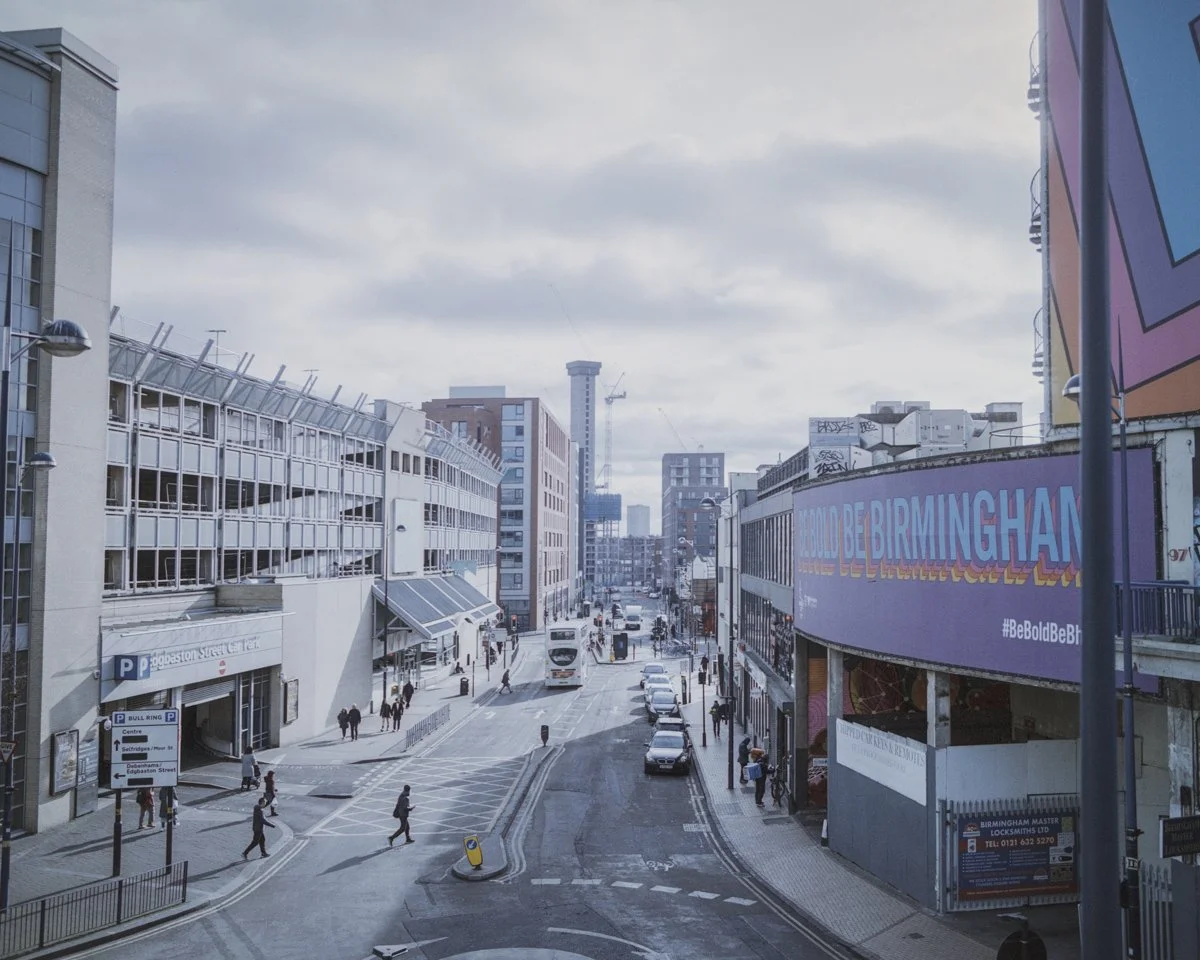
However, when I saw the results, I was pretty impressed! This is probably more a reflection of my shooting style but the film renders a lot different to what I would normally go for. But it was a pleasant surprise and I could certainly see myself using it more often and certainly the kind of film that would be useful for certain projects or even entering photography competitions with a more urban feel!

I personally think it looks better when you have a bit of strong, directional light. If you shoot more urban scenes then this is certainly a great film for you. It has a little punch of colour that pops through and draws the viewer into the image. The contrast is great and gives it a gritty feel, without being too overdone.


As with all films, choosing what speed to shoot it at is really a personal choice. I shot this film at 200 to give the film a little extra light and I’m glad I did. That said, I also think this film would look cool and underexposed a little, it would certainly render shadows deep and black thanks to that strong, contrasty look.

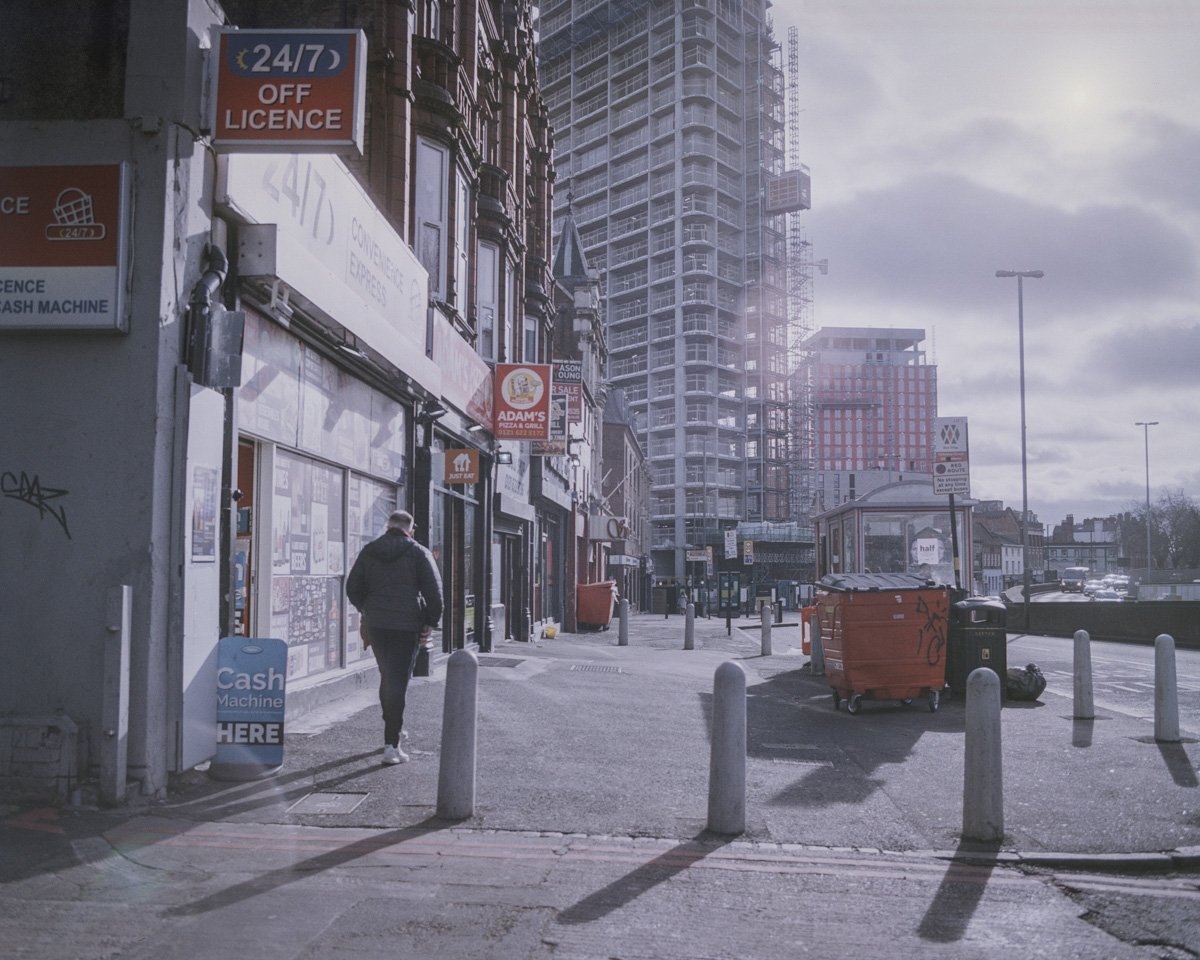
LOMOGRAPHY LOMOCHROME PURPLE
OK, I’ll admit I had no idea what to expect from this film! I’d done a little bit of Googling to see what it was all about but didn’t think it would be my cup-o-tea! I was wrong, I loved how these images came out! But there was one big problem with this roll of film, me… Let me explain.
I used the same camera/lens combo for all the films I tried - the Bronica GS-1. Whilst I was loading the Purple - I noticed the film leader and distance to the ‘Start’ markers on the backing paper was quite short. As I wound the film on to get to ‘shot 1’ - I was convinced the film was not being collected by the pick-up spool!

I hastily opened the back of the camera (believing the film would still be unwound) only to find the film had been collected correctly and I’d just exposed the first shot - what an idiot… but it gets worse. When I close the film back, it obviously resets the shot counter as if it’s loading a new film!

I quickly applied a bit of logic and switched to multiple exposure mode (thinking this would move the film counter on but not advance the film) - again, I managed to mess that up and what’s the result of all this stupidity - I wasted about half the roll of I’ll! There is a price to pay for this level of stupidity and when you shoot film, that price can quickly add up!

However, I did manage to get a few shots on the roll and I’m glad I did because I love how this film looks! This is the answer to all of my 'Vanilla’ Portra shooting and is so far removed from my normal style! It really did put a smile on my face as I was scanning the negatives and seeing those bright, bold colours shine through!

I’ll admit, I’m sure this film won’t be for everybody and I certainly preferred the way it renders vegetation/sky rather than what it does in urban environments. However, it was great fun to shoot with and I wouldn’t hesitate in shooting with it again! Sure, you can adjust hue in Lightroom to get a similar look but where’s the fun in that and the one thing this film stuck is, is fun!
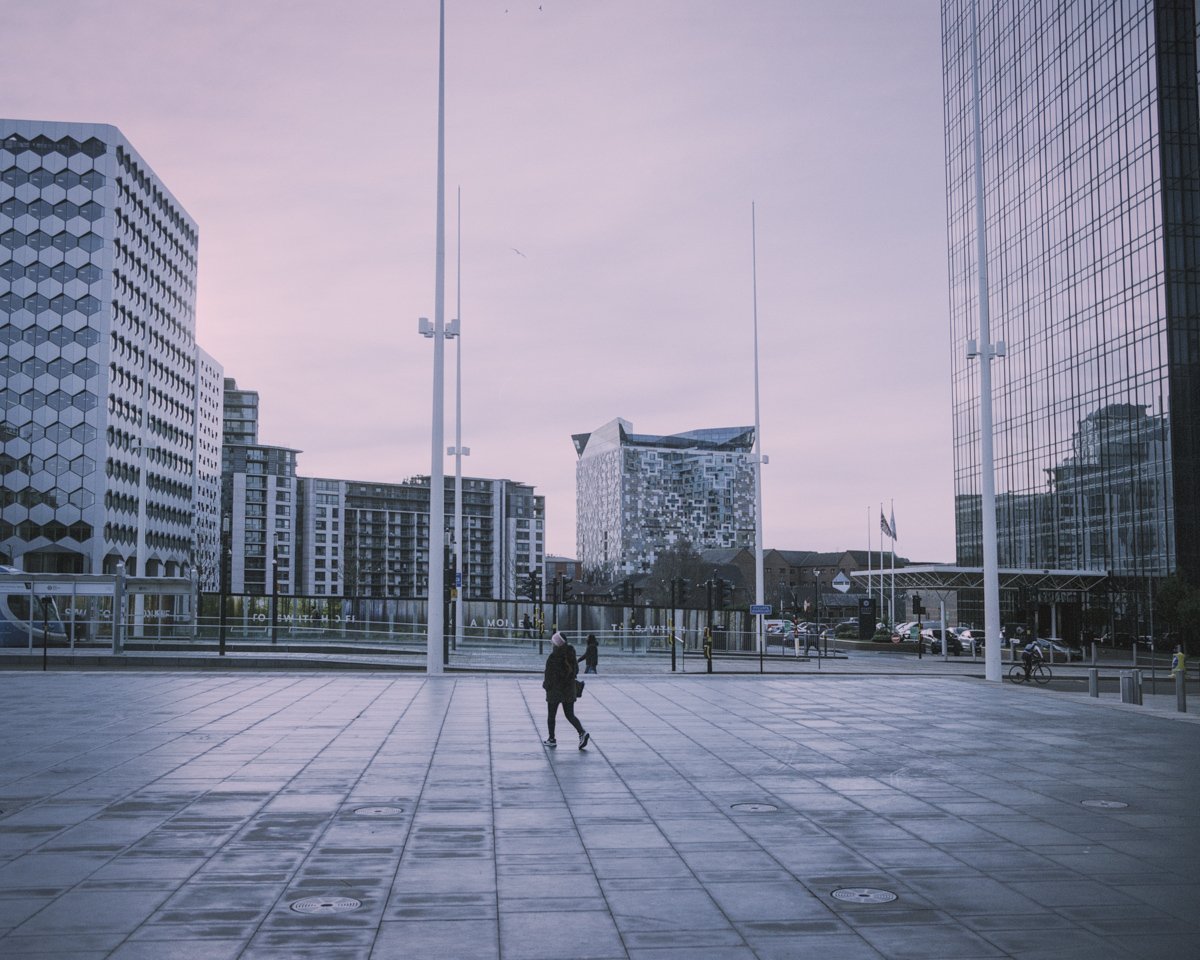
LOMOGRAPHY LOMO 800
So on a more serious level, this film is one that I was very excited to shoot with. Not because it has any weird or wonderful quirks but because it is probably most similar to a ‘standard’ colour negative film - albeit an 800 speed film. This film wouldn’t give me anything strange or peculiar, but if it was a decent alternative to Portra 800 then I’m here for it, as the kids say…

Shooting the film raised one important question - do I shoot in the day, or in the night. Obviously, ISO 800 lends itself to slightly lower light conditions but I thought I’d fire off at least one late afternoon shot, just to see how it does. I wish I’d shot a lot more in the daylight! I think this film looks awesome in a sunset/soft light scenario! The soft pastel tones, beautiful grain structure and slightly warm feel make this film ideal for these kinds of scenarios!

However, I’d banked on it being a film I could use at night and guess what, it excelled in that department too! The 800 speed meant that my exposures didn’t need to be super long! I overexposed by about a stop and the longest exposure I was getting (in normal shooting conditions) was around two seconds. For a couple of shots, I did choose intentionally to stop down a little and get a bit more movement in the light trails.


This film worked wonderfully in the dark and I’m very impressed by the results. My only slight concern is the warmer base tone that comes through - but this is obviously easily corrected in post. If I was to have another, very mild criticism of the film it’s that the negatives themselves felt a little bit thinner than normal and therefore, were prone to curling. I honestly don’t know if this is me being super sensitive or if most 800 speed films are like this, but it’s something to be mindful of.


That said, I would have no problem buying a whole bunch of this film as my go to low light option. More so, I would also buy a load to shoot in the day/dusk as I think this would be a fantastic option. I’ve often heard good things about Lomo 800 and I can say that I am a well paid-up, ticket holding member on that particular band-wagon!
MY FINAL THOUGHTS…
I had so much fun shooting these films. I have felt for a while that I need a change of speed with my film photography and shooting these stocks has highlighted that there is so much more to film photography than the old favourites! Would I use these films on a daily basis, possibly not but I can argue a good case for projects shot in each of these films and that is something that I’m sure I will do!

Lomography is more than just a retailer though and this is the message that I really wanted to get across. Brands like Lomography are at the heart of film photography and are opening up a world of possibilities to people like me and hopefully, you. From their cameras and films to their absolute enthusiasm about the community, it’s great to see brands not just trying to ‘sell’ us something, but genuinely caring about the people that matter, the creative process and the end results! Long live Lomography…


About the Author - Ross Jukes is a professional Photographer and Videographer with over a decade of experience. Working in both Digital and Analogue formats, Ross has worked with international clients, had his worked published numerous times and exhibited his work extensively. With a passion for all things photographic, Ross combines his experience, enthusiasm and dedication to his art form to create engaging and educational content for the photographic community.

Disclaimer: All links to Amazon UK are affiliated links - you will still pay the same price but I will receive a small commission for providing the link. All information provided in this blog is intended either for educational or entertainment purposes and is accurate to the best knowledge of the author. However, further research/professional advice should be sort before making purchases/implementing any advice given and no responsibility is taken by the author or parties mentioned here within.

2022 in Review - Looking back at a crazy year!
To say that 2022 has been an odd year would be a bit of understatement. Everybody knows that the last few years have been a challenge. The 2020 Pandemic ruined lives, businesses and the economy and things were not too much rosier in 2021! So I think we were all hoping that 2022 might finally be the year where things felt a bit more normal.


Well, if financial uncertainty, global events and a sense of impending doom were the overarching feelings of the previous couple of years, 2022 was pretty much standard in that case. However, I don’t want to look back on a year and just complain about the doom and gloom. I just think it’s important to acknowledge that this has been a very testing time for everyone and 2023 is likely to be just as difficult!
Slow Beginnings
Being self employed has taught me one thing and that is that it’s a very unpredictable lifestyle. One week you can be run off your feet and the next it's Crickets and you start panicking that you’ll be out of business by the weekend! Well that is how January felt for me. Although there were a few interesting little jobs, there is always a bit of a delay as clients and business get back into their own rhythm.


By February and March, things were getting much more into a steady routine and work was coming through from regular clients again. Two in particular were Aston Villa Football Club who were updating some of their hospitality offerings and Tom White Waste, who need to rebrand their website and took the chance to capture new imagery.
Both clients required multiple day shoots and as with every late Winter/early Spring shoot - the weather would have a big impact on both jobs. Planning is essential but also being completely up front and honest with clients is strongly advised. Having a ‘Plan B’ if the weather is too bad to shoot is pretty much essential at that time of year.


Interestingly, a lot of my clients throughout 2022 required a lot more video in addition to traditional photography and this allowed me to really stretch myself both in terms of learning new techniques and in the gear I use. Throughout the Spring I had to update my main camera, I plumped for the Canon R5C for those that are interested - as well as buying a lot of additional lighting and sound recording gear.
The additional investment was fully justified as the work continued to come in and having the peace-of-mind knowing that the equipment could handle all of the clients requirements was worth the outlay alone.
Things were heating up!
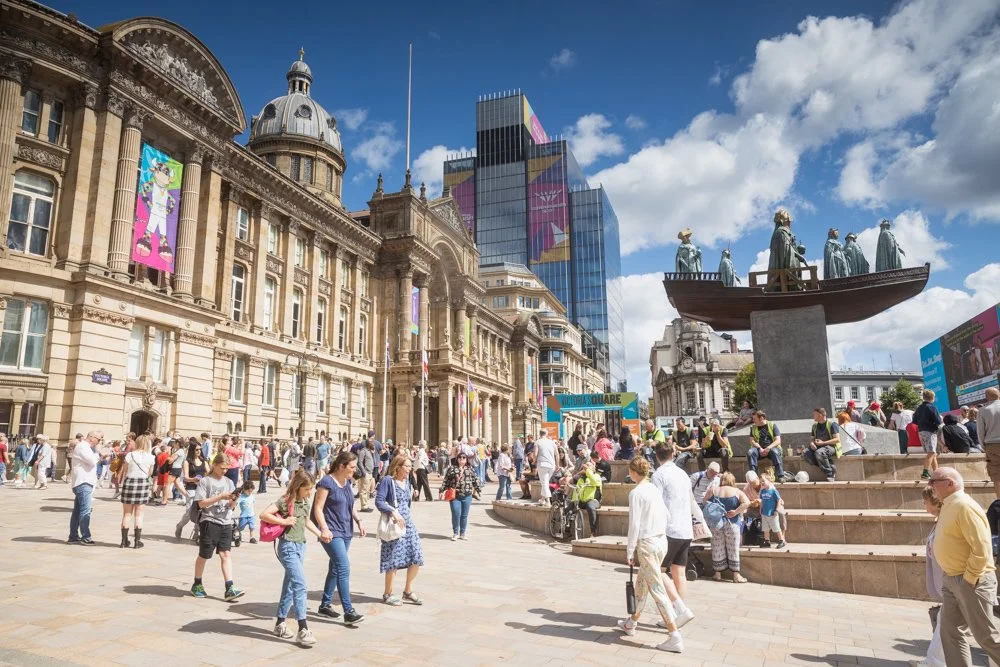
Going into the Summer, I was more than aware that it was going to be a big one as Birmingham was due to host the Commonwealth Games. This was massive for the city when I was asked to help capture certain events, I was completely over-the-moon. I’ll be writing a post in more detail about the experience but it was two weeks of utter madness with long days, huge amounts of editing and physical exhaustion by the end of it! I loved every second though and our amazing city completely smashed it!


By this point, the weather was also going into overdrive with the UK recording record breaking temperatures and for the first time ever, I had to adjust a shooting schedule because it was too hot to work! I’m used to dragging myself out in the depths of Winter but I couldn’t quite believe we had to reschedule shoots because of the risk of heatstroke and worse - a wise decision though and one that I’m glad the clients agreed with!
Birmingham’s incredible Summer continued as Unboxxed brought their ‘Polinations’ event to Victoria Square. In the space just a couple of weeks, the square had been transformed from the hub of the Commonwealth Games (outside of Alexandra Stadium!) and into a mystical forest complete with evening light shows. It was a complete spectacle and one that I was once again, very proud to be part of.


I went on to shoot several more events with Unboxxed which involved exploring a converted oil rig in Weston Super-Mare, complete with plants, a huge cascading waterfall and eyes! However, that was just the tip of the iceberg they also had me photograph the solar system! No telescope needed though, this was a scale model laid out across Liverpool! Though it spanned some 10km so after walking to Pluto multiple times, I was ready for some time off!


That wasn’t a possibility though as between regular clients and huge events, I was having my busiest year ever! It’s not uncommon to work seven days a week when you’re self-employed and this was certainly the case for me. Regular shoots and huge amounts of editing were slowly but surely taking their toll. I never complain about being busy, it’s a privilege to be in this position - but self-care is equally, if not more important than work!
Finding a balance…
By the late Summer/early Autumn, I need to reset a little and find a bit of time to decompress after a very hectic few months. I don’t have too many means of escape, I like a drink but have to stay level headed, I like football but I’m commonly working on match-days. So I turned to the one thing that gives me a huge amount of pleasure and that is film photography.
I had purchased a new camera in particular that I was really excited to use and set about finding time wherever I could to get out with it. The camera in question was a Bronica GS-1. It’s a medium format beast that is commonly overlooked in favour of the Mamiya RB/Z67 or the Pentax 67 systems.


When I first picked it up, I knew it was the right choice for me though. It is slightly smaller than its competition (but in no way a small camera!) but still produces a huge 6x7 negative and had a beautiful waist-level viewfinder that makes everything look amazing. It was a pleasure to be out shooting film but the work kept coming in.
By mid-Autumn, I’d already worked with around 15 new clients in addition to my regulars. This was quite mind blowing to me as I was already passing work over to fellow photographers - something I love to do if I get the opportunity. This did mean that there wasn’t going to be any big holidays or adventures this year - not too much of a problem in a cost of living crisis!
Gearing up for Christmas…
Going into the final few months of the year, I was very conscious that I would start getting enquiries about prints etc. for presents. This is brilliant as it’s always special for me to see my work in print. I decided not to push this too much as I am really aware that lot’s of people have been struggling financially this year.


Being completely honest, this year has been a struggle for me as well, regardless of being incredibly busy. Personal situations and living conditions have been a huge strain and being financially conscientious is a must! This all lead me to think that this really isn’t the year to be encouraging any unnecessary ‘gifting’ for gifts sake - though I always appreciate anyone who likes my work enough to hang it on their walls!
Throughout the year another issue cropped up that I had never seen coming. I was working more & more in other cities from Brighton to Edinburgh and many place in between! However, rail strikes had a big impact on getting too and from many of those jobs and having good ‘Plan B’s’ were essential.
Looking ahead…
I often have to pinch myself and I still find it amazing that people pay me to do something that I get so much pleasure from. I’ve already start booking jobs for January & February and can’t wait to get stuck into next year.


I have a few more personal plans next year and need to take a bit of personal time out to make sure I’m in a good place mentally & physically. 2022 threw up and few nasty surprises and more than ever, I’m realising that taking care of myself is a huge priority!
I’m also looking forward to getting out with the film camera more and actually sharing some of the results! I pretty much didn’t post to any social media for the entirety of 2022! Again, I will be writing a post sharing a bit more detail about this but all-in-all, I feel ready to start engaging a little more next year.


Finally, I am always looking forward to working with existing clients and get very excited about working with new people. I love meeting new people and can’t wait to see who I get to meet in 2023 and what experiences that might lead too!
A huge thank you…
More importantly than anything, I want to say a huge ‘thank you’ to anyone that I’ve worked with, anyone that has asked me to do more than one job! Anyone who has been on a 1-2-1 with me or purchased a print! Also, anyone that has simply dropped me a message or left a comment on social media - I’m truly thankful for any kind of support that I receive!
I can’t wait to get stuck into 2023 and wish you all an amazing Christmas and New Year! :)
About the Author - Ross Jukes is a professional Photographer and Videographer with over a decade of experience. Working in both Digital and Analogue formats, Ross has worked with international clients, had his worked published numerous times and exhibited his work extensively. With a passion for all things photographic, Ross combines his experience, enthusiasm and dedication to his art form to create engaging and educational content for the photographic community.
Disclaimer: All links to Amazon UK are affiliated links - you will still pay the same price but I will receive a small commission for providing the link. All information provided in this blog is intended either for educational or entertainment purposes and is accurate to the best knowledge of the author. However, further research/professional advice should be sort before making purchases/implementing any advice given and no responsibility is taken by the author or parties mentioned here within.

My Top 10 Cameras of 2022!
As the year comes to an end, I thought it would be interesting to take a look at some of my favourite cameras that I have used in the last 12 months. I use a camera every day for work, but I also take a huge amount of pleasure from just picking up a camera and going for a walk.
my favourite cameras in 2022
As the year comes to an end, I thought it would be interesting to take a look at some of my favourite cameras that I have used in the last 12 months. I use a camera every day for work, but I also take a huge amount of pleasure from just picking up a camera and going for a walk. This means that cameras do different things for me, some are work horses for specific jobs, some are purely for the user experience!
As I shoot more and more film, I’ve learnt that I really enjoy the slower process. Taking time to compose images, check exposure and the mystery of how it will come out is thrilling. With this in mind, you can probably guess that if I could only use one camera, it would probably be film (and medium format at that!).
That said, I have had to upgrade my camera this year and the new ‘daily driver’ has been interesting to say the least! However, I have also found myself exploring digital cameras for everyday use and have been really enjoying the journey. Film prices have made it difficult to justify taking an analogue camera out every time so finding a digital camera with an analogue feel was essential! Let’s get into the list…
PLEASE NOTE: I PURCHASED ALL OF THESE ITEMS WITH MY OWN MOMEY AND NO PAYMENT OR CONTROL WAS EXCHANGED FOR PUBLISHING THIS UNBIASED REVIEW

10 - Koni Omega Rapid M
Coming in at ten but by no means a bad camera os the Koni Omega Rapid M. This was a bit of a random purchase for me and not really something I had spent a lot of time researching. The only thing that really stood out to me was the 6x7 aspect ratio. I knew that I was never going to afford a Mamya 7ii or the like so when I found out about the Koni, I was intrigued.

The Koni Omega Rapid M is capable of some really sharp images
However, when I saw the prices, I was immediately sold on the idea. Coming in at a fraction of the prices of the trendy Mamiya, it almost seemed silly not to at least give it a go. My major concern was finding a decent example. My eBay searches were mainly bringing up cameras located in Japan. I wasn’t concerned about importing one but as luck would have it, one popped up in the UK and I quickly snapped it up!
The camera is simple to use (with one of the coolest shutter advances I’ve ever seen - imagine cocking some kind of vintage gun!). The ergonomics of the camera are not great, it’s bulky, heavy and a bit of a pain to carry around. However, the results are fantastic and certainly make me wonder why anyone would spend more for the Mamiya (apart form maybe the weight and user experience!).

9 - Fuji X10
Next up is a very recent purchase and I’ve recently posted a review about this camera, so I won’t go into too much detail here. The more I use it though, the more I enjoy it. This little camera fits so well in a pocket and for me, the results are certainly good enough that it justifies living in my pocket.

Need I say more about the little Fuji X10?
Possibly my biggest wish for this camera would be the low light performance. Whereas it is perfectly capable of getting a good image in darker conditions, it takes work. Given the age of the camera though, I really am nitpicking and this is a great little camera to use in most other circumstances.

8 - Fuji X100V
For many, seeing the mighty X100V languishing down in eighth might seem completely foolish. However, I have really had to try to love this camera. It is probably the closest thing to the perfect pocket camera out there in 2022. However, my main gripe is it’s barely pocketable!

The Fuji X100V can produced super rich and vibrant images
I love the images that can be had from this camera and the looks, ergonomics and user experience are all fantastic. Trying to fit it in a pocket is not such a good experience. In the winter months, when big coats are a must, it’s a great camera to carry. In the summer though, if you’re going out in jeans and a T-shirt, you’re going to need to bring a bag!

7 - Canon Eos R
Many people may assume I’ve completely lost my mind to see the Eos R even on the list, let alone ahead of the X100V. However, this camera has been a complete workhorse for me and even though it may not be my ‘main’ camera anymore, it still makes for a fantastic second camera.

The Canon Eos R once again proving why I can’t let it go…
When it was released, the ‘R’ got a lukewarm reception to say the least. For me, the ergonomics are great, it’s reliable in most circumstances and my style of work, the results are more than acceptable. With decent video quality and a pretty snappy autofocus system, this camera has been rocksolid and still earns a place in my camera bag.

6 - Yashica Mat 124 G
The Yashica Mat 124 G is a pretty legendary camera. An affordable alternative to the Rollei counterparts, this is a common starting point for the entry to the world of TLR’s. I picked up a very clean example at auction and even at the time, I knew I was paying over the odds but I’m glad I did!

The Yashica Mat 124 G is a much loved camera for a reason…
It’s a super simple camera to use and TLR’s by their very nature are just a joy to use! I’ve had so much fun using this camera and produced some of my favourite images from this year on it. If you’re in the market for a TLR and find a good example at the right prices, I wouldn’t think twice about grabbing one!

5 - Canon P Rangefinder
The Canon P was probably the 35mm camera that really got me interested in analogue photography, I think the camera is beautiful and is an absolute joy to use! I can’t really compare this to the Leica alternatives but considering you’ll be paying over ten times more for a Leica, I’m certainly happy with the P!

The Canon P Rangefinder is such a funny camera to carry…
The biggest downside of the P for me personally is that it’s not medium format. I simply prefer the image quality and detail from the larger negative and I would almost always pick up one of the bigger cameras over the P every time. It’s such a shame though as this is a beautiful camera and I would absolutely recommend it if you’re not interested in film size!

4 - Mamiya 645 Pro TL
Ok, so this camera being so high up on the list is quite a surprise to me! It’s a great camera and having owned the ‘Pro’ - I picked up a ‘Pro TL’ as it was such a good deal! However, the 645 negative size never really did it for me and I found myself leaning towards other cameras.

The Mamiya 645 Pro TL can produce images to rival almost any medium format camera…
That was until film prices went through the roof in 2022 and I have to admit, I’ve found myself using this camera more and more. It’s a fantastically versatile camera and produces great results. I always class it as more of an ‘entry level’ medium format camera but I admit, that’s complete rubbish - this is a very capable camera one that I will be shooting with more next year!

3 - Leica M8
OK, so I admit that this camera was a complete indulgence and you can find out more about it in my first impressions. That said, I absolutely love this camera and once you get past the price tag, it actually suits many of my wishes from a camera! The shooting experience is great, it feels solid in the hand and the results that you can get from it are incredible.
The Leica M8 has a truly ‘film’ camera feel with most of the benefits of digital…
Obviously, it’s completely perfect. It’s practically useless in anything other than good light and can feel a bit chunky at times (though that is the ‘classic’ Leica feel). More concerning though is the potential for weird artifacts in the image and knowing that the M9 had a bit of a sensor issue, it’s always nagging in the back of my mind that it could just die!

2 - Canon R5C
Right, so this is the big one! This is the camera that I upgraded too and I’m so glad that I did. I will be doing a review of it but needless to say, I love this camera. The results that you can achieve from this thing (both in photo and video) completely justify the hefty price tag!

The Canon R5C is a remarkable camera and I will do a full review soon…
However, this is a complete ‘tool’ and it is only used that way. In fact, I don’t think I’ve take it out once to shoot for pleasure. The main reason being that this camera is not one camera, it’s two! It has two separate operating systems for photo and video. The ergonomics for a photo camera are not the greatest and there are a few cameras I would rather pick up ahead of this.
With all that said though, this is a fantastic camera though and hasn’t missed a beat when it comes to commercial work. In an ideal world, I would probably have separate photo and video cameras but with all the features this camera packs in, I’d be spending a lot more money for that privilege!

1 - Bronica GS-1
Well, this is quite the turn up for the books… I spent a long time looking at the Mamiya RB67 and the Pentax 67 to fulfill my six by seven desires. The more research I did, I kept coming across the ‘underrated’ Bronica GS-1. According to all of the reviews, the size, weight and usability of the ‘Bronnie’ were all better than the aforementioned options!

The Bronica GS-1 is a special camera and I will do a full write up very soon!
However, having now used all three, I can honestly say I am happy with my choice and I absolutely love this camera! The waist level viewfinder is beautifully clear, the shooting experience is a pleasure and I can walk around with this camera all day and not feel too concerned about weight!
The thing that really got me though are the results that can be had with this camera! I have picked up a few lenses and keep finding myself gravitating back to the 100mm. Given the choice of all the cameras I own, this is the one that I would be picking up if I could only use one camera!
So there you have it, that’s pretty much my year in cameras and unless anything major happens, these are the ones I will be using the most in 2023 as well! I’d love to hear your thoughts on the list though and what would you pick? Happy shooting in 2023!
Disclaimer: All links to Amazon UK are affiliated links - you will still pay the same price but I will receive a small commission for providing the link. All information provided in this blog is intended either for educational or entertainment purposes and is accurate to the best knowledge of the author. However, further research/professional advice should be sort before making purchases/implementing any advice given and no responsibility is taken by the author or parties mentioned here within.

Leica M8 - My First Impressions...
I'm not going to justify this camera as anything other than a very, very expensive indulgence. For the same money I could buy a modern offering from Canon or Sony that would blow the M8 out of the water in every single department. But that's no the point here. This camera is as much about the process as it is the somewhat sketchy results.

Finding the Perfect Camera
For the last few years, I have been on the hunt for the perfect camera. I have a pretty simple criteria, it must be small, fun to use and produce stunning images! Easy enough then, right?
Watch the video for my thoughts on the Leica M8 in 2024!
Well judging by my purchase history, I have been struggling. That was, until I came across a video from the excellent One Month, Two Cameras (Ali) - a channel seemingly dedicated to the exact struggle of finding the perfect camera.
PLEASE NOTE: I PURCHASED THIS WITH MY OWN MOMEY AND NO PAYMENT OR CONTROL WAS EXCHANGED FOR PUBLISHING THIS UNBIASED REVIEW
Video Source - One Month Two Cameras via YouTube
Ali superbly explains why the Leica M8 is her (almost) perfect camera and it had me hooked. I just had the small task of raising the funds and hunting down a good condition M8. Over the coming weeks, I sold a bunch of cameras that simply were not being used and then trawled the internet for a good condition M8.

Grey days in Birmingham are a challenge for any camera…

Leica M8 making all trees look Autumnal…
Finally, I stumbled across a great condition M8 on MPB - a site dedicated to secondhand camera sales. At £1250, the little Leica was a little more than I'd planned to spend but it seemed to be around the average so I plucked up the courage and pulled the trigger! A few days later, I was in the Leica club and ready to go shoot!

First Impressions...
I was super excited to get the camera out of the box and my first thought when I picked the camera up was 'this thing is heavy!' Not so heavy that it's uncomfortable, far from it but it's definitely got some heft to it! It feels solid and all dials and buttons have a reassuring sturdiness to them.

The body itself is very simple. It has the unmistakable Leica shape. The shut release and shutter speed dial and perfectly located on the top plate. There is a small but very useful LED display on the top for shots remaining and battery life, two delicate subjects that we'll talk more about later.


“The body itself is very simple. It has the unmistakable Leica shape.”

On the rear of the camera, there is a small and underwhelming LCD screen (keep in mind this is a camera from 2006!). Next to the screen is a small d-pad for navigating the menu. On the bottom of the camera is the familiar Leica style plate that must be removed to access the battery and SD card slot.

I quickly grabbed a Canon 50mm lens and an adapter so that it would fit my new Leica and started grabbing shots. The first thing I noticed was the big, bright viewfinder. I'm pretty familiar with using rangefinder cameras these days and this is the best viewfinder I've used by some distance. The frame-lines are clearly visible and accurate. The rangefinder patch itself is bright and contrasty enough to make focussing simple.

I fired shot after shot (mostly of the cat!) and instantly fell in love with the sound of the shutter. It is not discreet! It has a significant clunk to it which more than satisfies my 'digital camera that feels like a film camera' needs. In fact, short of a manual advance lever (and maybe scrapping the LCD screen etc) this camera basically feels like a Leica M6 - one of the most coveted 35mm film cameras out there.
A Rocky Start...
It's safe to say that my first impressions were overwhelmingly positive. I quickly bagged up my new baby and hit the streets. I was keen to see what the real world performance of the camera was and to overcome some of the issues I knew that I was going to have, and they were some biggies!

I knew going into this purchase that there were two main problems that the M8 had. Firstly, there is basically no Infra-red filter on the camera. This helps keep images sharp, and they are! But it also does funny things to the colours. Greens take on a yellowy burnt kind of look and synthetic blacks just come out purple.
This caused such an uproar on release that Leica had to send out IR Cut filters to all new owners to overcome the issue. I thought I could live with it. I very quickly realised I couldn't and a costly filter would need to be purchased. This was an easy fix, the next issue was not so simple to overcome.

This camera, as with many of its age is just not great in low light. I really wanted to be pleasantly surprised and in certain circumstances, I was. But it's safe to say that shooting at anything past dusk can have major limitations. More worryingly, the sensor is prone to some very strange artifacting - more-so in low light. I thought it might be infrequent, but already I was seeing some worrying signs.
The Sensor...
Now is probably as good of a time to talk about this cameras major strength, but also its biggest weakness. The sensor is an ASP-H size CCD sensor from Kodak. What does this mean? It has great colours. In the most simple sensor, the colours out of this camera have a very film like feel that nostalgia junkie like me go crazy for. This comes at a cost though.

That’s a worry from the M8 :(
Apart from low light performance not being great, there is also the small issue of this sensor just doing really strange things with no real indication of when it's going to happen. This makes it very difficult to account for. It seems more prominent in low light conditions but also scenes with difficult contrast. Either way, it is a major flaw.

Low light can be a challenge, but it can work!
It's important to remember that this is a 10-megapixel camera from 2006. Setting expectations is key to building a relationship with this camera. That £1250 price tag does make it a pretty difficult pill to swallow when you are not 100% sure that your image will come out clean or not. As a film shooter, this level of disappointment is something I've learnt to live with.
Getting to grips with it...
With some of the major issues out of the way, it's safe to say this camera is a beauty to use. One of the only potential issues I would note is the camera can be a bit difficult to carry. I have added a wrist strap and have ordered a grip for the camera. For such a costly camera, I thought it best to add something a bit more grippy!

Those colours though…
Talking of additions, the other 'elephant in the room' is lens choice. It won't come as any surprise that Leica glass is just as expensive as the Leica bodies. With that in mind, I wanted a wider field of view than what the Canon 50mm was giving me (with it's 1.33x crop on the ASP-H sensor, this feels more like 66mm). After some research, a happy middle ground of cost and performance was the Voigtlander 28mm Ultron Type II.
I've been really impressed with this little lens and will do a separate review soon. It's important to remember when getting into a system like this, there will always been things you need to add. I'm sure this lens will be the first of many additional items and IR Cut filters to go with any additional new lenses - this could get costly.
Video Source - Mattia Burling via YouTube
Final Thoughts...
I will do a full review in the near future but its pretty safe to say that I am very happy with the Leica M8. I've been really pleased with the files coming out of this camera. The images are sharp with great colours and enough of a vintage feel to them to satisfy my film-shooter tendencies.
The handling of this camera is great. It feels like a film camera and if it had a manual advance (like the Epson RD-1) it would be almost the perfect middle ground between film and digital! If nothing else though, it looks great and certainly turns heads when you're using it in the street - you may want to make sure it is insured!

This camera is not for everyone though. It pays to think of it as a film camera as it involves a lot of manual intervention to get good image out of it. You will definitely need to be present in the photography process and it is not a simple 'set and forget' shooting style. When it hits though, when the light is just right and plays ball, it is fantastic.
I'm not going to justify this camera as anything other than a very, very expensive indulgence. For the same money I could buy a modern offering from Canon or Sony that would blow the M8 out of the water in every single department. But that's no the point here. This camera is as much about the process as it is the somewhat sketchy results.

Obligatory mirror-selfie… Sorry…
All-in-all, I already love this camera! If you have been looking at one to purchase for yourself and you’re on the fence (and can afford it!) Do it! You’ll certainly have a lot of fun with it. It has some major flaws, but if you can look beyond the potential downsides, this is an amazing way into the world of Leica! Be warned, it’s a bad habit to get into though! :)

Disclaimer: All links to Amazon UK are affiliated links - you will still pay the same price but I will receive a small commission for providing the link. All information provided in this blog is intended either for educational or entertainment purposes and is accurate to the best knowledge of the author. However, further research/professional advice should be sort before making purchases/implementing any advice given and no responsibility is taken by the author or parties mentioned here within.

K&F Concept Tripod - The little tripod that can!
I have been in the market for a small, lightweight tripod for some time now and after trying a few different options, nothing seemed to be working for me. So when I received an email completely out of the blue, from K&F Concept asking if i would like to try one of their tripods, I jumped at the chance!

I have been in the market for a small, lightweight tripod for some time now and after trying a few different options, nothing seemed to be working for me. So when I received an email completely out of the blue, from K&F Concept asking if i would like to try one of their tripods, I jumped at the chance!
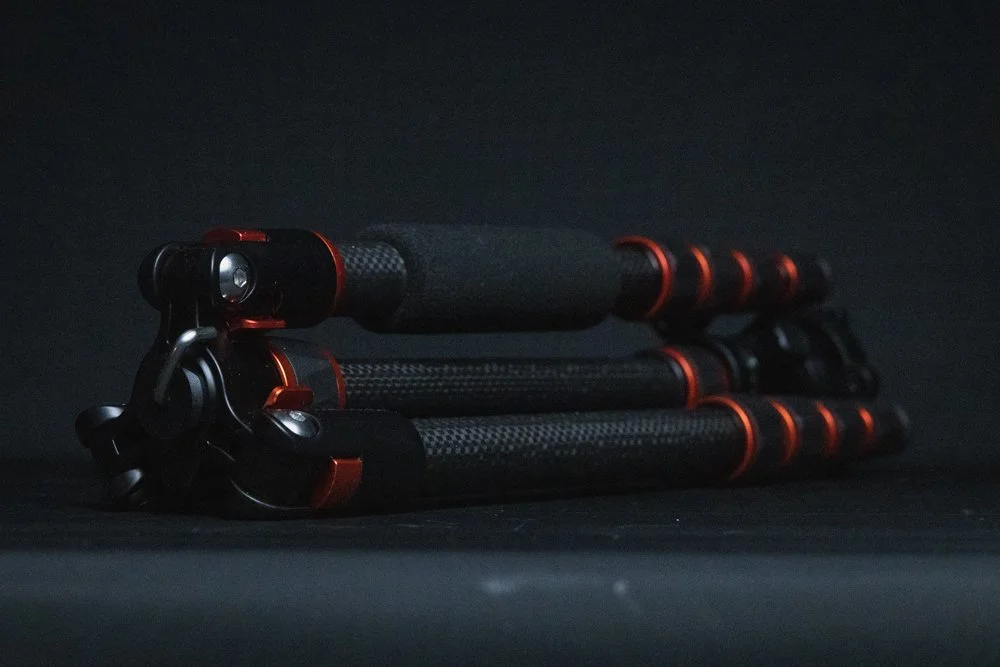
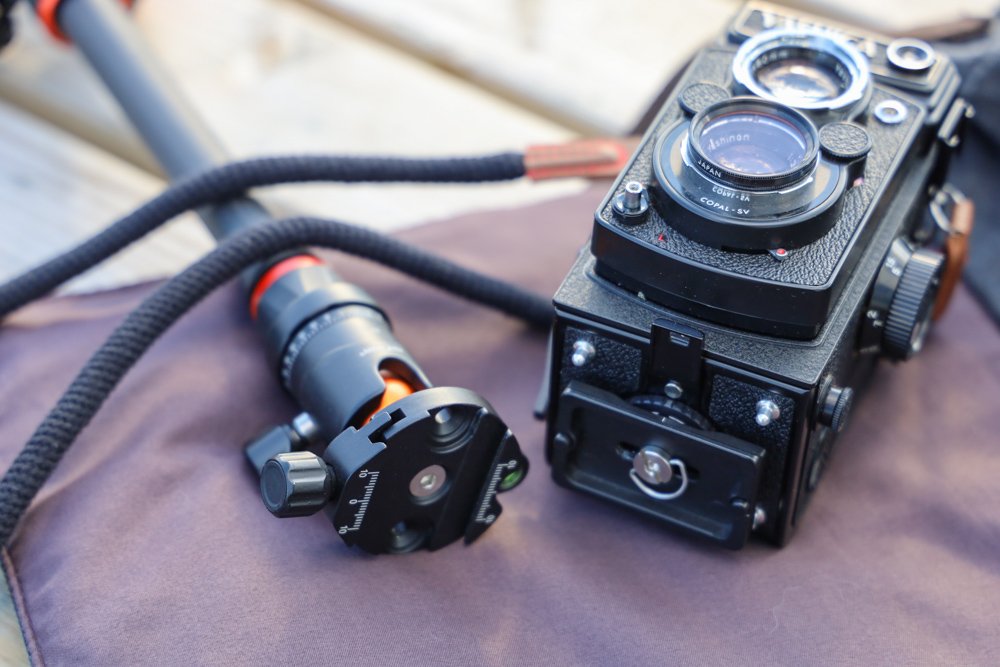
I’ve long been a fan of K&F Concept as a brand and had used their filters in the past. So I was very excited when the tripod arrived and as with all of their products, it was nicely packaged. I quickly unwrapped it and the first thing that struck me was how light the tripod was, it barely felt like i was holding anything - but more on the specs later!
“If you’re looking for a small, lightweight travel tripod that’s well built and versatille, they really don’t get much better than this”

WHAT’S IN THE BOX…
For a small, budget friendly tripod - K&F very generously provide you with a sleek bag to transport your tripod in, which is a great addition. Another bonus for me was that the tripod includes a ball-head, so no additional costs there and and Arca-Swiss style mounting plate, which matched my setup perfectly so that I could just leave the plate on my camera and use it on any of my tripods.


SIZE & WEIGHT
The tripod is very compact and is comparable to a 1 litre drinks bottle in it’s folded down state. One thing that always puts me off small tripods is that when they are folded down, they sometimes have awkward parts sticking out that can make it difficult to transport them. however, K&F have clearly put a lot of thought into how well it can be transported and I’m pleased to say, it folds down very compact and easy to handle.
Equally, there are no concerns on the weight front. I’m use to carrying a large tripod with a big geared head and it very quickly becomes a chore on long hikes! It was a genuine relief to be able to carry something that is barely noticeable that can be attached easily to the side of a bag or if you have enough space, inside a bag itself!


BUILD QUALITY
One thing that I have found with smaller tripods is that there is always a compromise when it comes to weight vs build quality. However, I’m pleased to say that this thing feels tough! The locking mechanisms all feel solid and the ball-head seems to stay in position with no movement, even at angles where I thought the weight of a camera might cause it a few problems. More importantly, the images that I have captured when using the tripod have all been sharp with no signs of movement of micro-jitters!
One thing to keep in mind is that this is still a small tripod with the main focus being on portability. The legs will flex with heavier cameras and longer lenses but in truth, you really should be using a larger tripod for bigger setups anyway. That said, I’ve still used my Canon Eos-R with 70-200mm EF lens & adapter and the tripod took the weight - I just used a two second timer to allow the camera to ‘settle’ after I pressed the shutter button and still got perfectly sharp images.
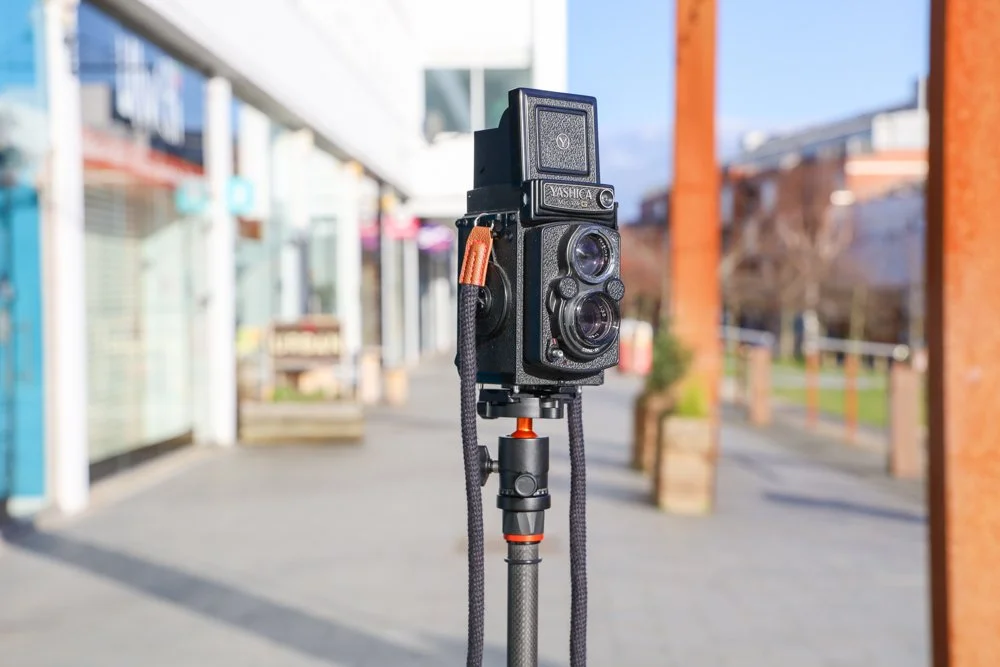
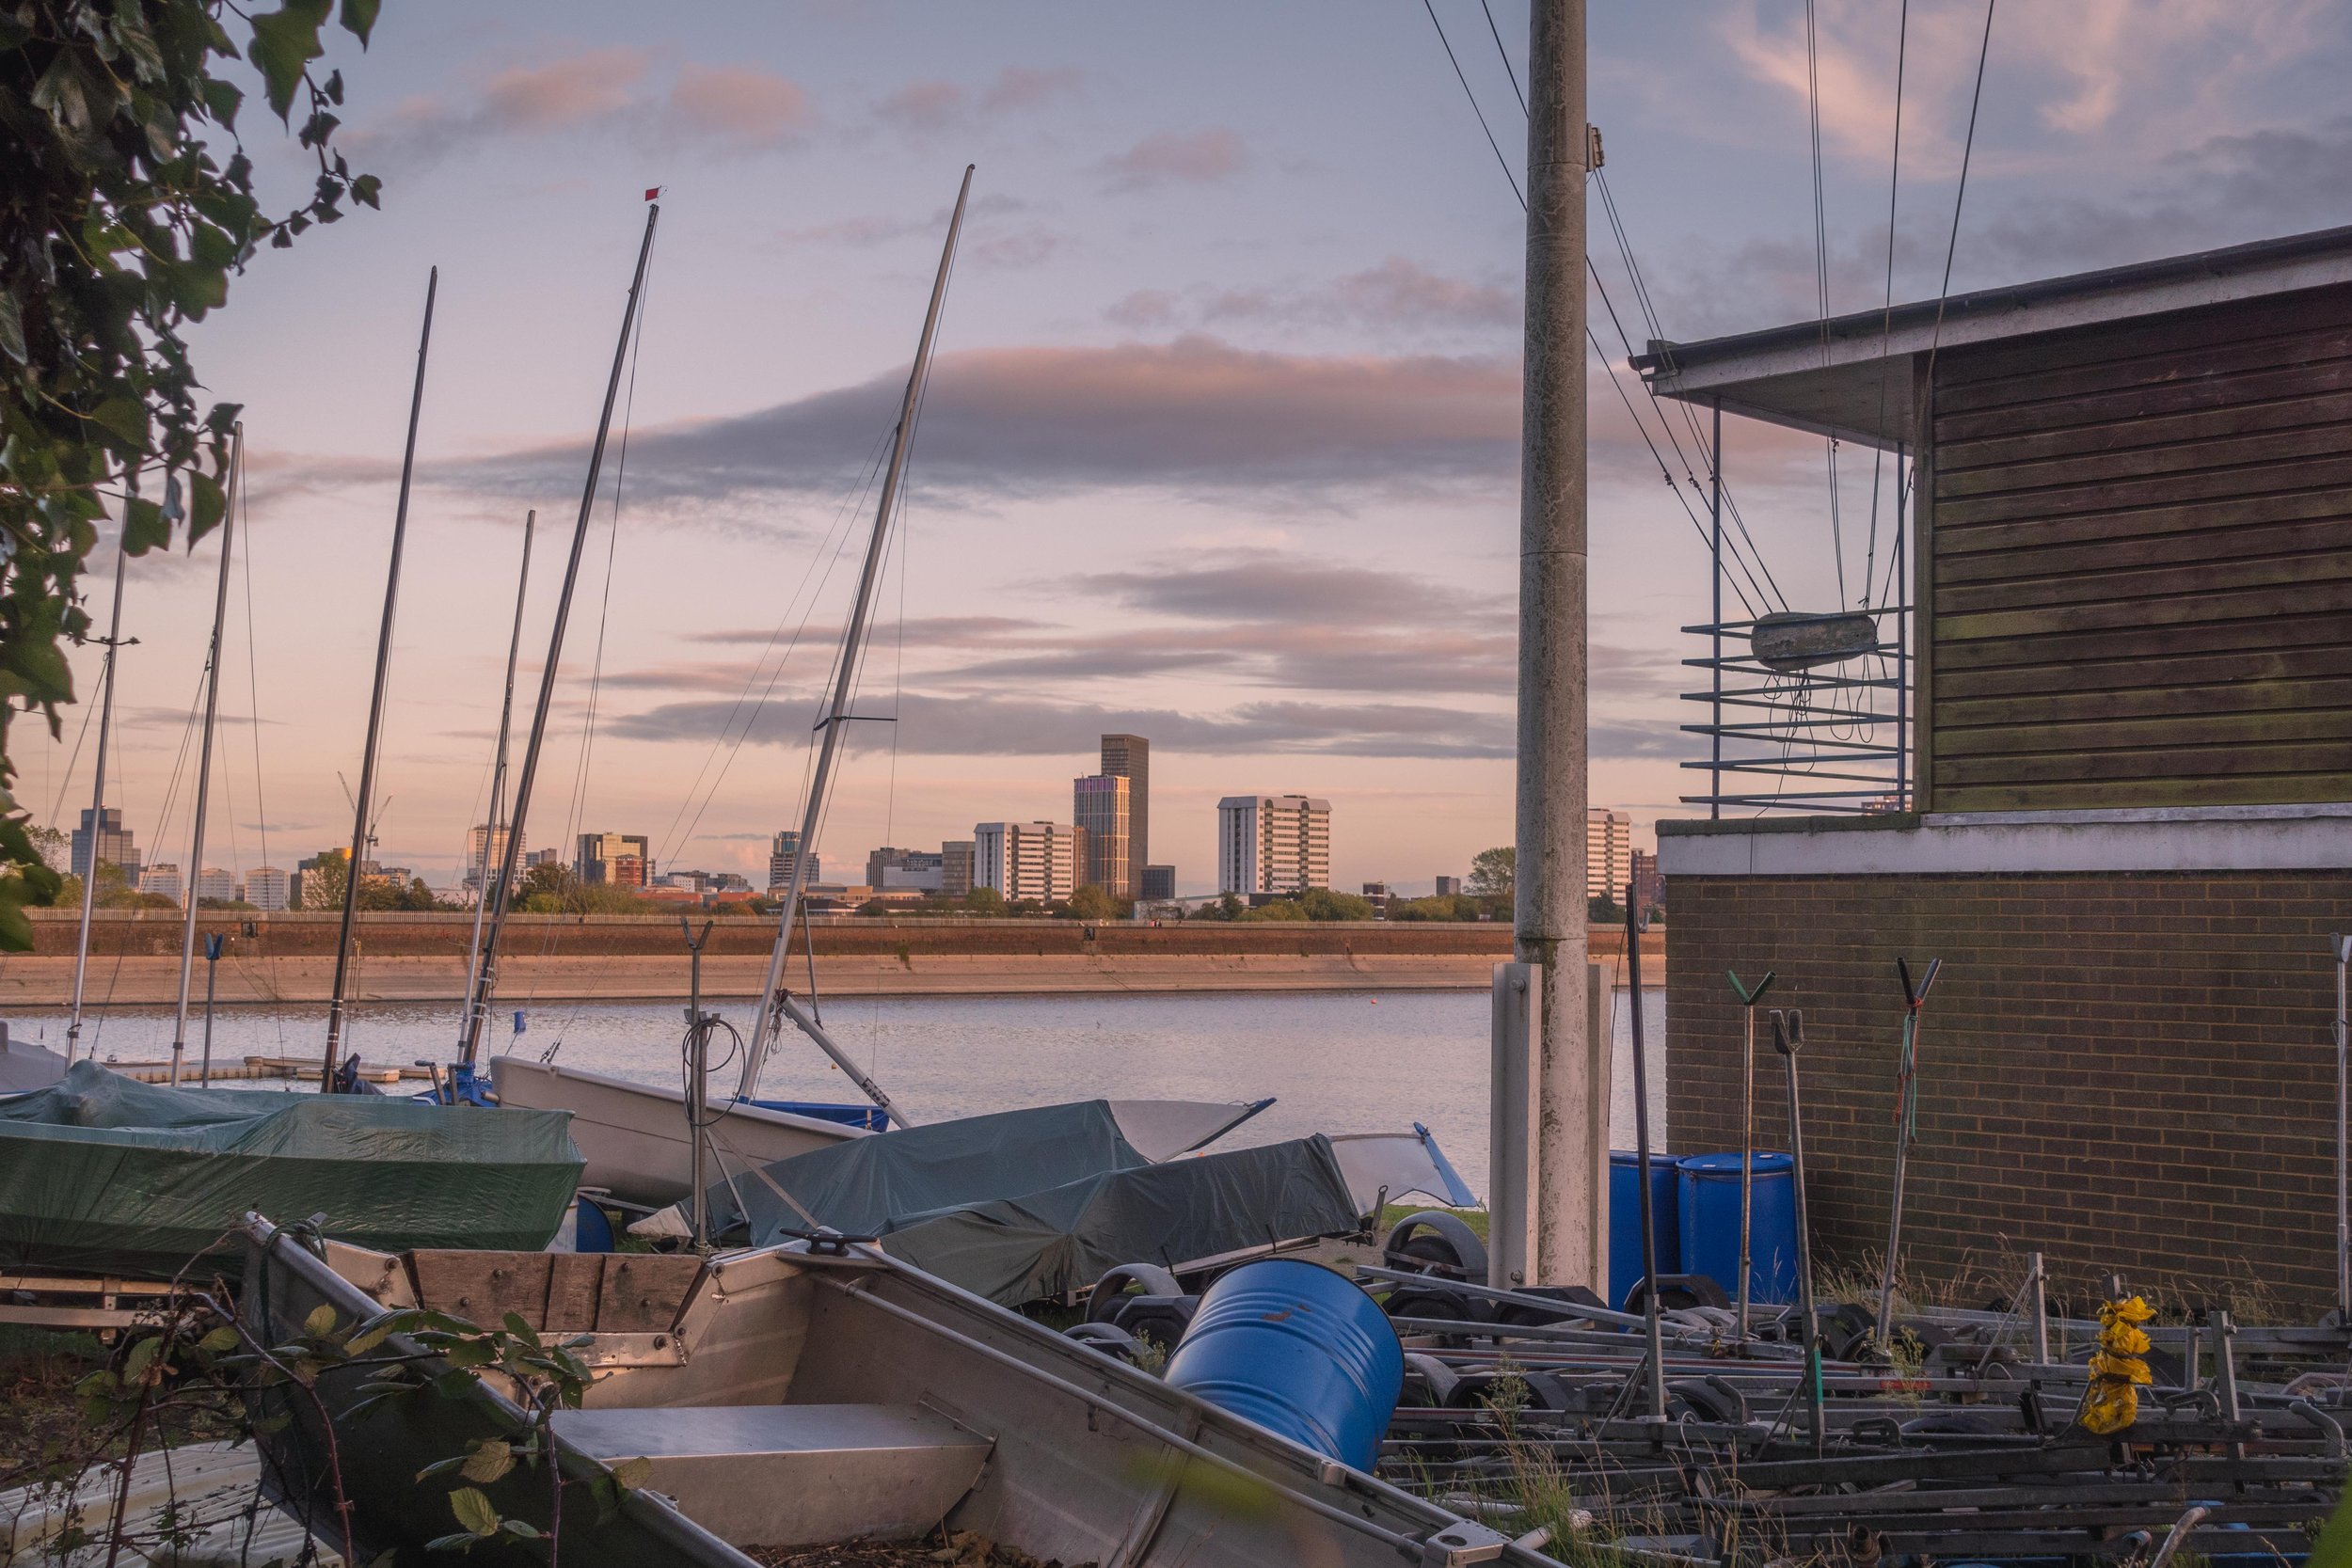
However, this tripod (for my use case anyway) is more for use with my analogue cameras when shooting at sunrise/sunset in lower light conditions can be more challenging. For that purpose, this tripod is fantastic and the build quality offers all the stability that I need!


KEY FEATURES
LOAD CAPACITY - 8kg/17.6lbs
MAXIMUM WORKING HEIGHT - 1520mm/59.84”
MINIMUM WORKING HEIGHT - 460mm/18.11”
FOLDED LENGTH - 350mm/13.78“
WEIGHT - 1013g/2.20lbs
MATERIAL - Carbon Fiber


USE CASES…
So by now, you’ve probably got a really good idea of what this tripod is all about. It really is designed to be the perfect travel companion. The light weight, compact nature of the tripod makes it ideal for those who need to be mobile and might not need a tripod on a regular basis - but as we all know, it’s better to have one and not need it, than to not have one at all!
If you are using larger cameras or doing particular technical work, such as architectural photography, you may benefit from something a little sturdier. However, for most use cases, this little tripod can get you through most situations. Even in stronger winds, you have the option to add weight to the tripod via the cleverly thought-out hook system and lowering the centre column will help with the balance of the tripod.
The overall versatility of the tripod makes it an ideal companion for those who aren’t quite sure what conditions they may come across. The leg sections articulate well and the brilliant little ballhead ensures that making quick adjustments to your composition is a breeze! I even think video shooters would see some value in having a lightweight tripod like this in scenarios where larger, fluidhead tripods may slow you down!


CONCLUSION
I’m sure you can probably tell by now, I love this little tripod. I think as long as you are fairly realistic with the weight of the gear you will be putting on it and the kind of conditions you plan to use it in, then this tripod will have you well covered!
From personal experience using this tripod, it has surpassed my original concerns and proved invaluable in many situations. As a film shooter, who needs to rely on a tripod in lot’s of different circumstances, it has been great having a tripod that is both easy to carry and quick to set up/take down.
This excellent option from K&F Concept ticks a lot of boxes and even though there may be sturdier tripods out there, many of them will come with a sacrifice of either size or weight. As a photographer that likes to travel light, setup quickly, grab my shot and then move on - this tripod is the perfect companion and one that many photographers should be checking out!
LINKS
GALLERY


I provide all of this content for free, so if you’d like to support me, please consider making a small donation ;)


Disclaimer: All links to Amazon UK are affiliated links - you will still pay the same price but I will receive a small commission for providing the link. All information provided in this blog is intended either for educational or entertainment purposes and is accurate to the best knowledge of the author. However, further research/professional advice should be sort before making purchases/implementing any advice given and no responsibility is taken by the author or parties mentioned here within.

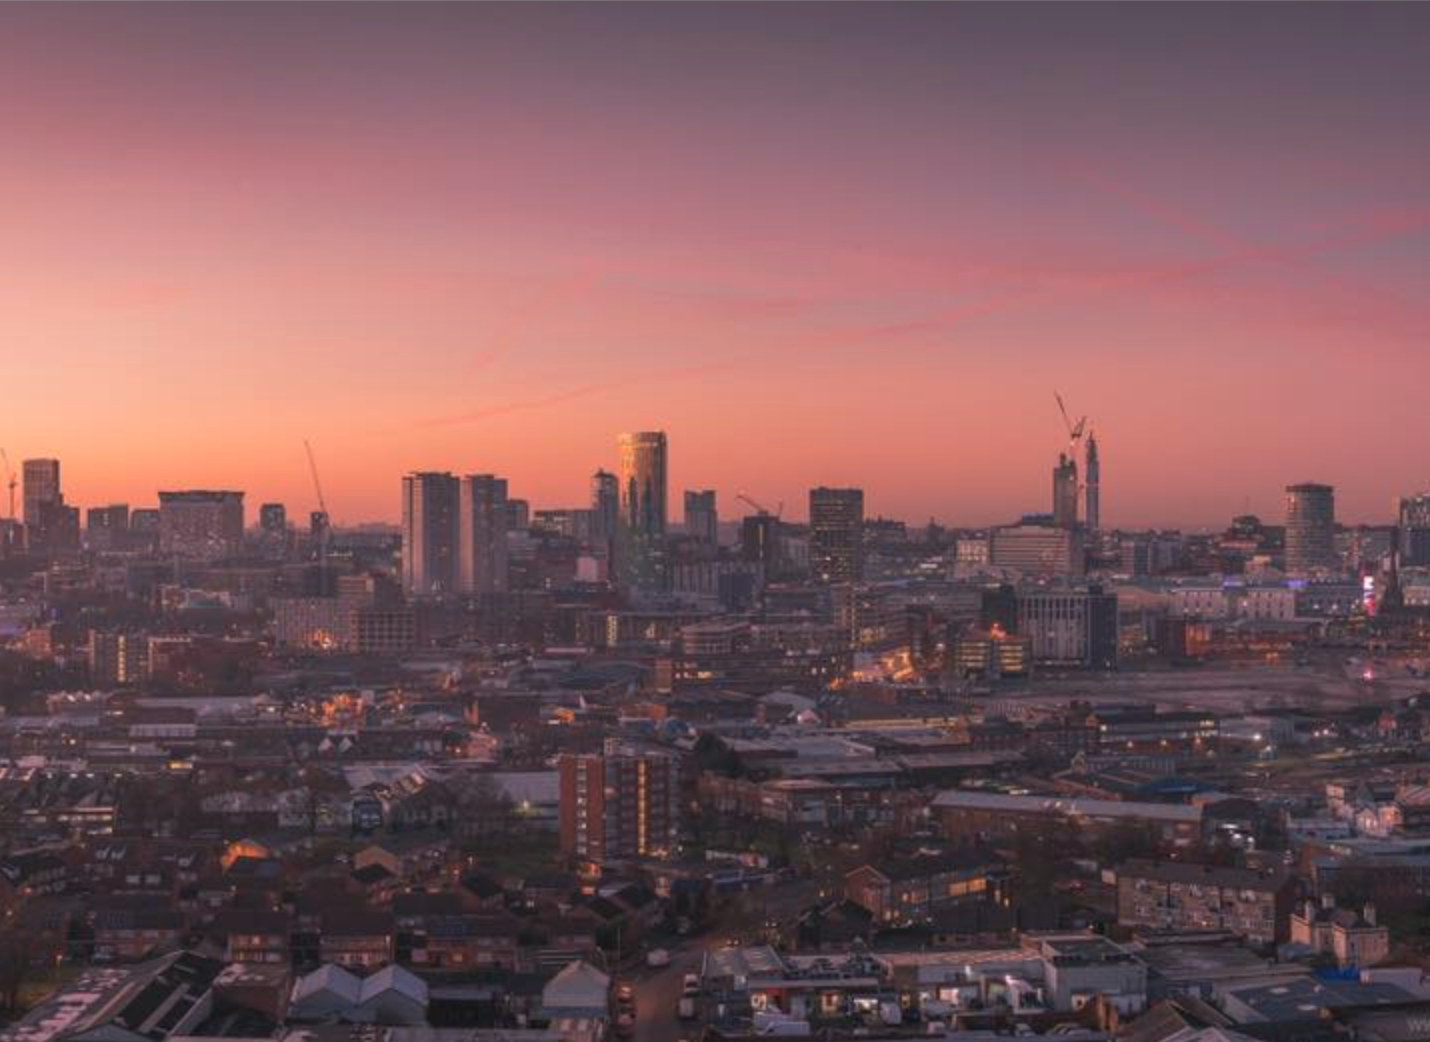
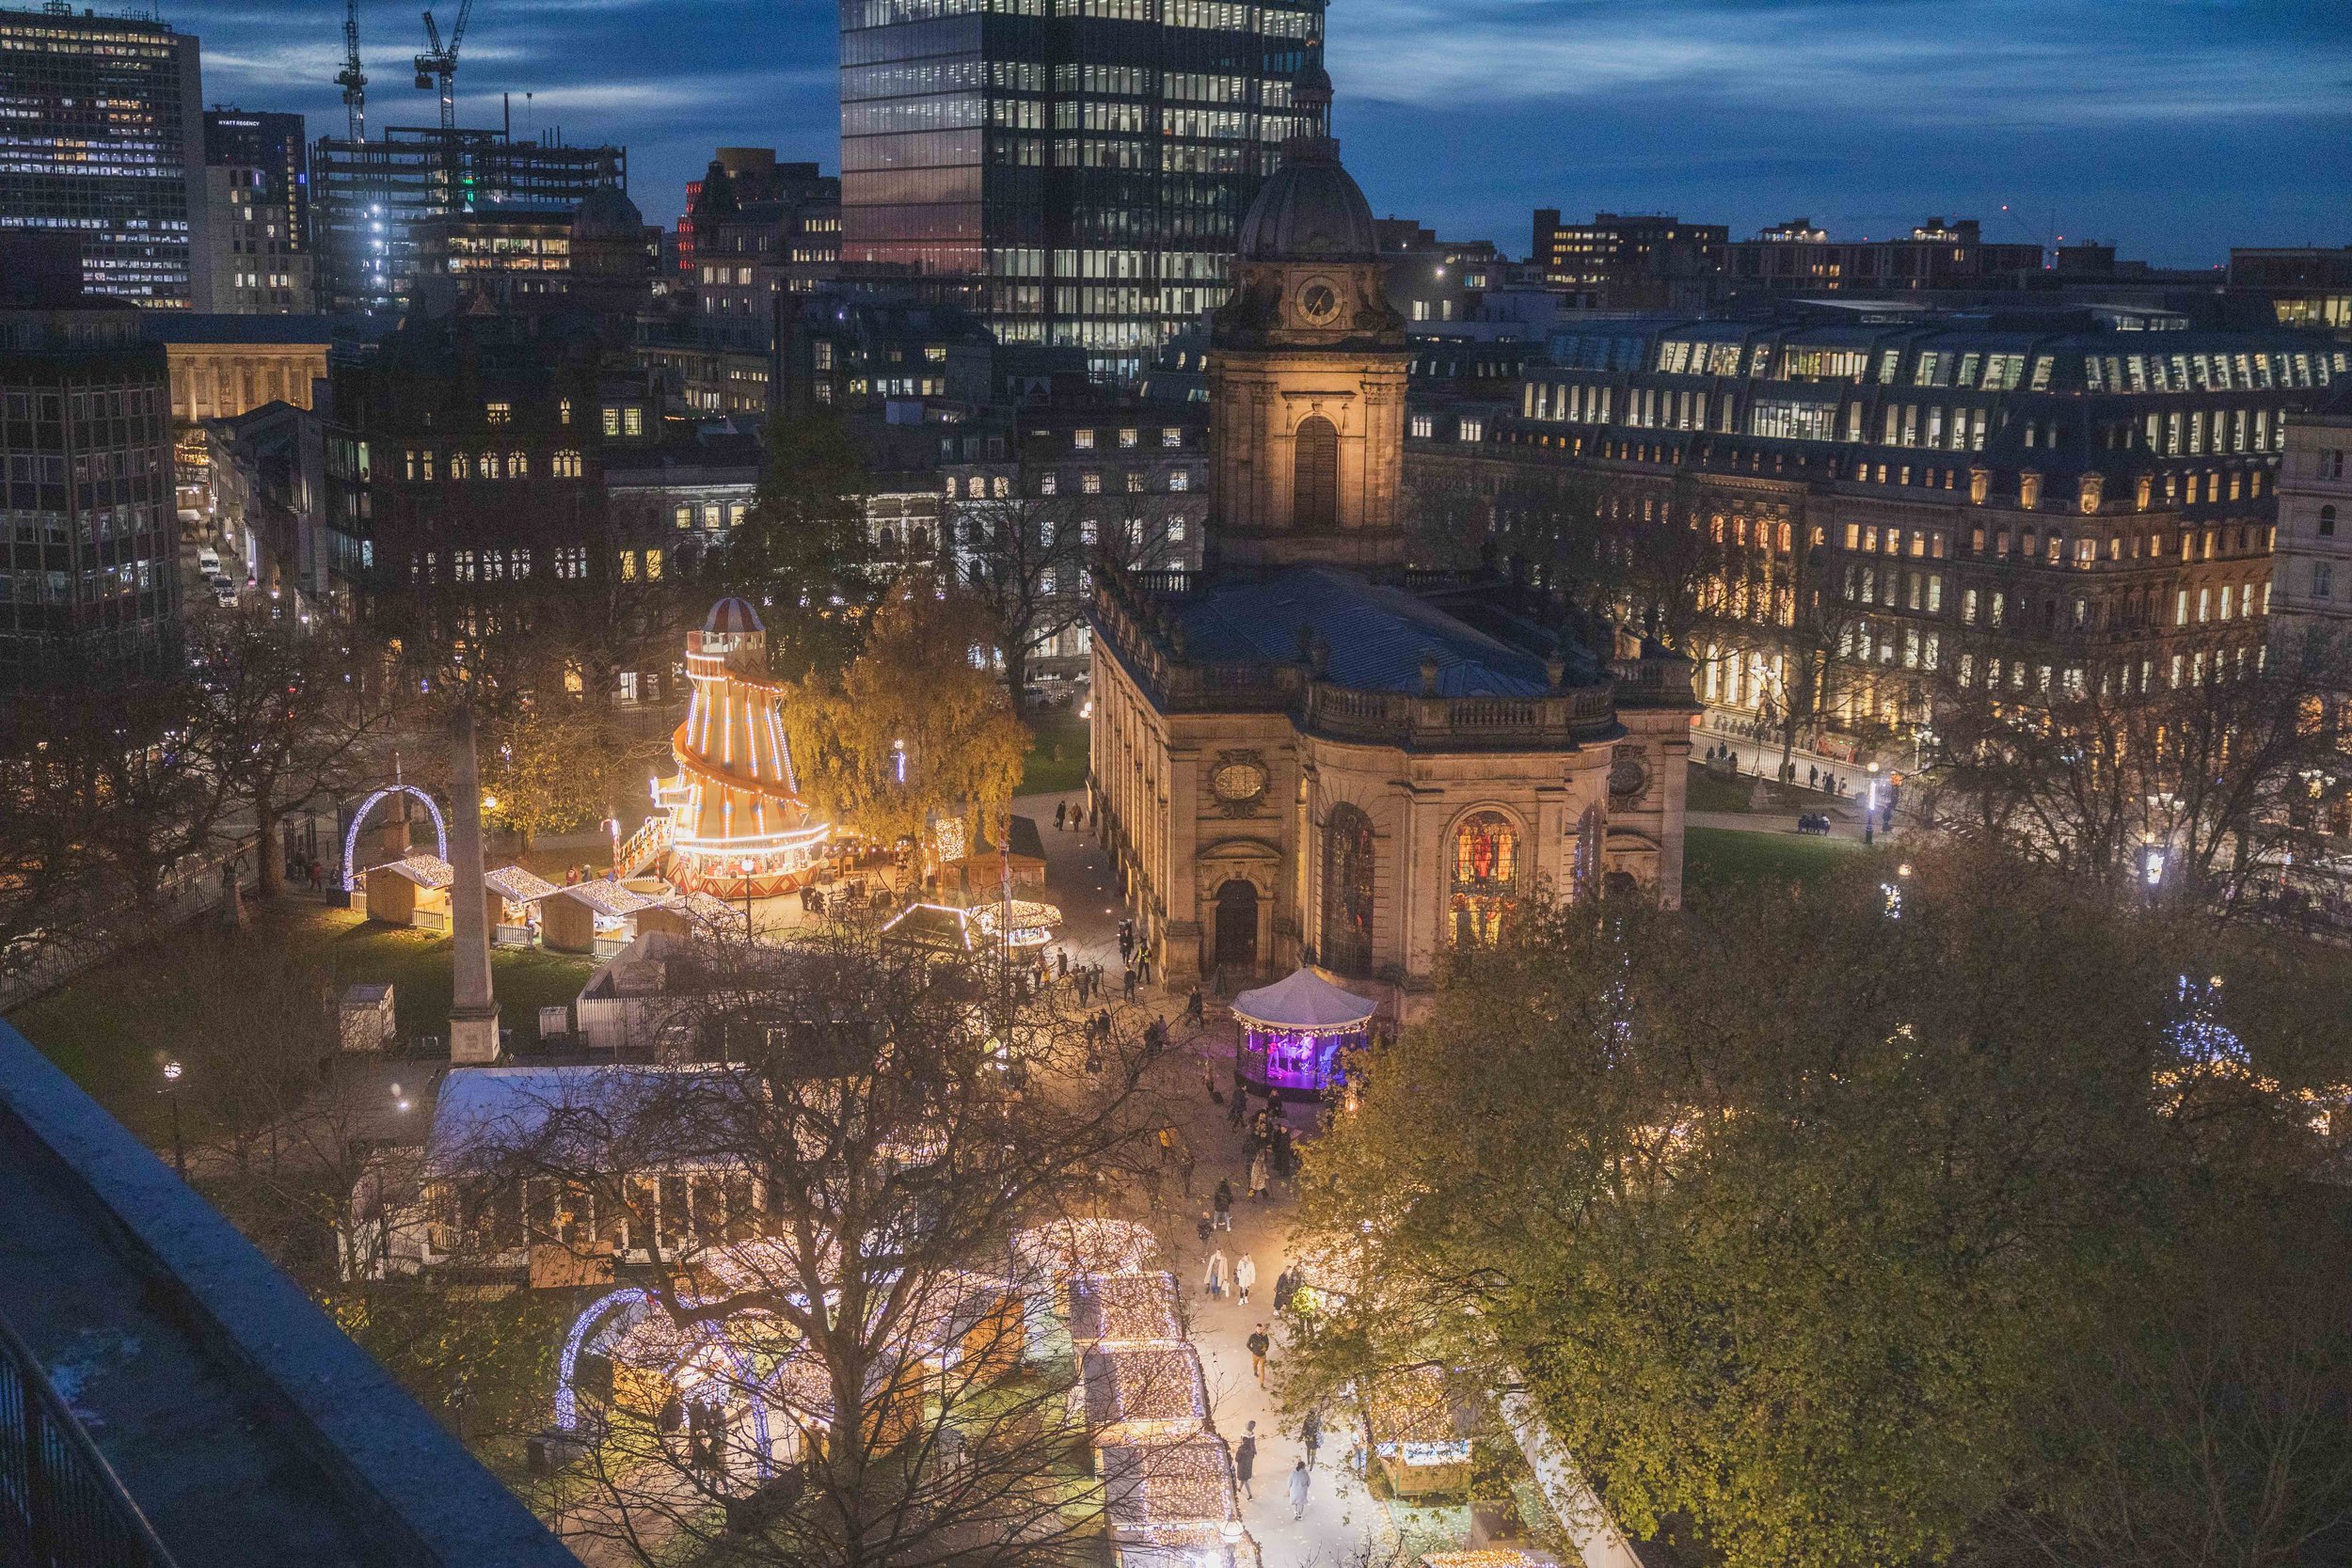
A Roof With A View - A Unique Vantage Point!
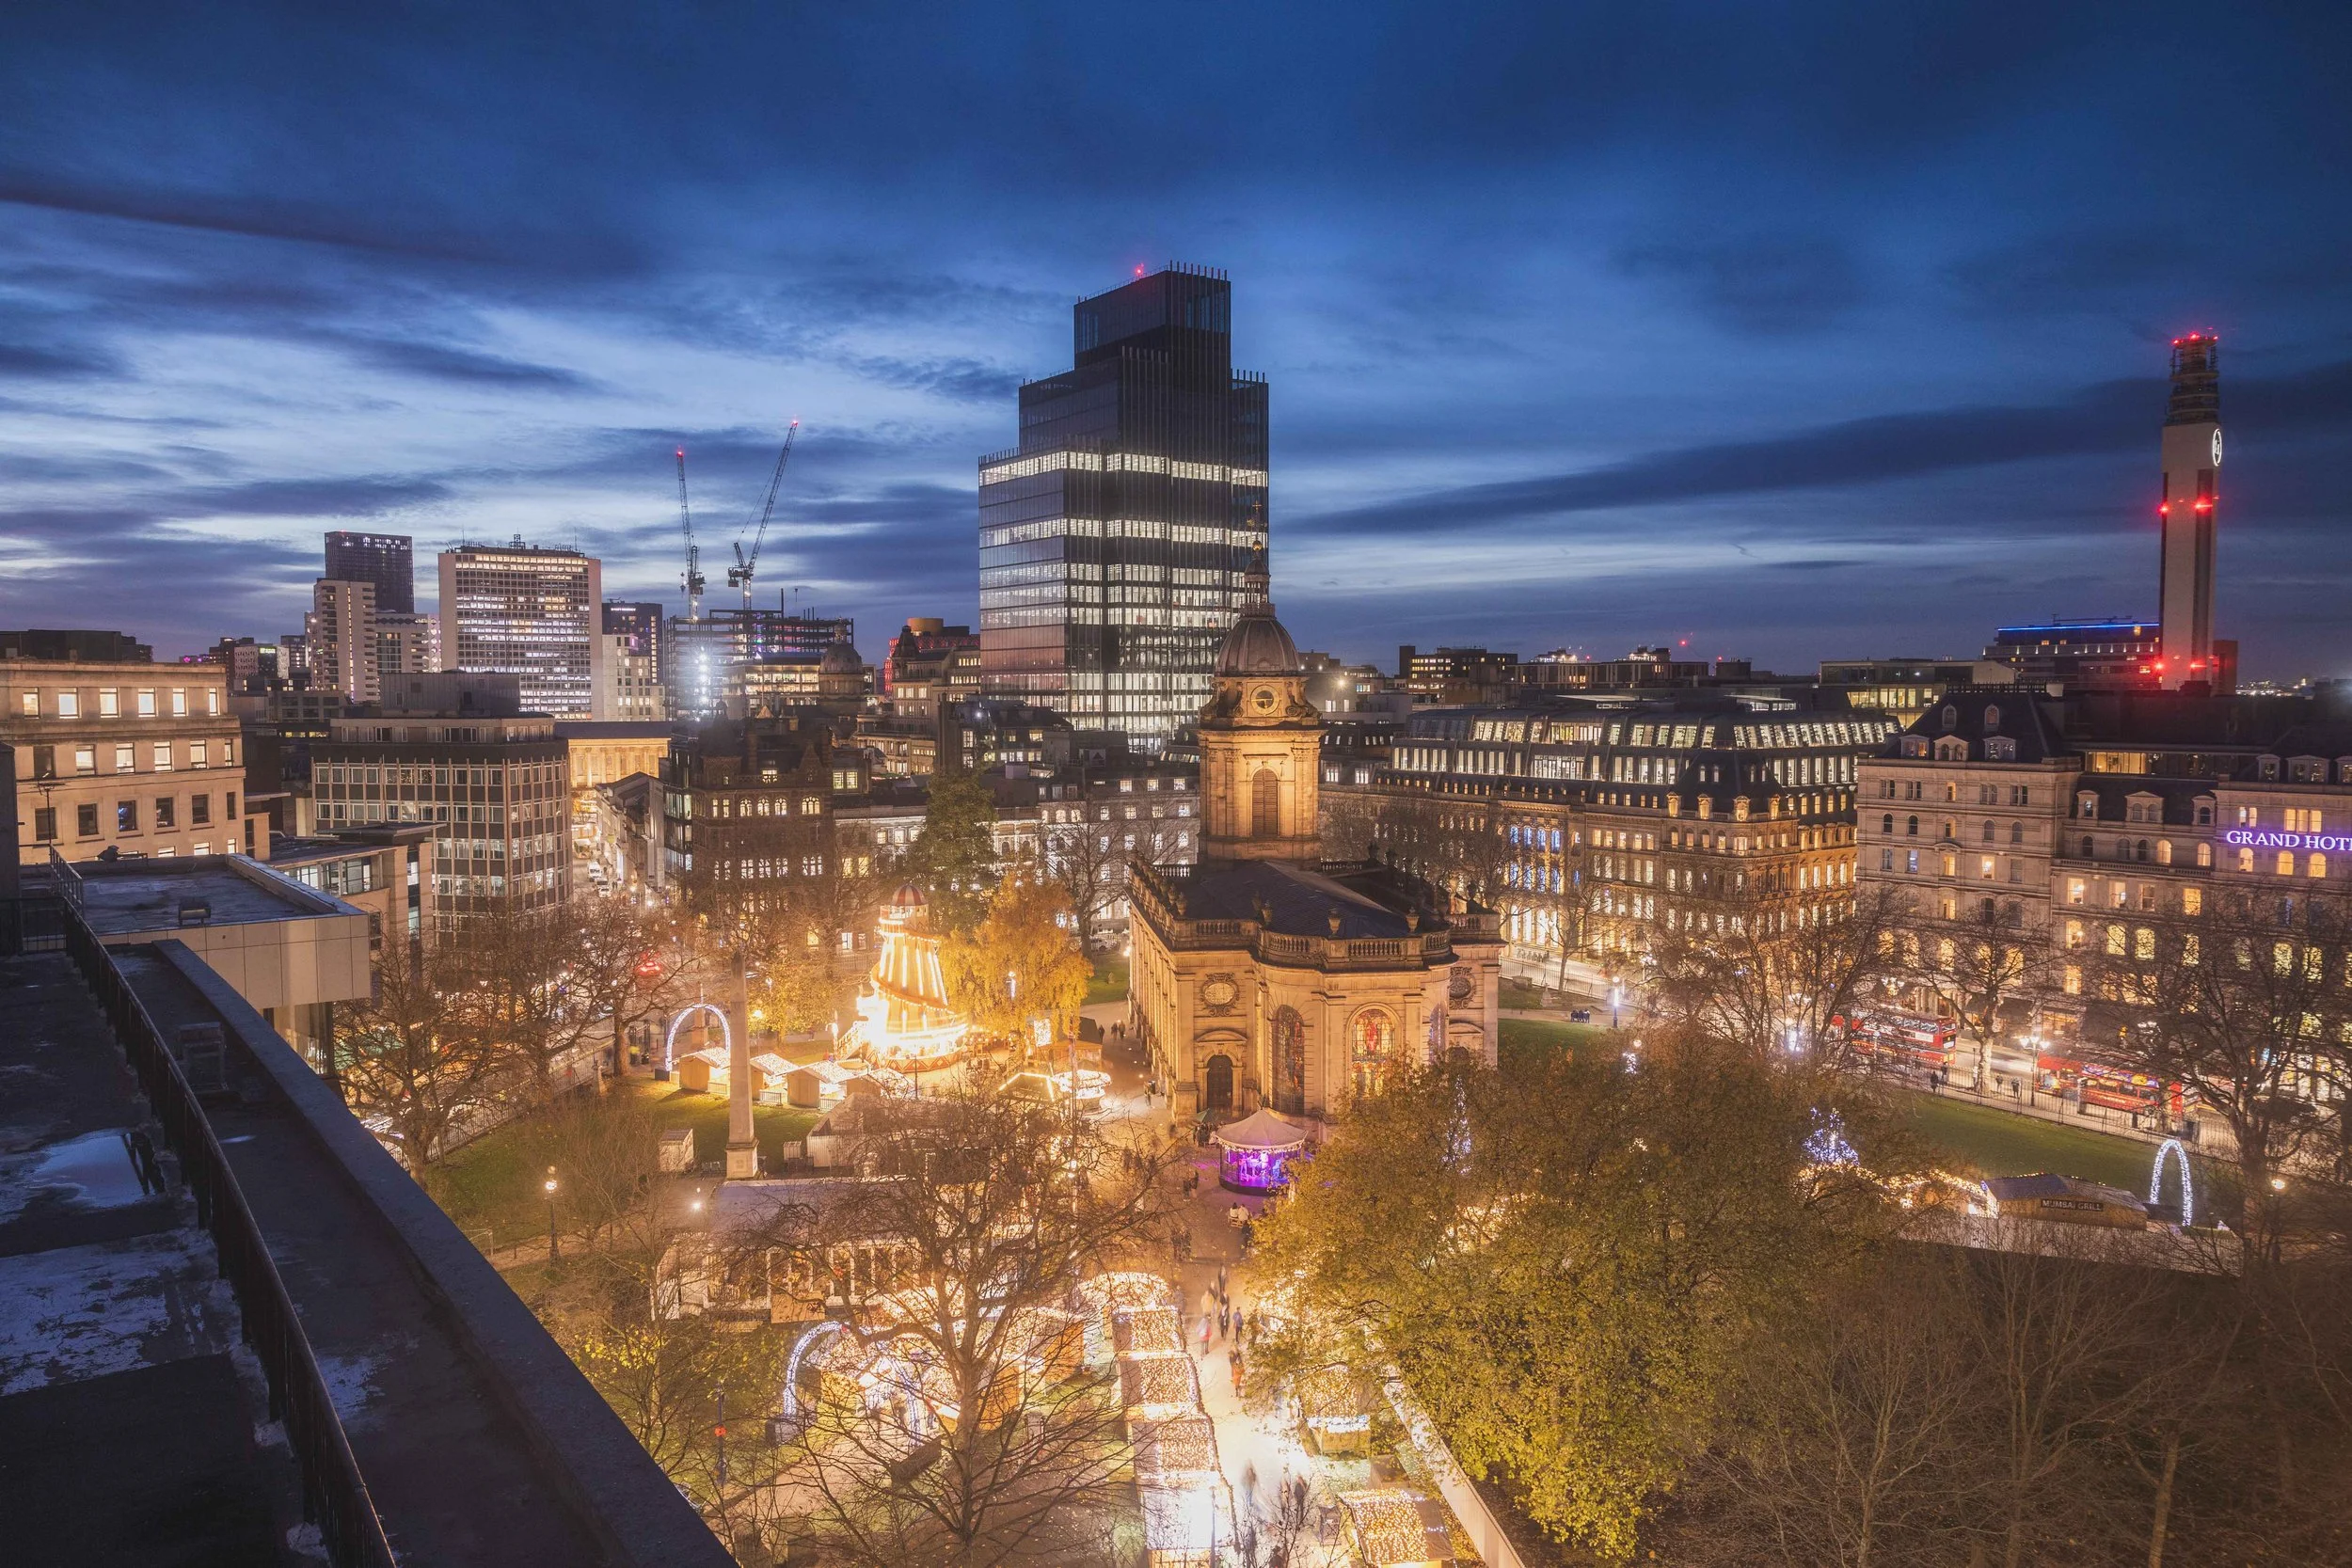
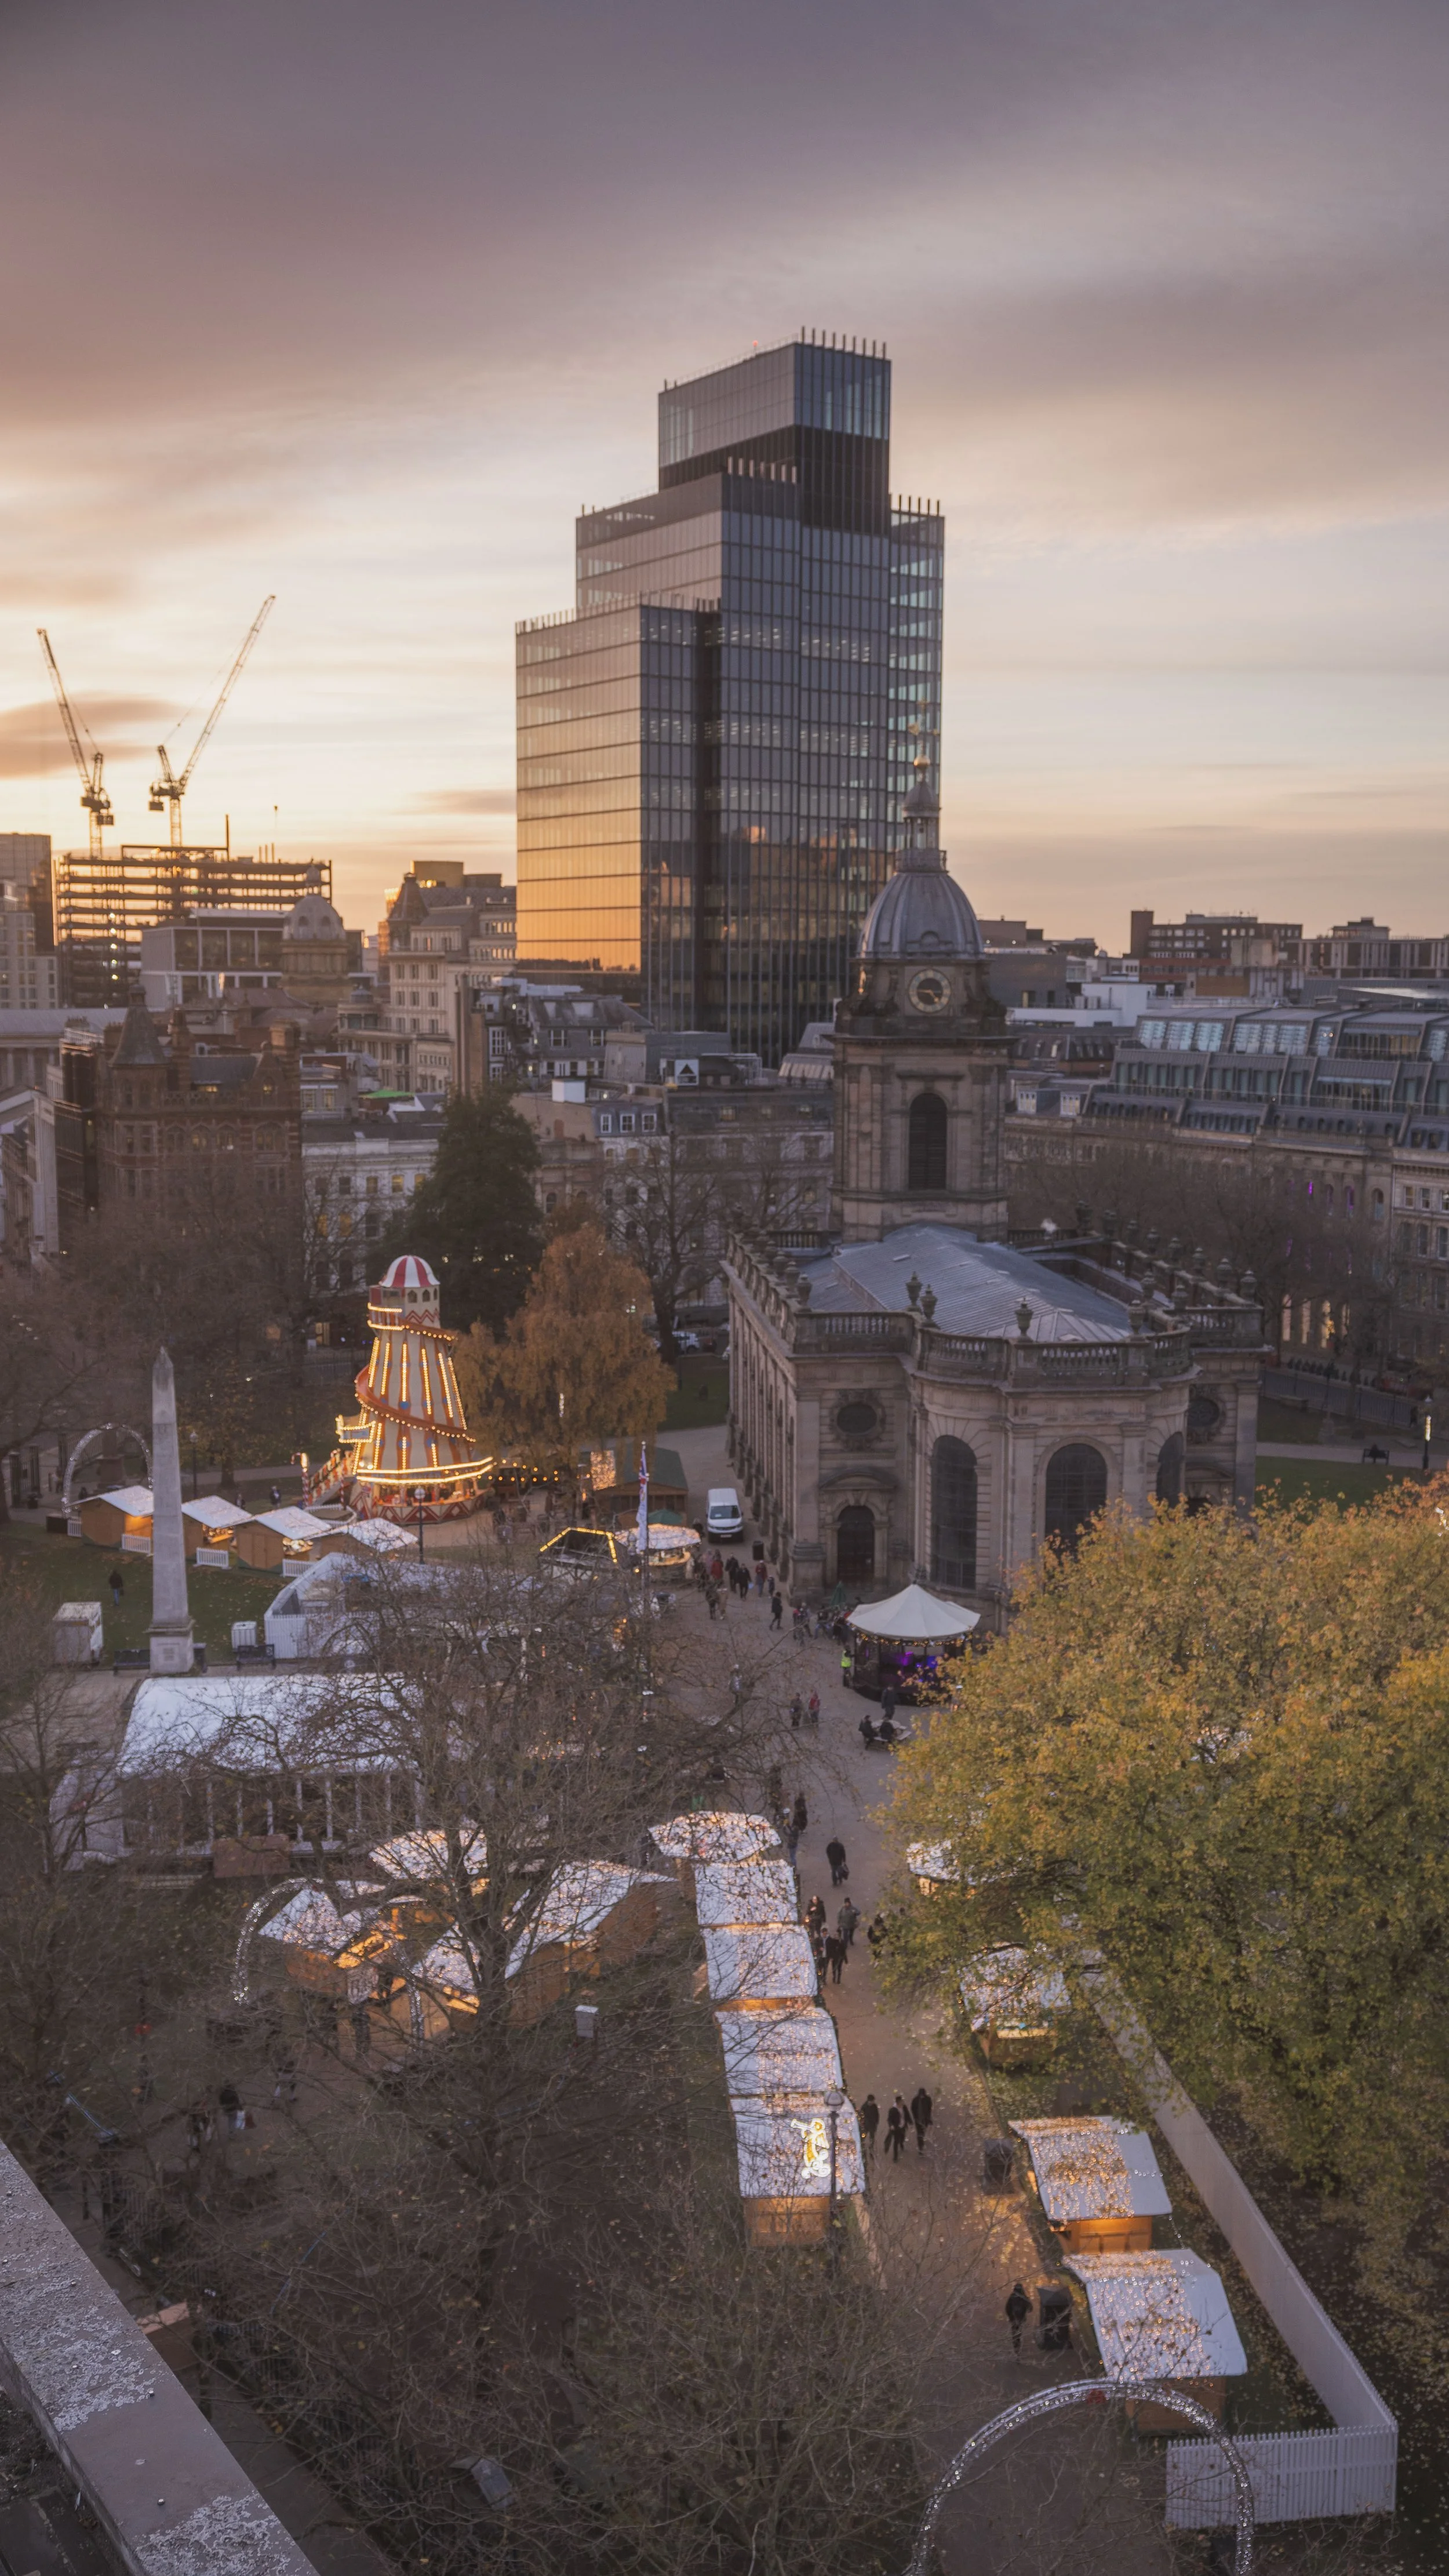
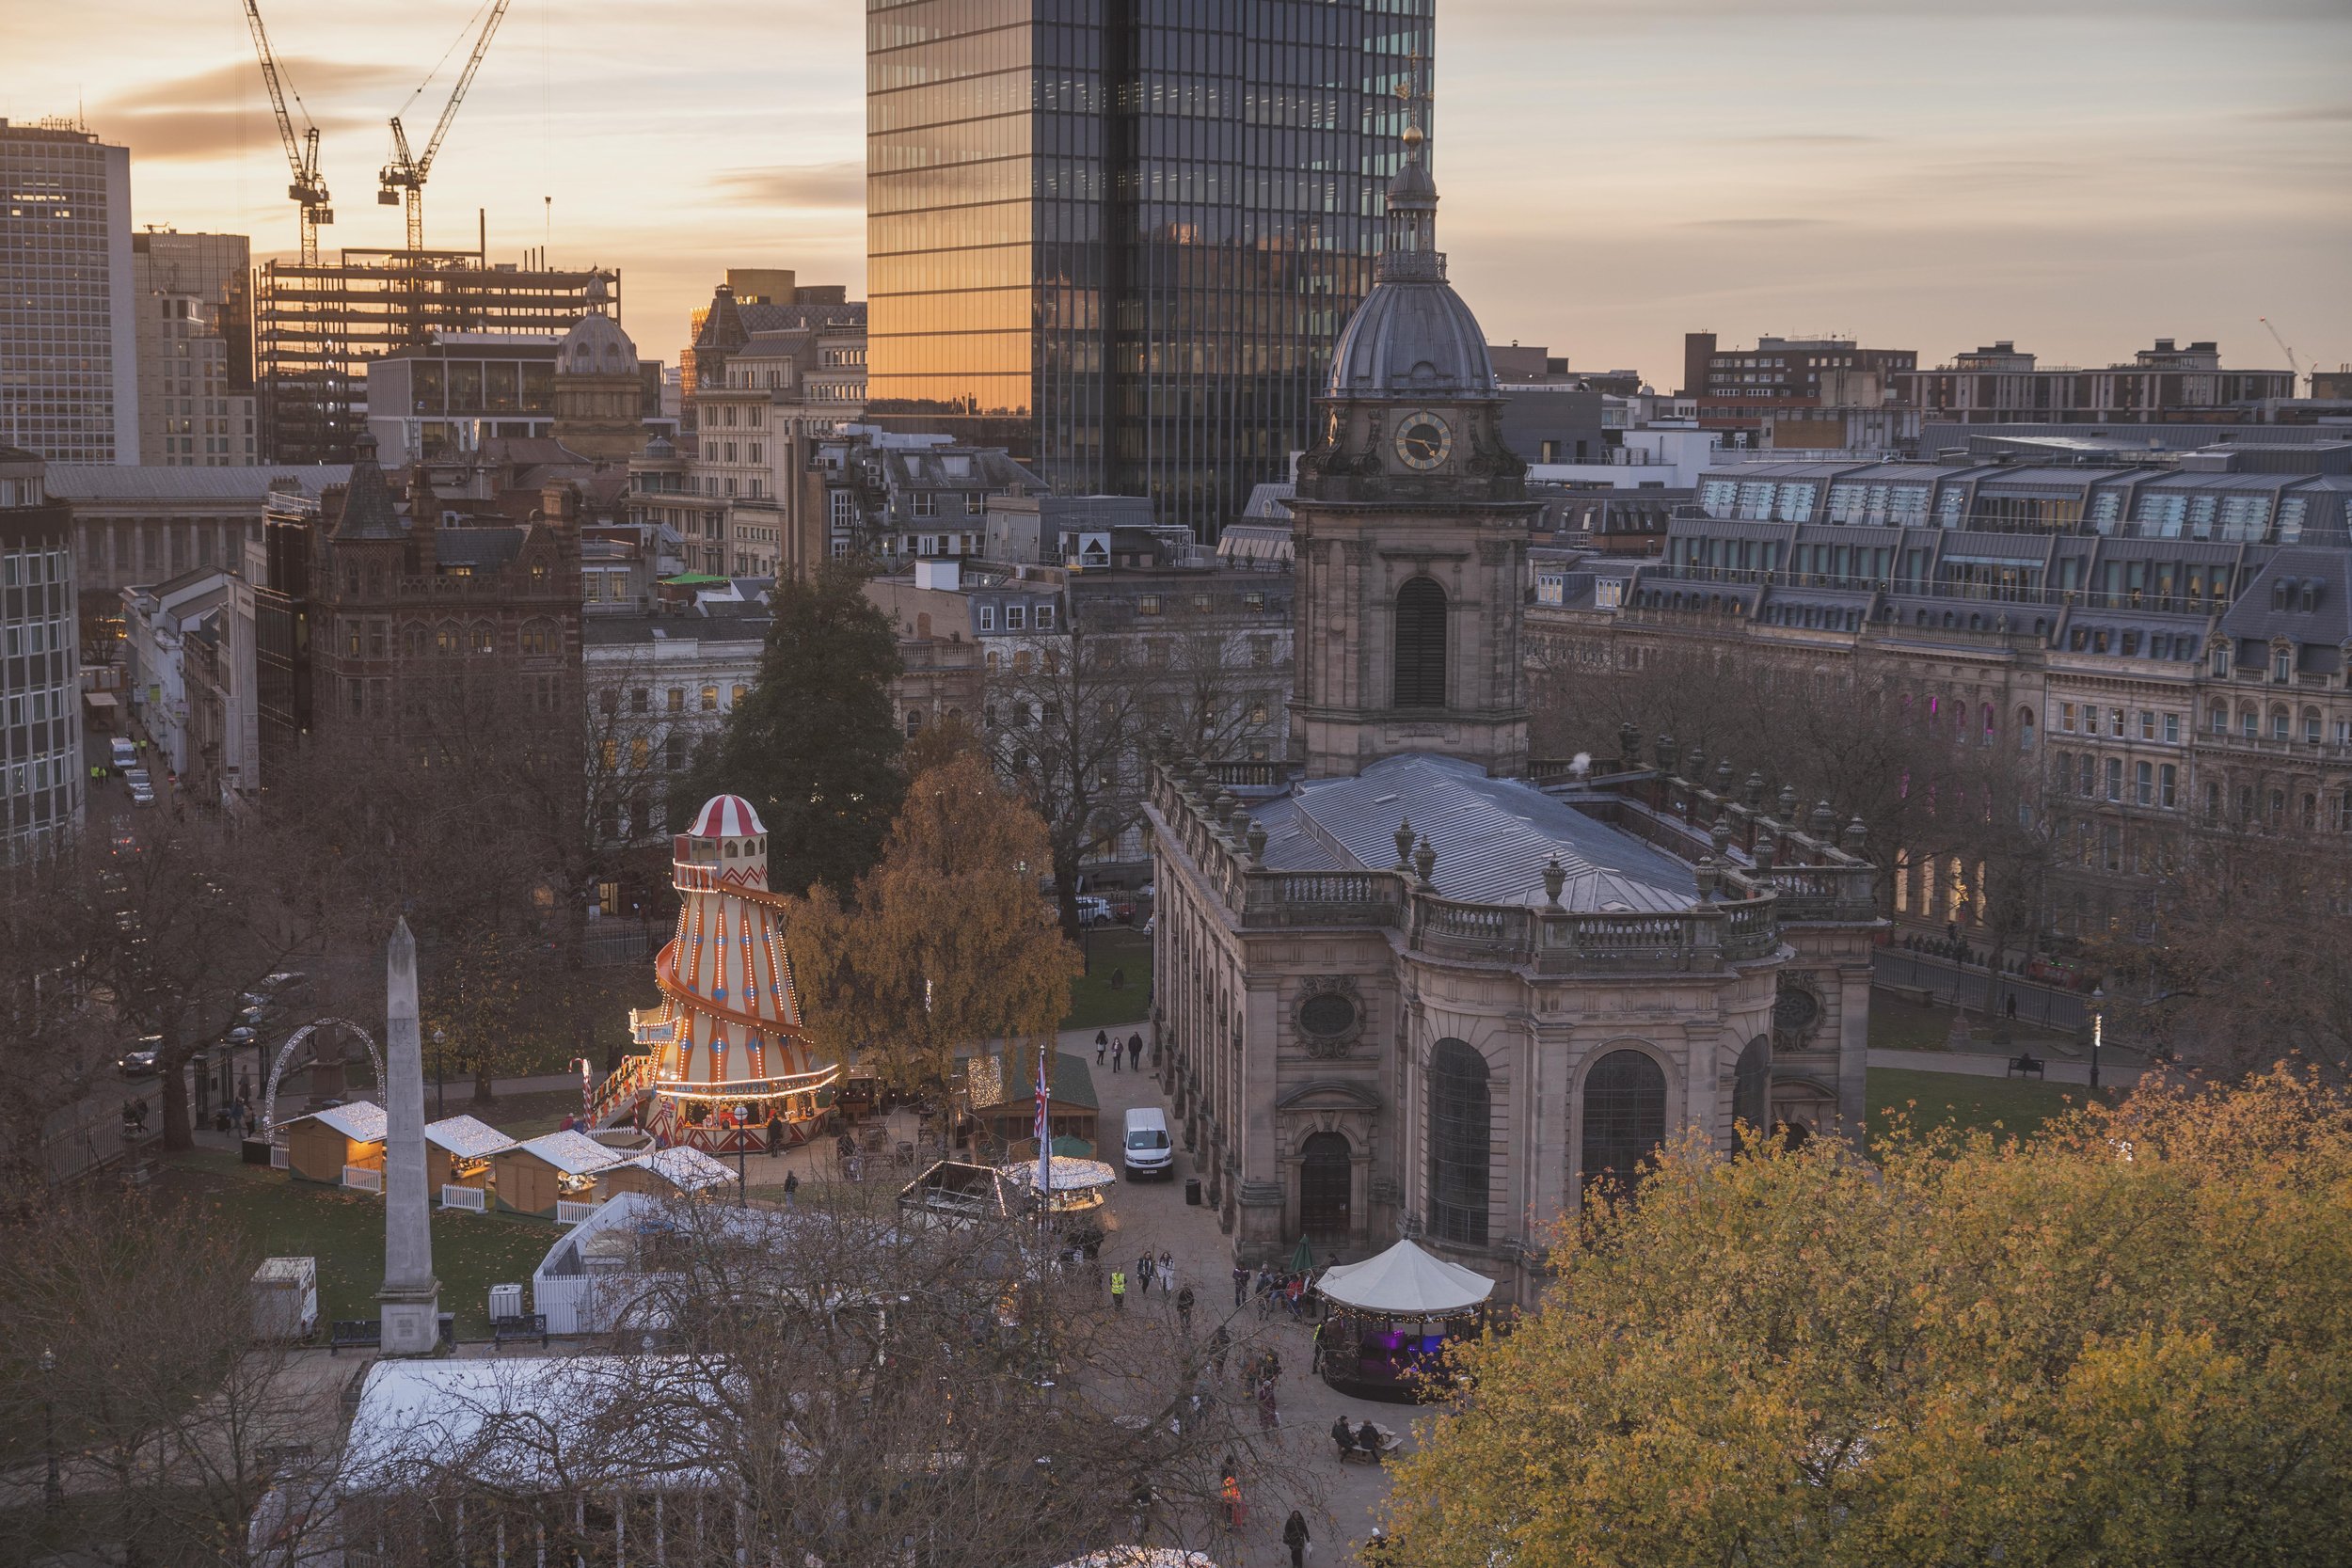
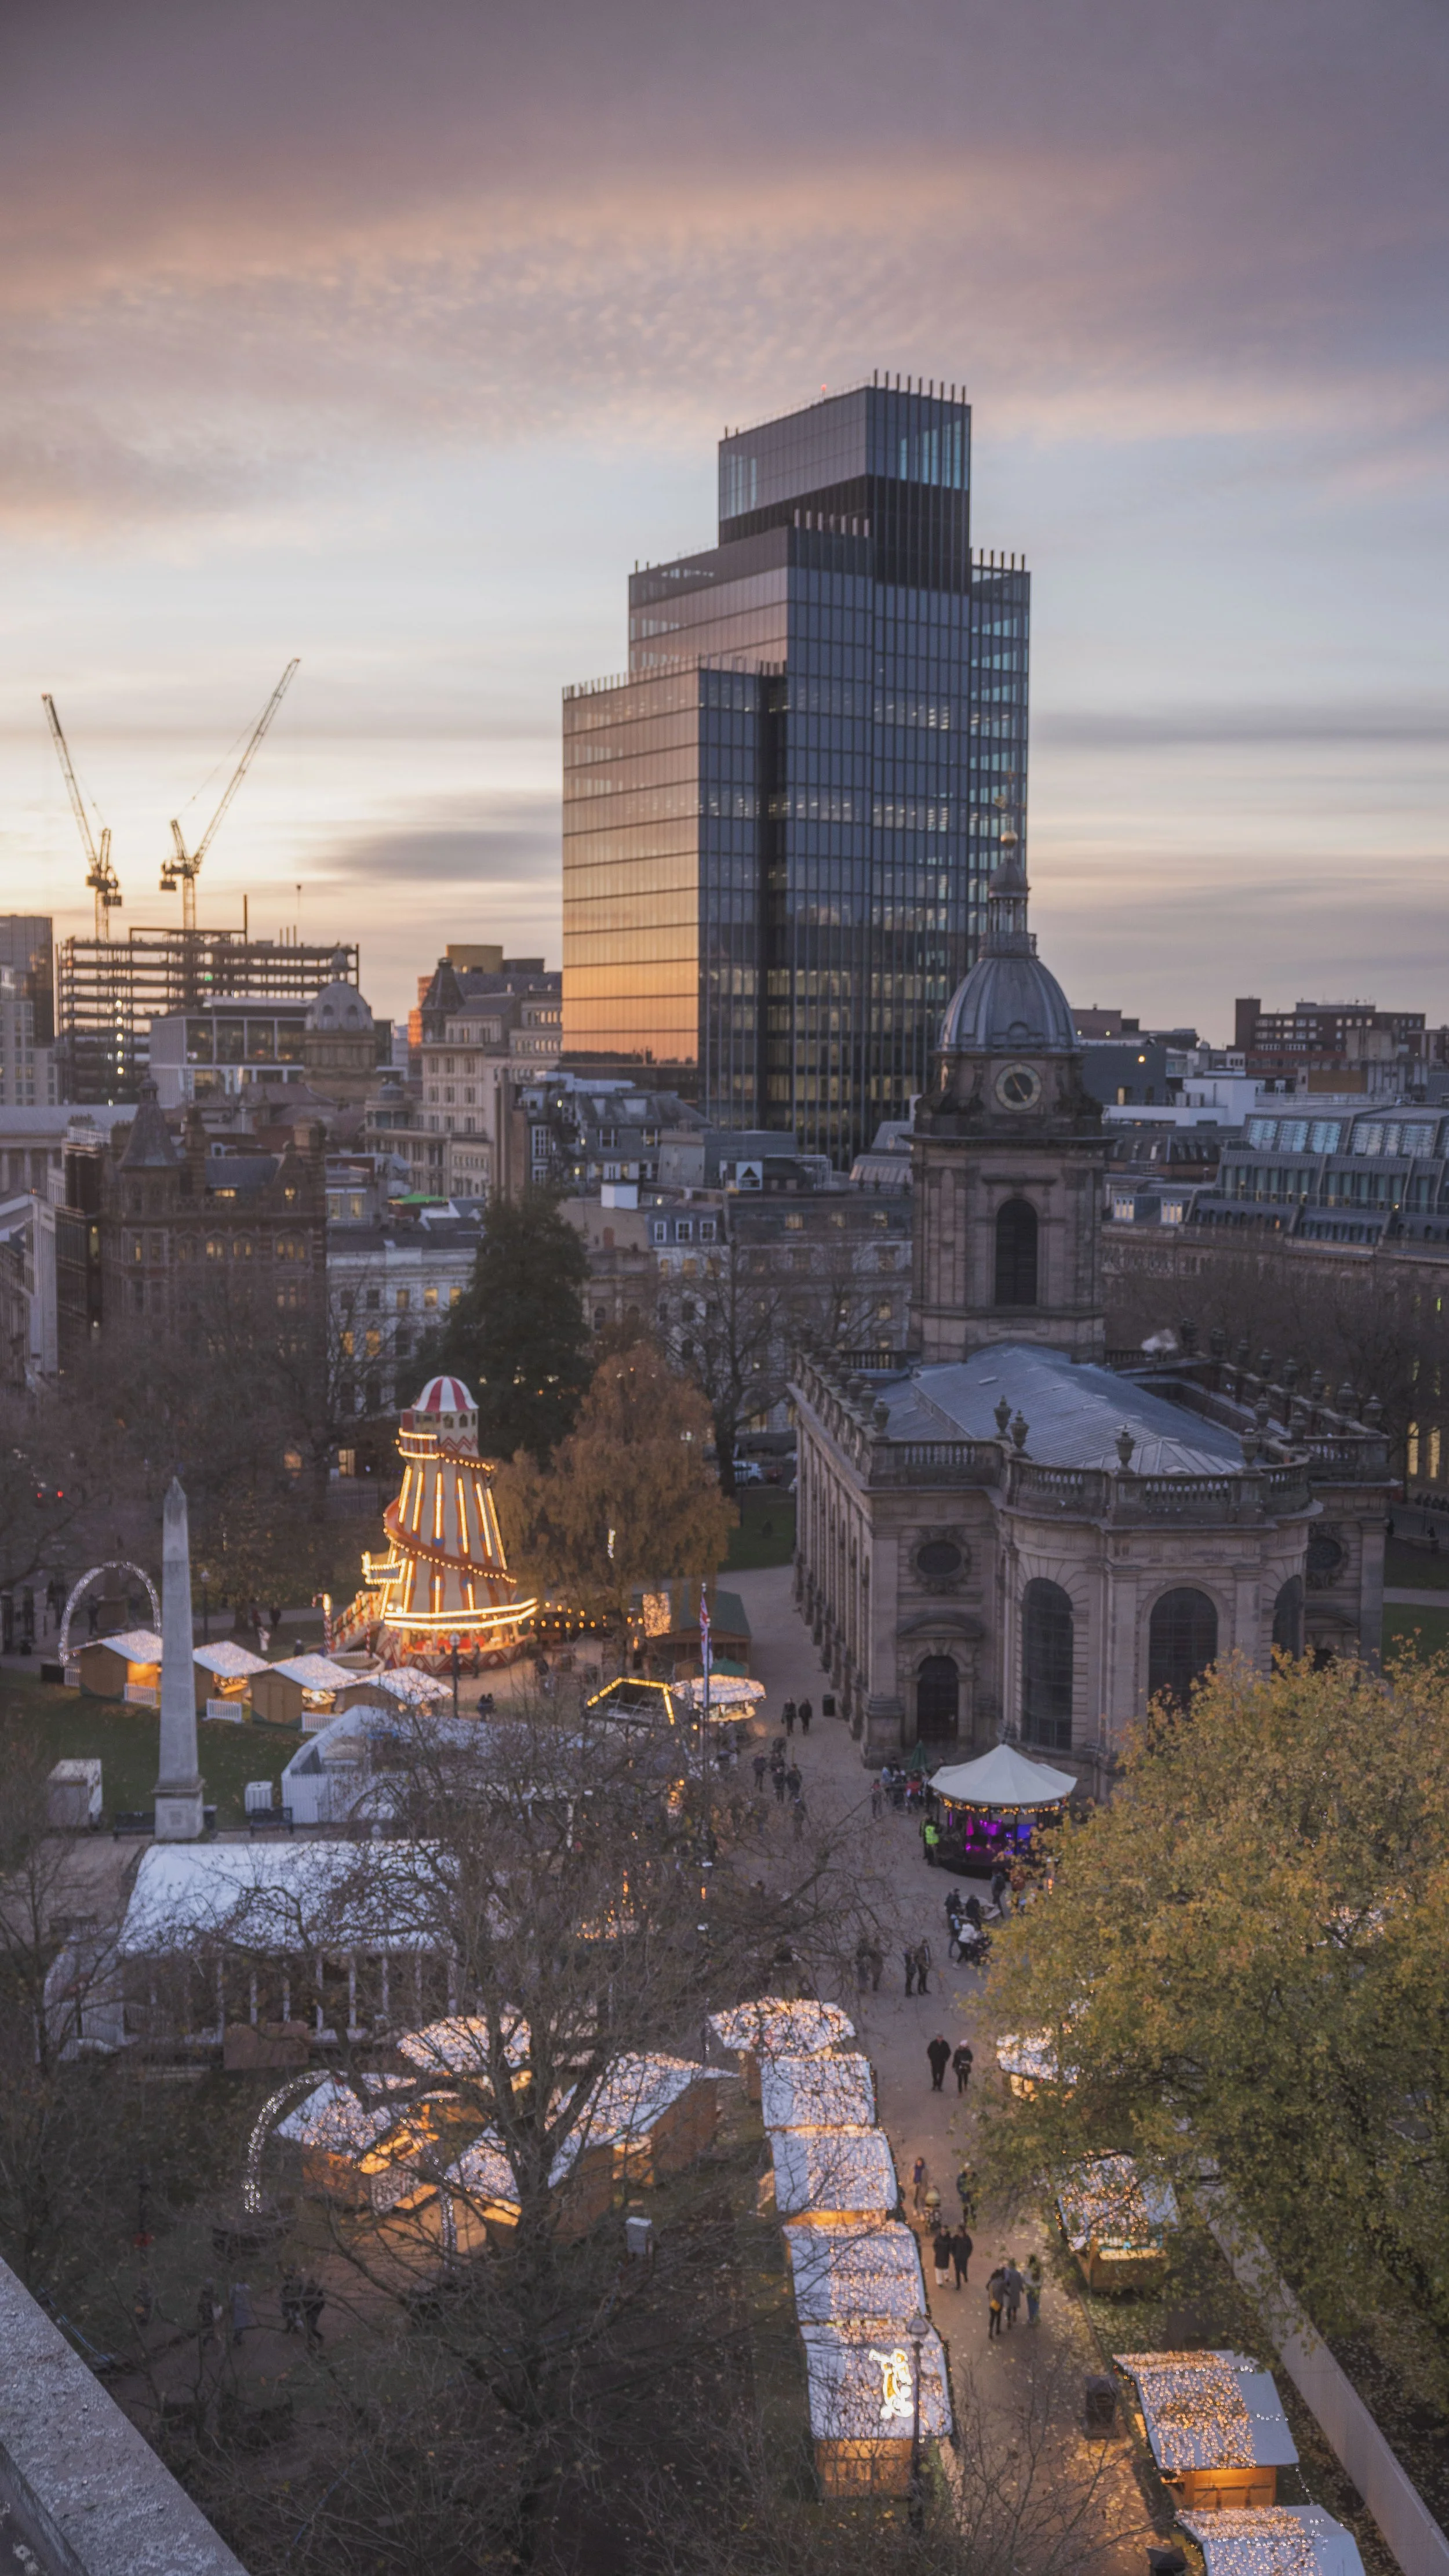
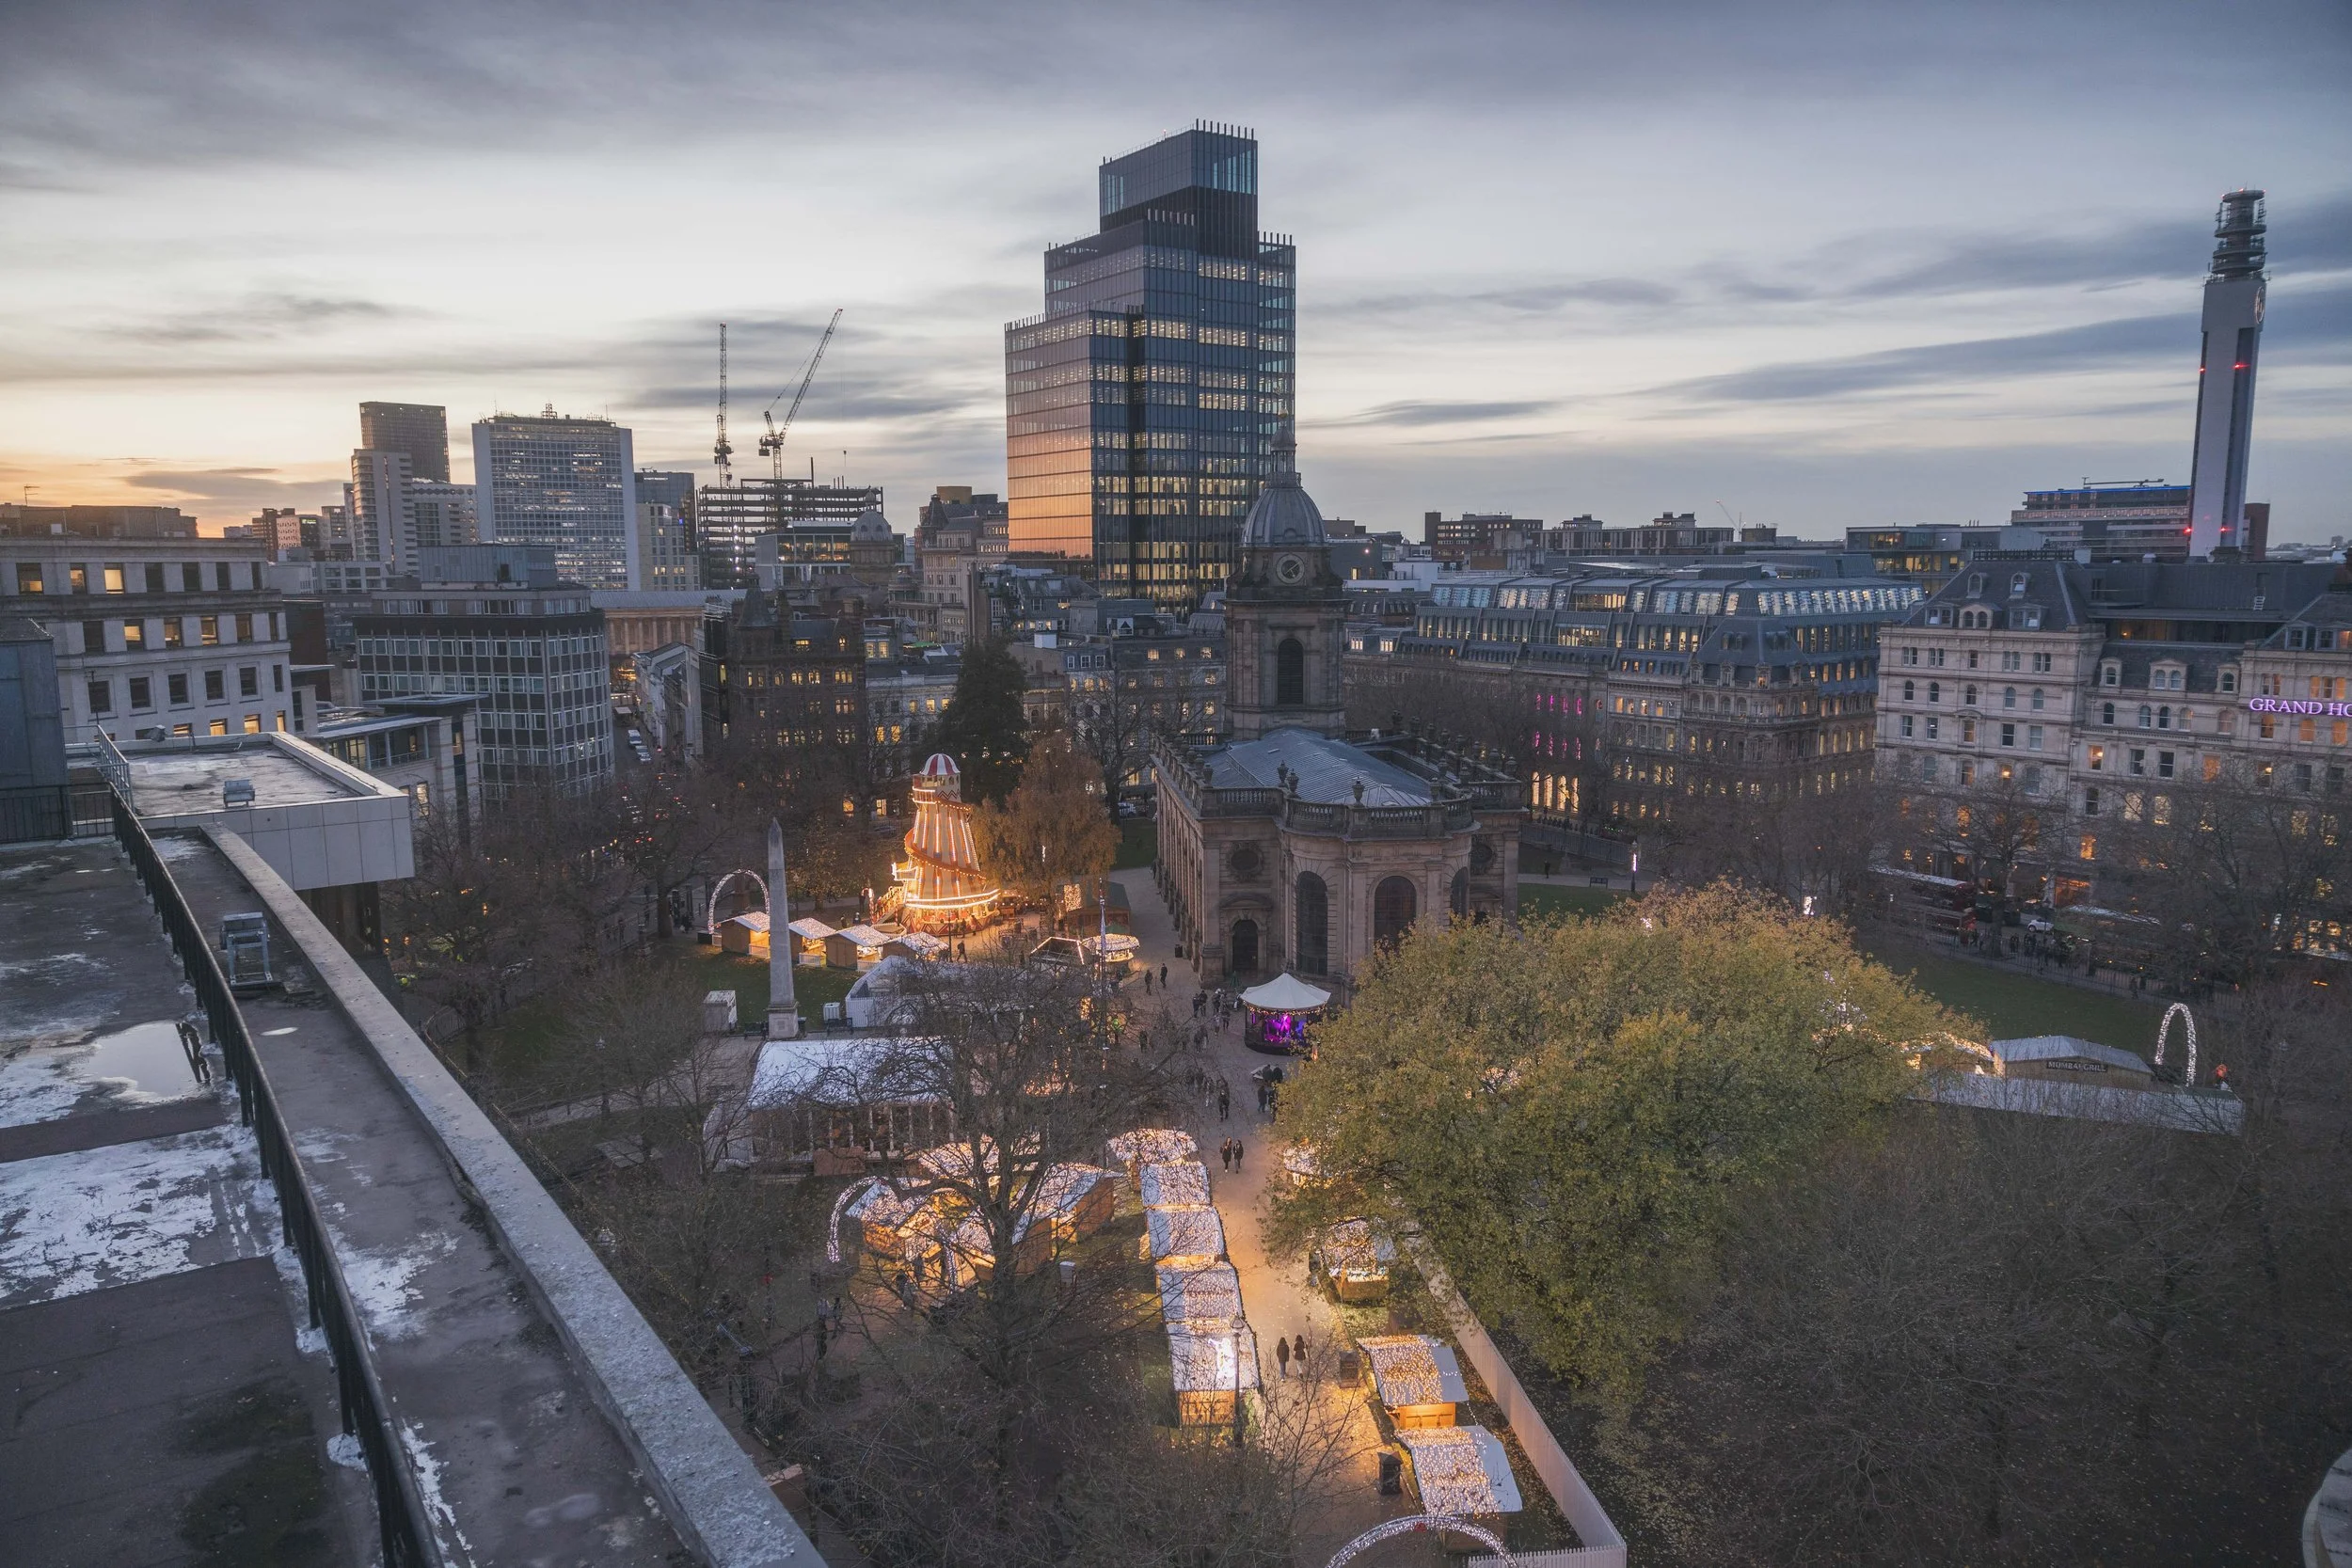
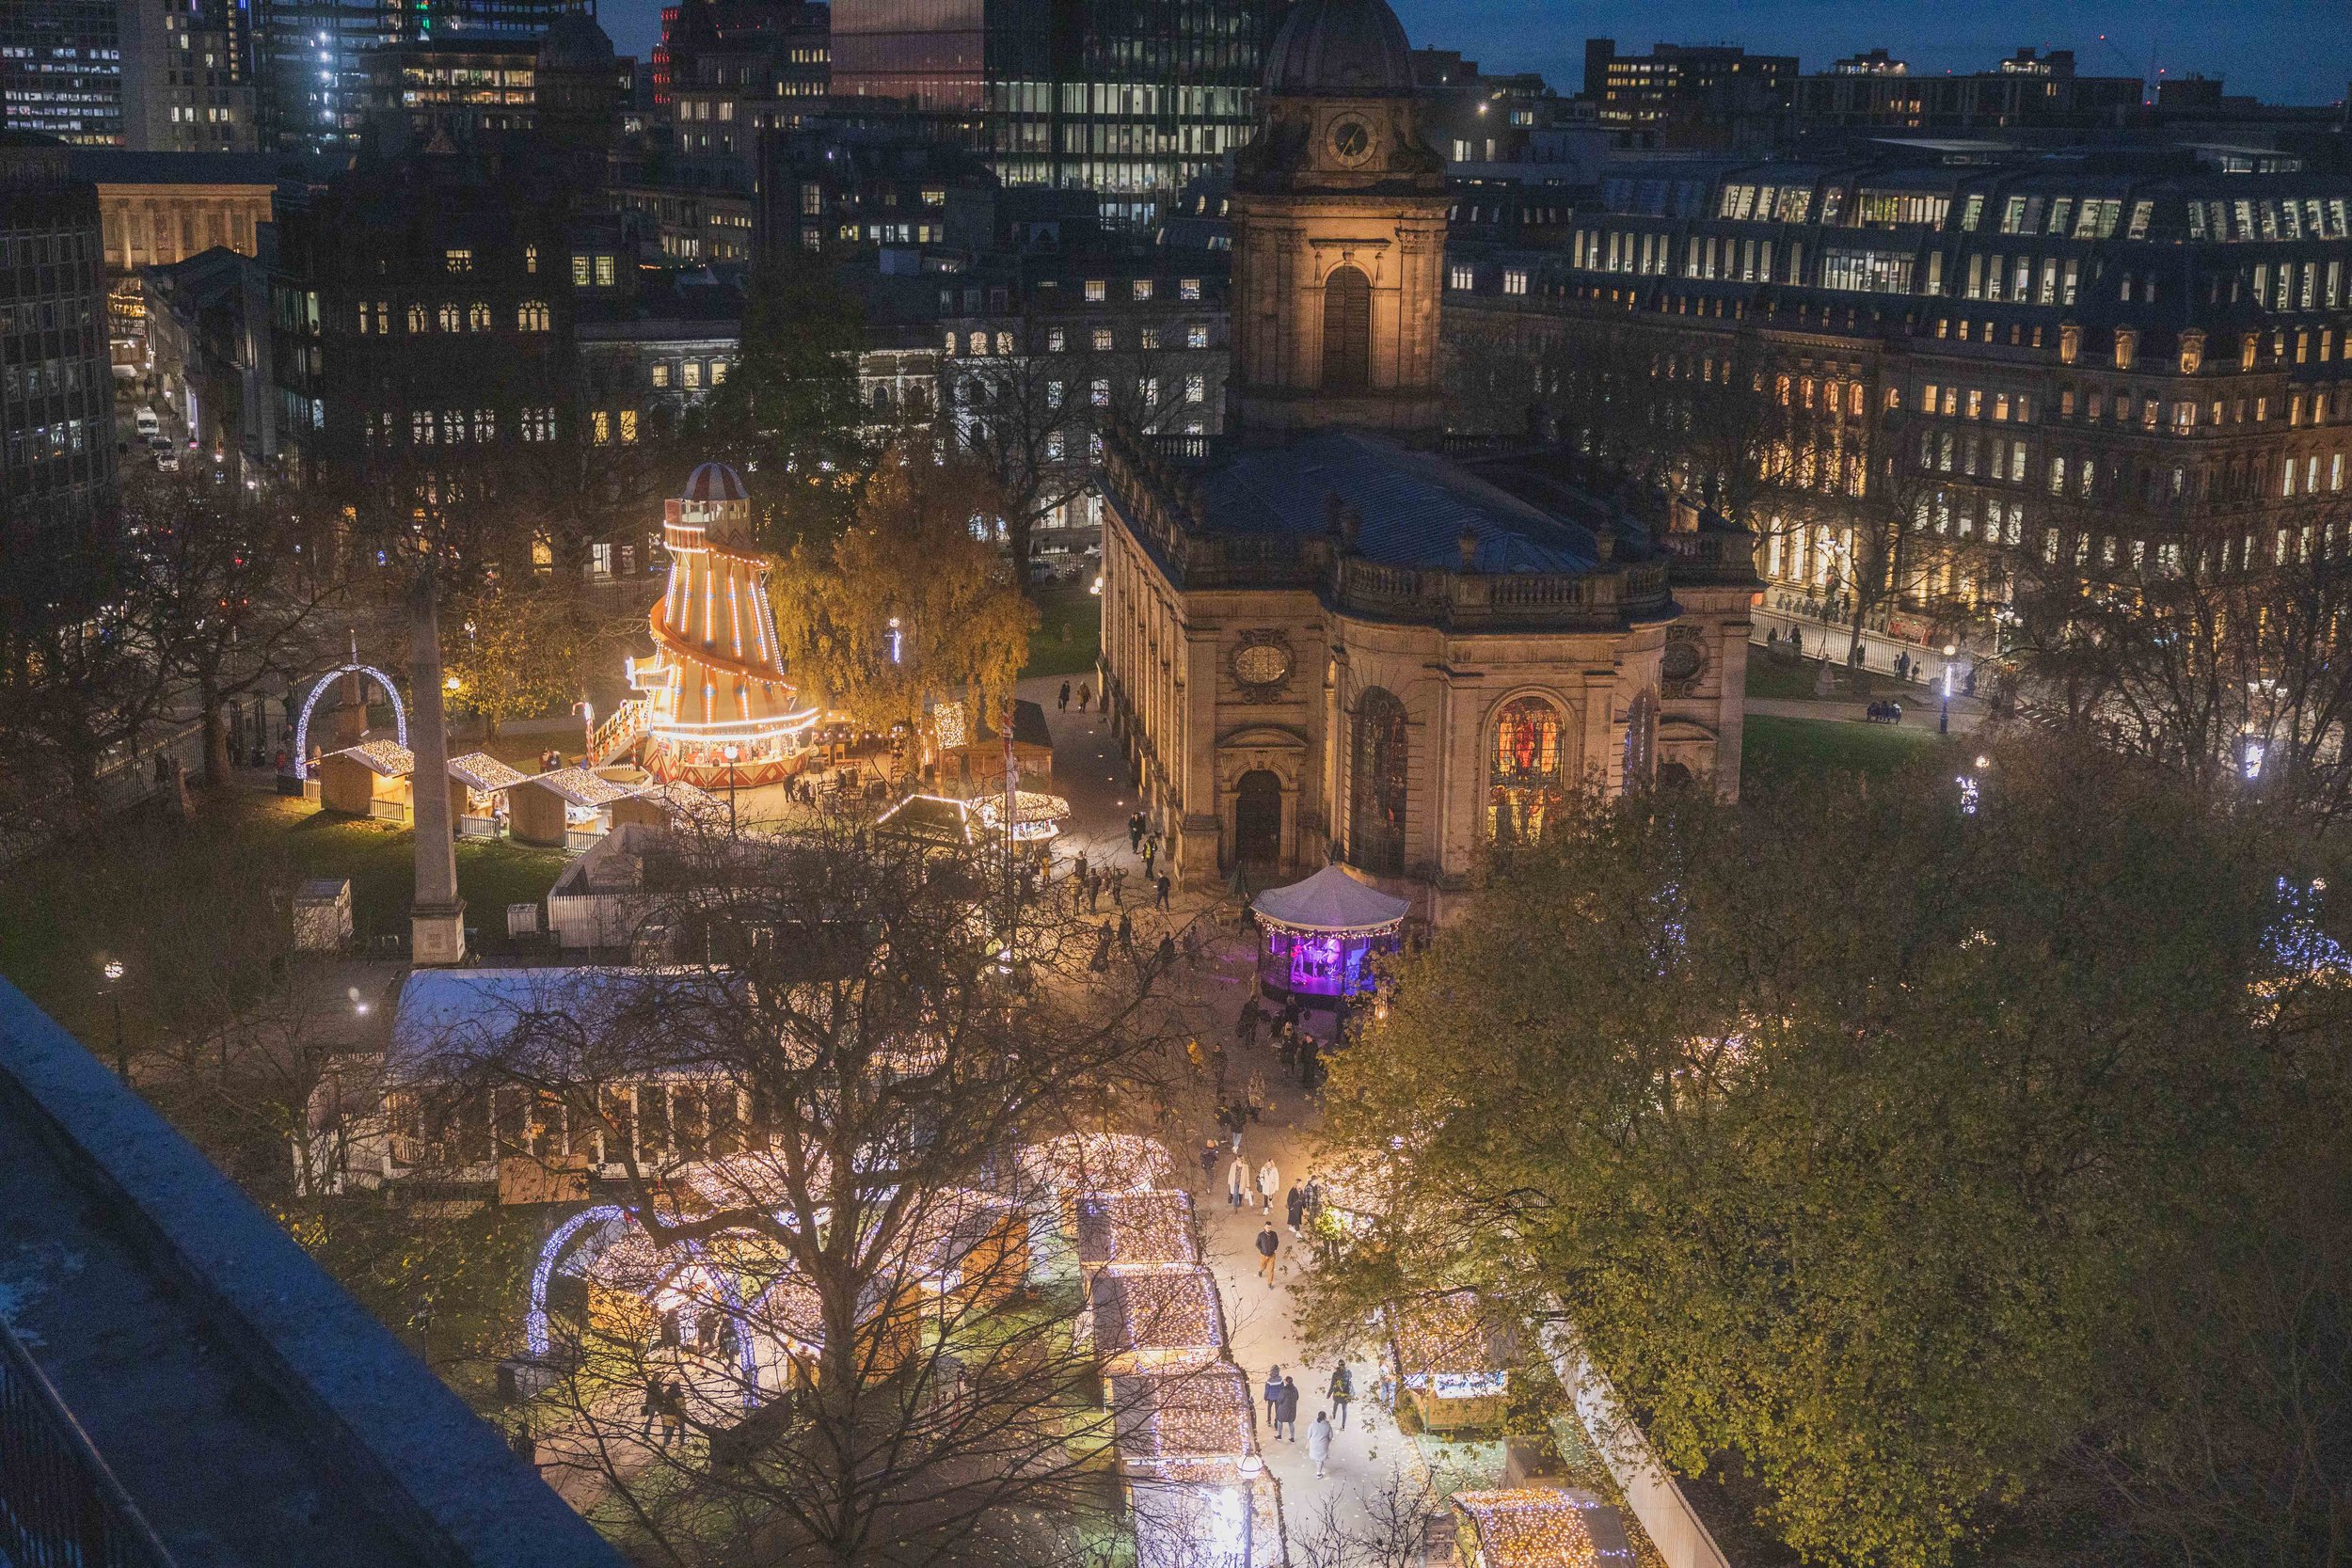
Another week and another rooftop with spectacular views over Birmingham! I was incredibly lucky to be invited to grab some shots from the roof of House of Fraser, one of Birmingham’s most recognisable buildings. As if this wasn’t good enough, it also meant that I would be taking in some pretty special views of ‘Christmas in Cathedral Square’ - Birmingham’s Independent Christmas Market at St Philip’s Cathedral.
Another week and another rooftop with spectacular views over Birmingham! I was incredibly lucky to be invited to grab some shots from the roof of House of Fraser, one of Birmingham’s most recognisable buildings. As if this wasn’t good enough, it also meant that I would be taking in some pretty special views of ‘Christmas in Cathedral Square’ - Birmingham’s Independent Christmas Market at St Philip’s Cathedral.
The event which is being staged by Colmore BID and partners, provides a fantastic market for some of the city’s best Independents and more importantly for me, looks fantastic too! My day had started at 3.30am and after multiple jobs, a very fortunate meeting and spending 12 hours outdoors in close to freezing temperatures - it was time to get on the roof and take in the beautiful scene!
Arriving at House of Fraser, the staff greeted me and were incredibly friendly and accommodating. Even though they had offered hot drinks and a chance to warm up, I was keen to get straight to the roof and try to capture sunset - which wouldn’t disappoint! It was kind of strange seeing ‘behind the scenes’ at House of Fraser, including a very cool workshop in the upper floors of the building that felt like I’d been transported back 50+ years!
As we made our way out through the final security doors and onto the roof, I almost ran to the barrier to take in the view and pretty much blanked my hosts as I started scrabbling to get my camera out! As with my previous excursion to the Rotunda (read all about that Here) I would be shooting a mix of digital and film - so there was no time to waste!
I quickly started grabbing images as I knew the best of the light would be gone in the first twenty minutes or so and as I’d planned to get some film shots as well, time was not on my side! I ran around trying to find which compositions worked best for me.
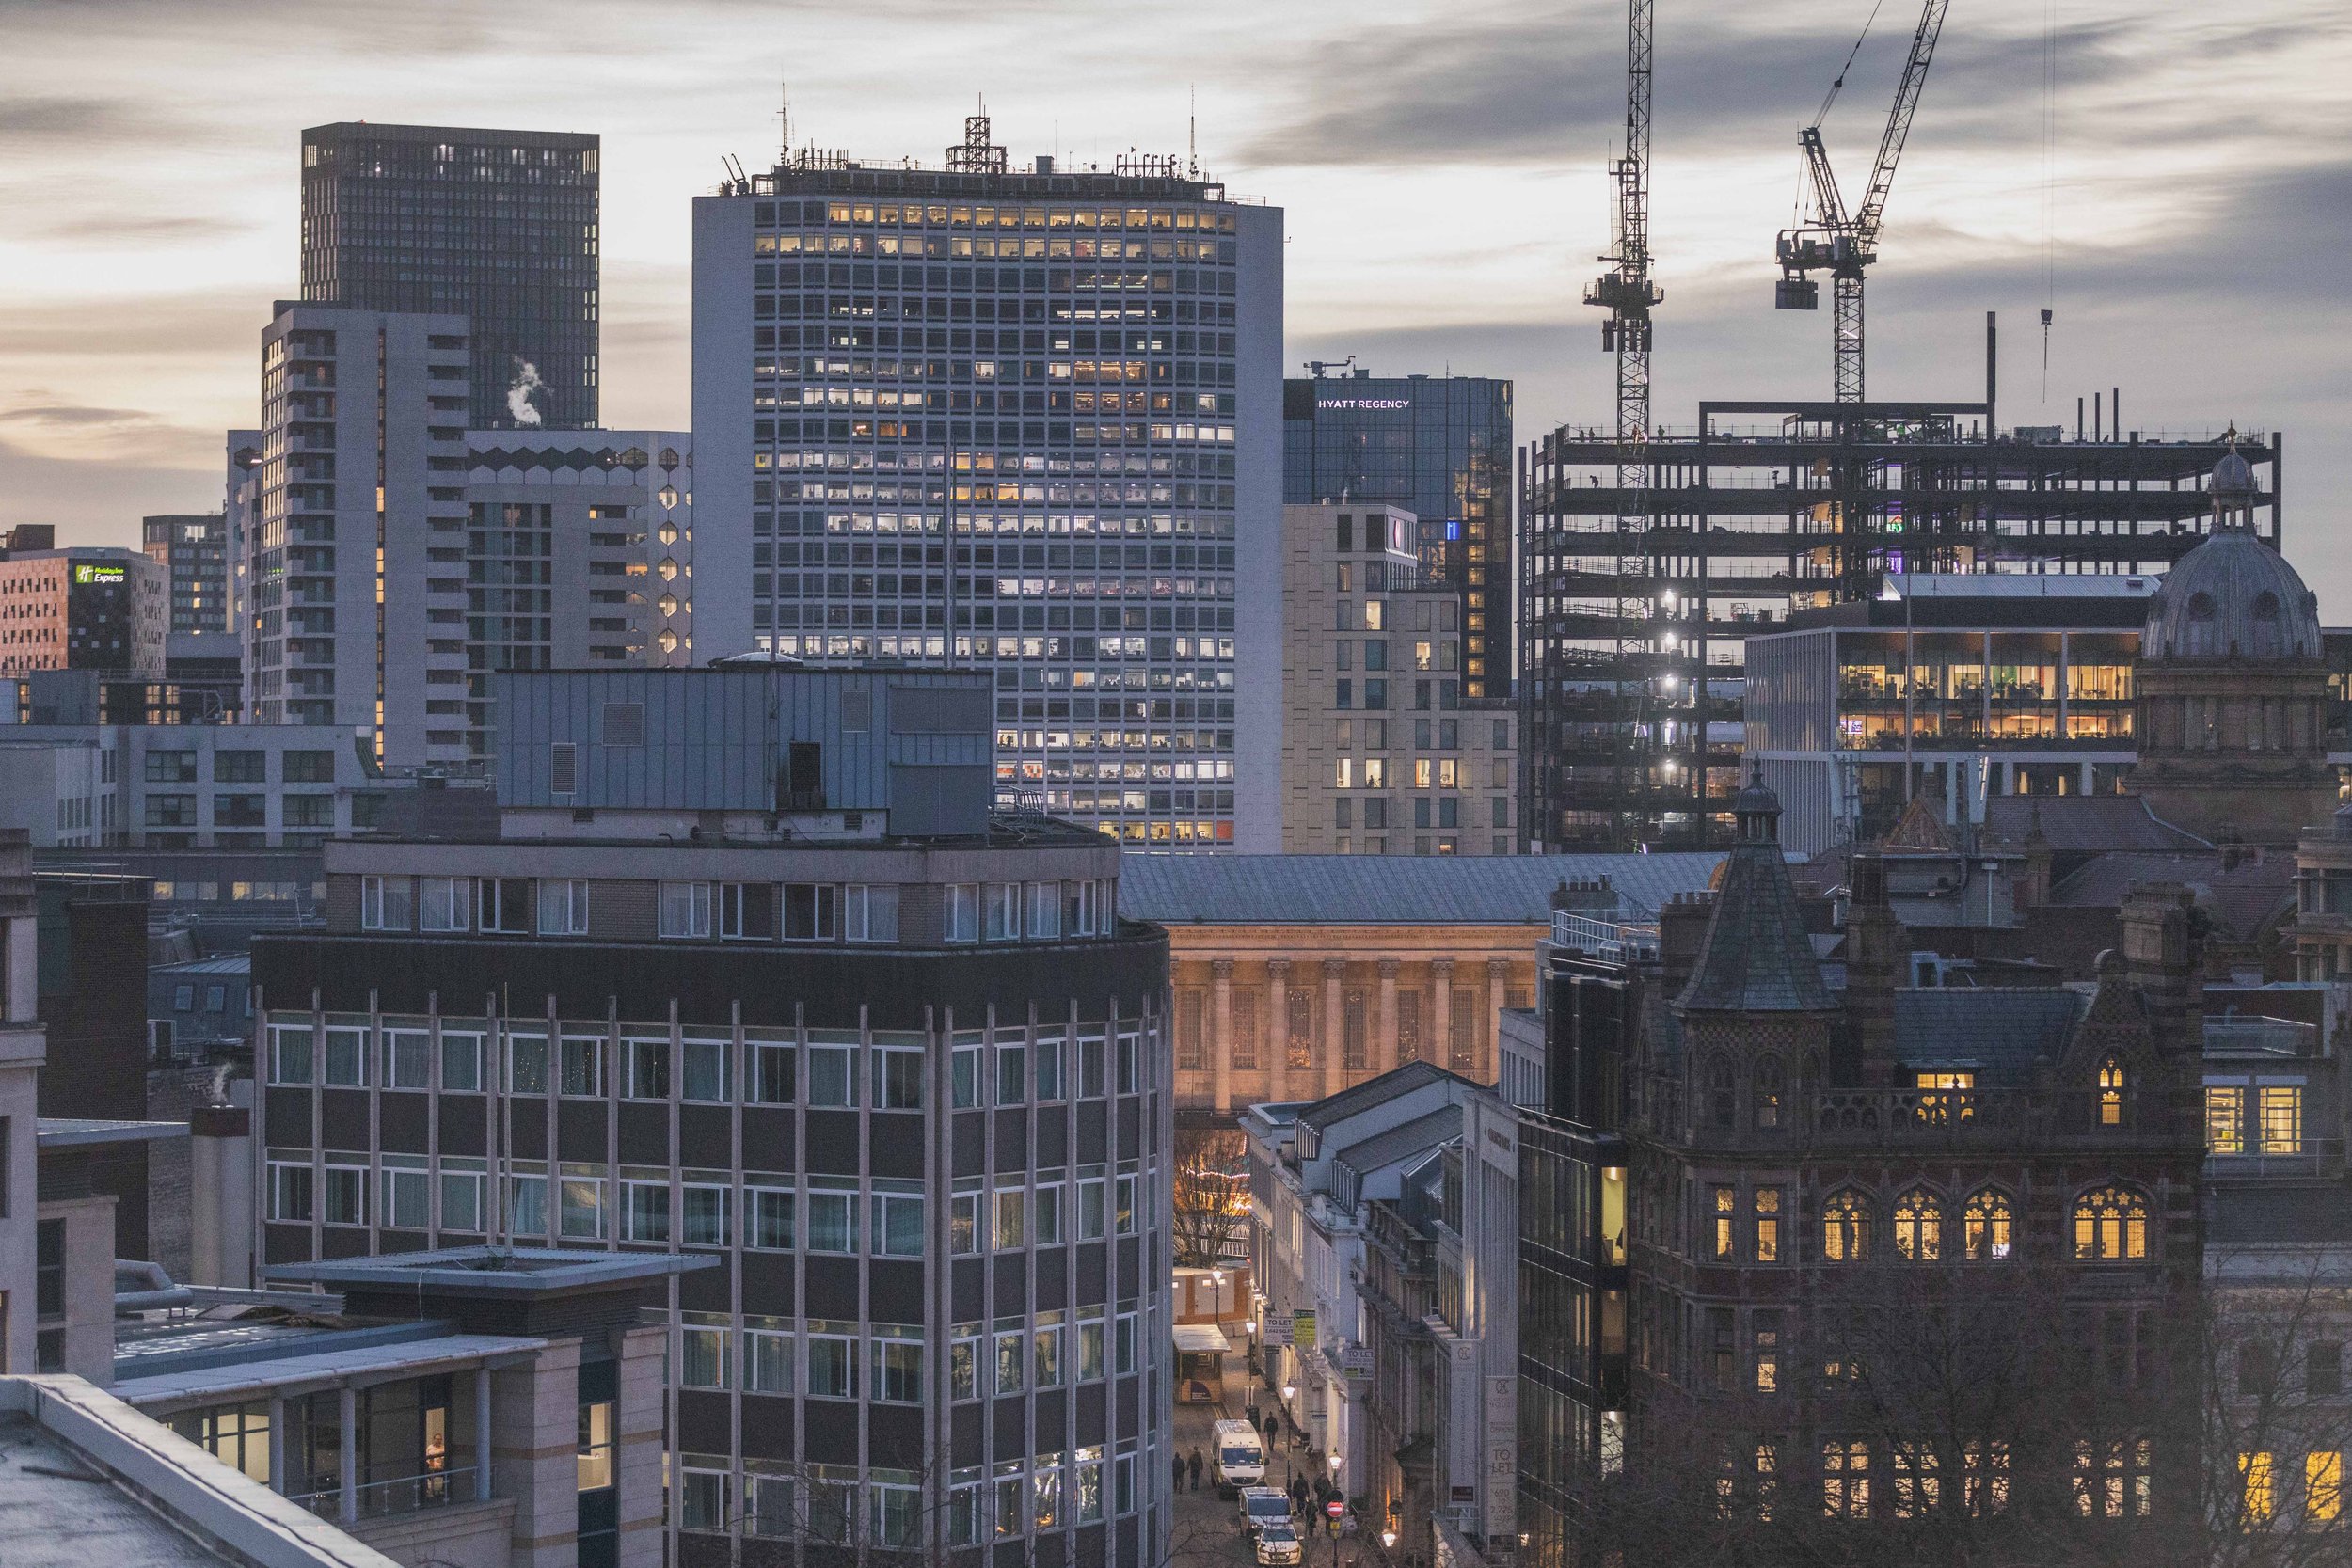
Digital Images
Shot on Canon Eos-R with 24-105mm lens
Purely for speed and convenience, I took my digital camera with me as well and I’m glad I did as I was happy that I’d got some shots ‘in the bag’. This meant I could spend a little more time planning the film shots. I pretty much always shoot landscape shots with a graduated filter and it work well in this situation as the sun set - it really helped balance the exposures well.
Overall, I’m really pleased with some of the digital images and it’s very nice to have my ‘safety blanket’ camera with me. About the only thing I wish I could change would be to have some snow or frost on the ground to give it a slightly more ‘Christmassy’ feel - but that might have to wait for another time!
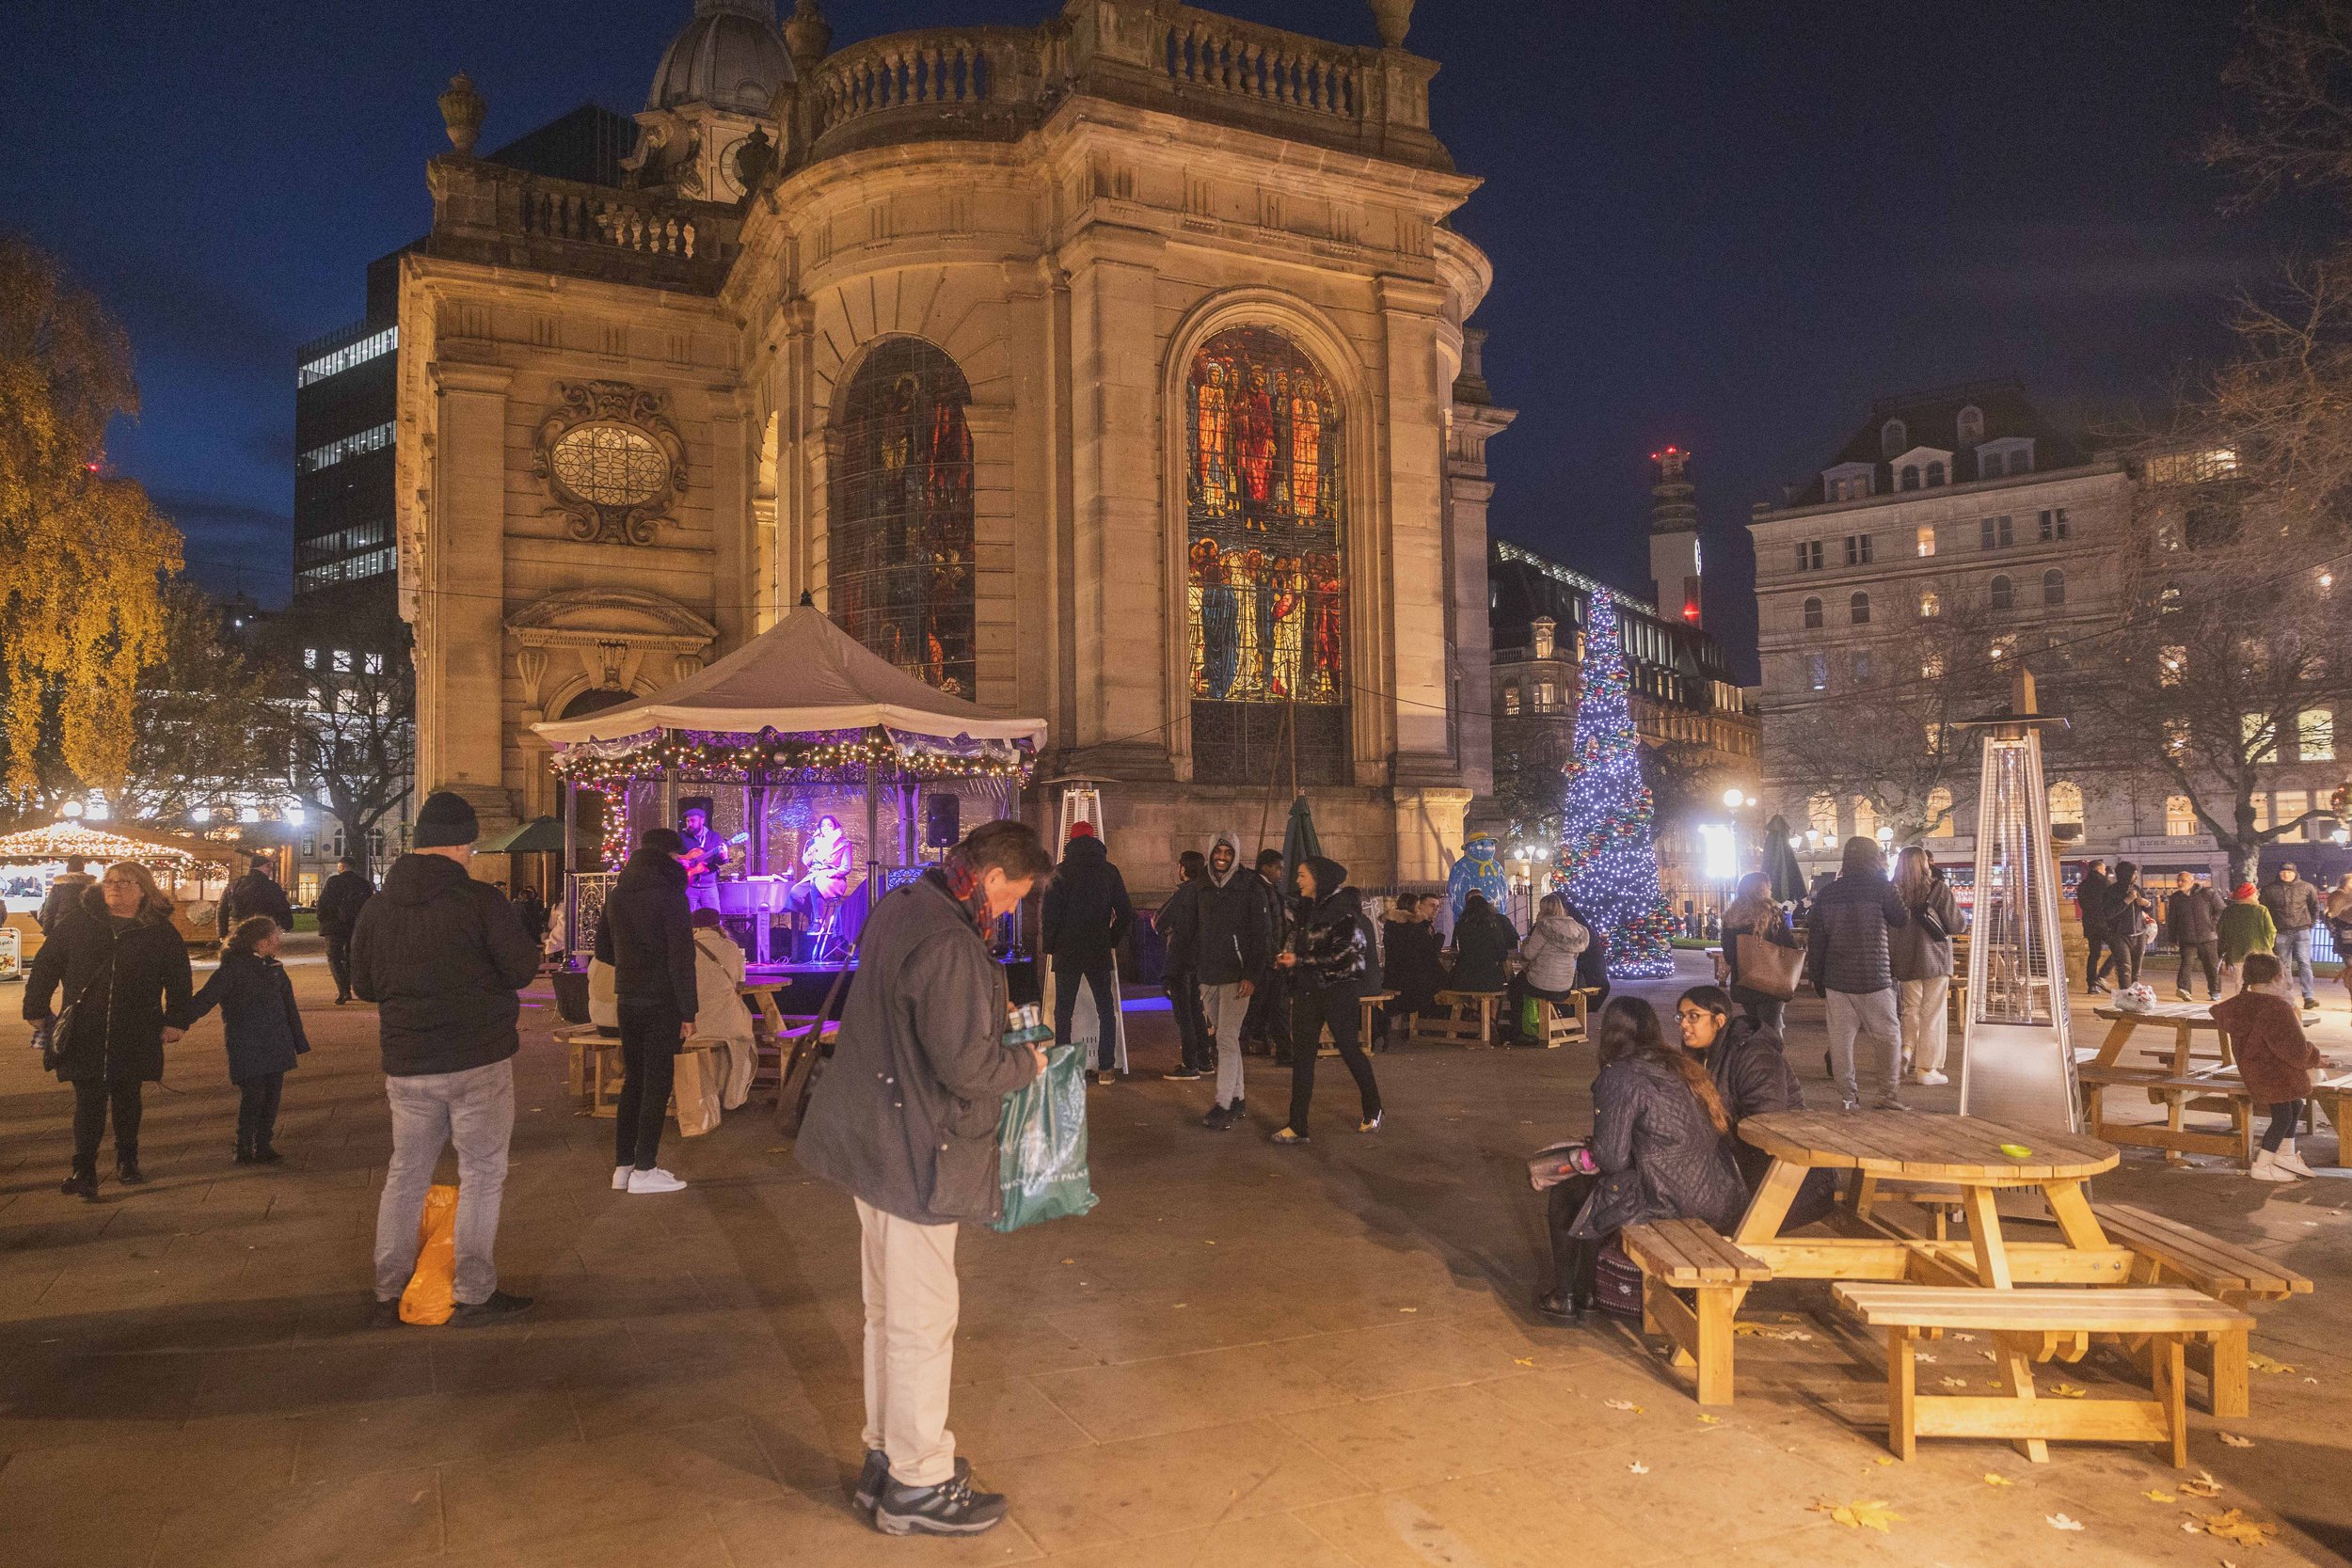
I took full advantage of my time and even shot some of the the other buildings around me such as Bank House and the Rotunda! I switched to the longer lens to grab some close up shots of the market. It was great to have such a unique perspective. Later, after I’d left House of Fraser, I also grabbed a few shots from ground level - just to show how cool the markets look!


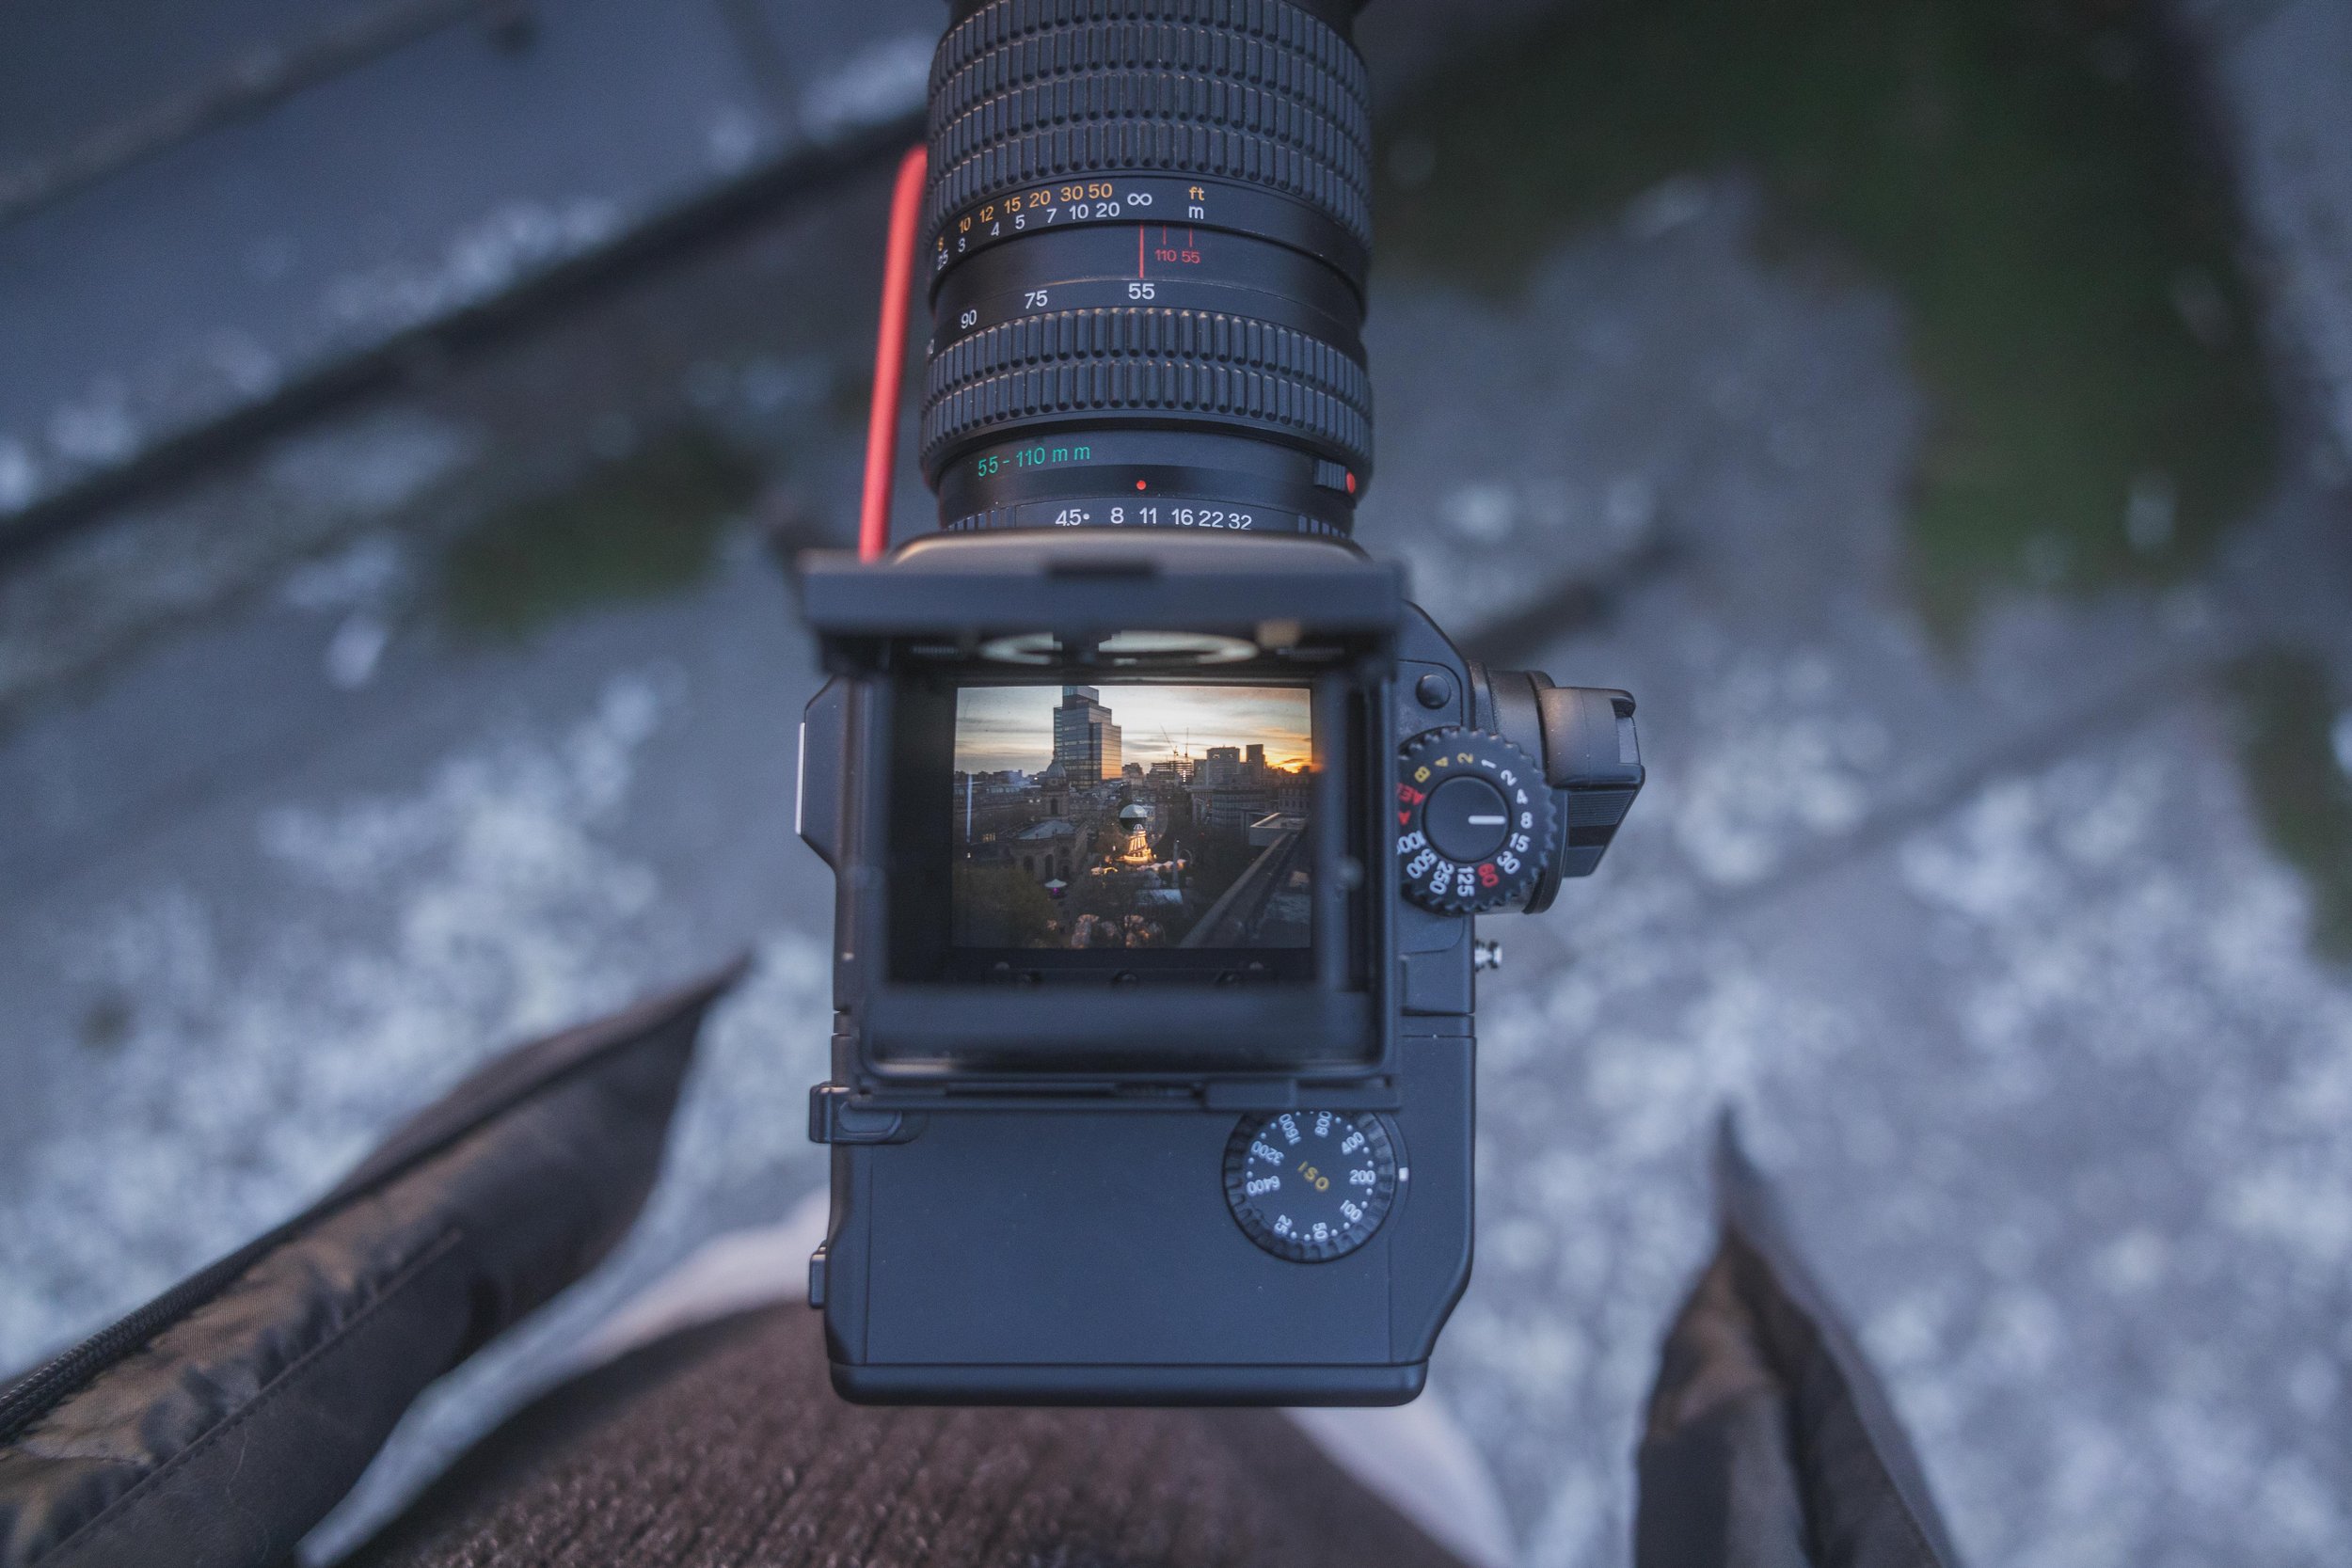


FiLM PHOTOGRAPHY - KODAK PORTRA 400
Shot on Mamiya 645 with Kodak Portra 400 and 55-110mm lens // Developed and Scanned at home
This was the highlight for me! For any of you following me on social medium, you’ll know that shooting film has been a bit of an obsession for me for the last couple of years. Every opportunity I get, I try to shoot film. On this occasion, I thought Portra 400 would work well, as it has a bit of warmer feel to it! I was certainly not disappointed with the results!
I knew from previous experience that I would get the best from the film before the light had completely faded, so I rushed to get as many shots as I could, just tweaking my compositions while the sun was setting. Some of the shots were a little difficult to expose as I wanted to make sure there was enough shadow detail - but on the whole, I think they worked out pretty well!


FiLM PHOTOGRAPHY - Cinestill 800T
Shot on Intrepid 4x5 Mk iv Black Edition with Cinestill 800T and Nikon 90mm lens // Developed and Scanned at home
So for anyone that’s shot even a little bit of film, you may have heard of ‘Cinestill 800T’ - For those unaware, it’s a type of film that us film photographers go a bit nuts over! It is a ‘cinema’ film that (when used correctly) just makes everything look amazingly cinematic! I won’t bore you with the details of how and why - but it can make some truly spectacular images!
However, one of my little journeys out wouldn’t be complete without me screwing something up - and this trip was no different! To cut a long story short, when I switched from 400 speed film to 800 speed - I forgot to change my metering to account for this! I’m an idiot, I know… So I think the images were a touch over-exposed.
That said, I also don’t think this scene was ever going to get the best from Cinestill so it wasn’t a great choice by me anyway. Some of the shots came OK, but overall, I am far happier with the Portra 400 shots.


Final Thoughts…
I’m the first to admit that I am very fortunate to get access to some of these places and subsequently, some of the best views in Birmingham. However, I always do what I can to make the most of these opportunities and create the best images I can so everyone can enjoy them! Overall, I’m pretty happy with these images and in particular, how the film images came out! Hopefully, there will be even more roof top excursions in the future!

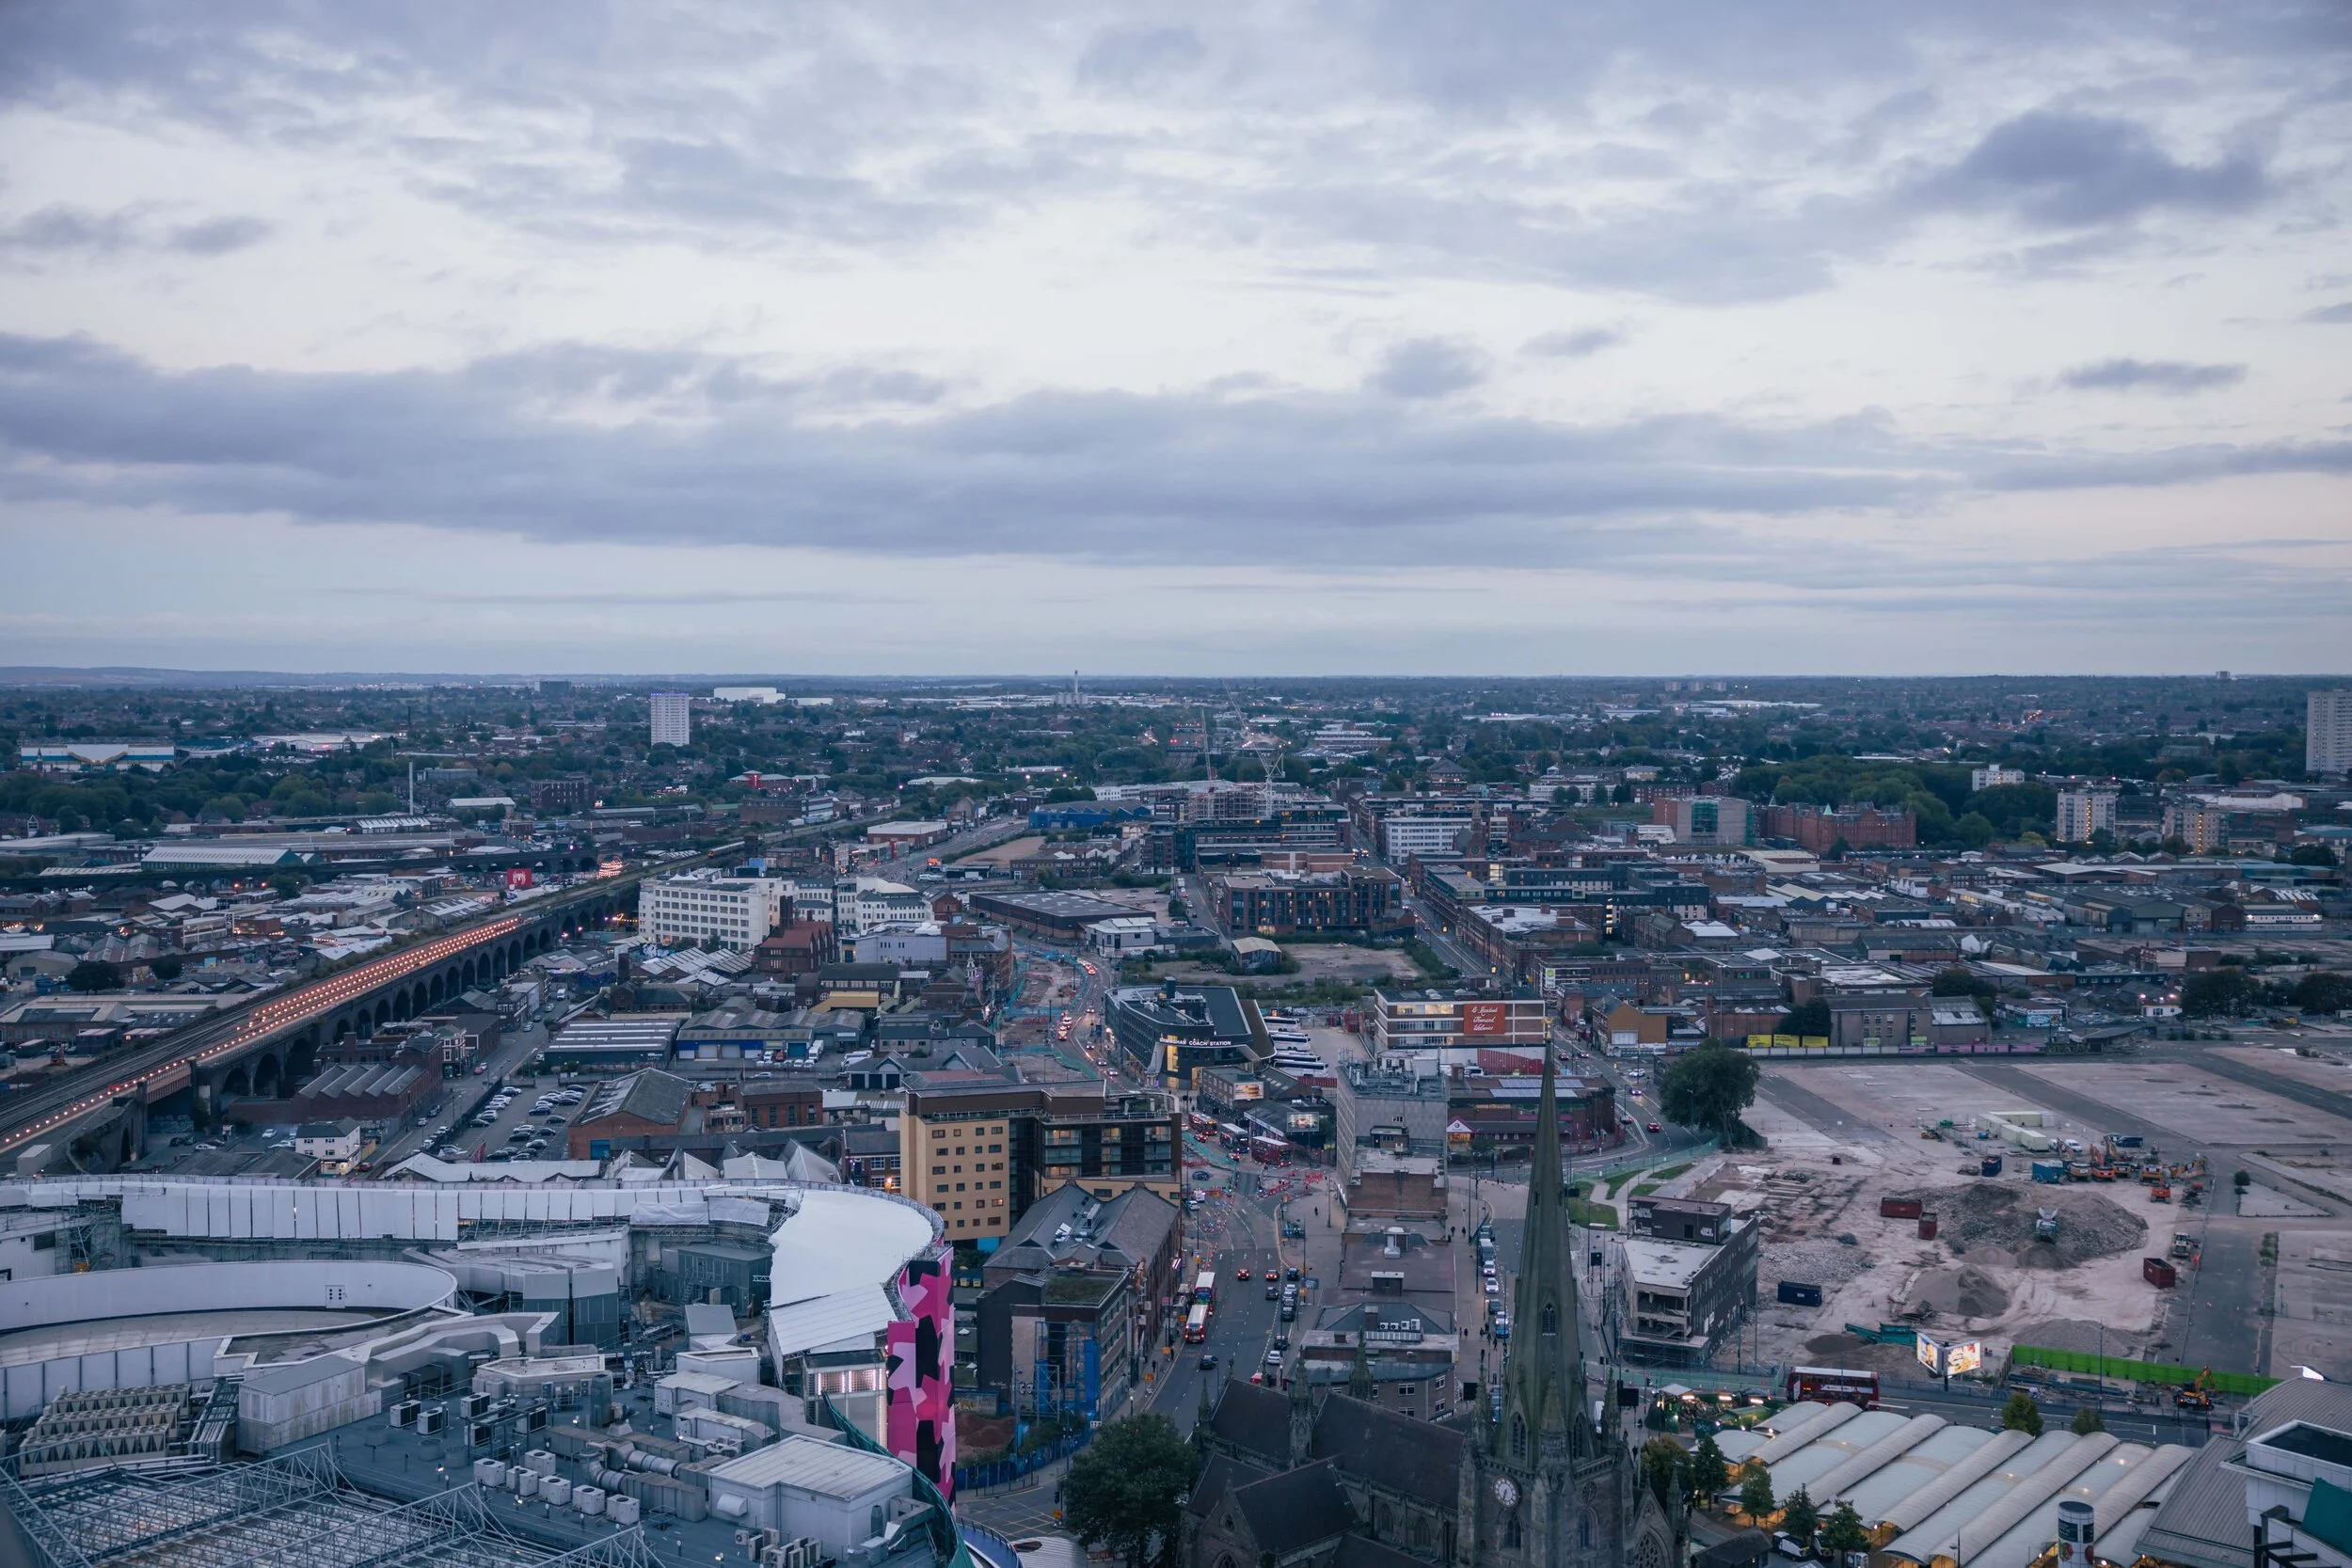
The Best View in Brum? Possibly...
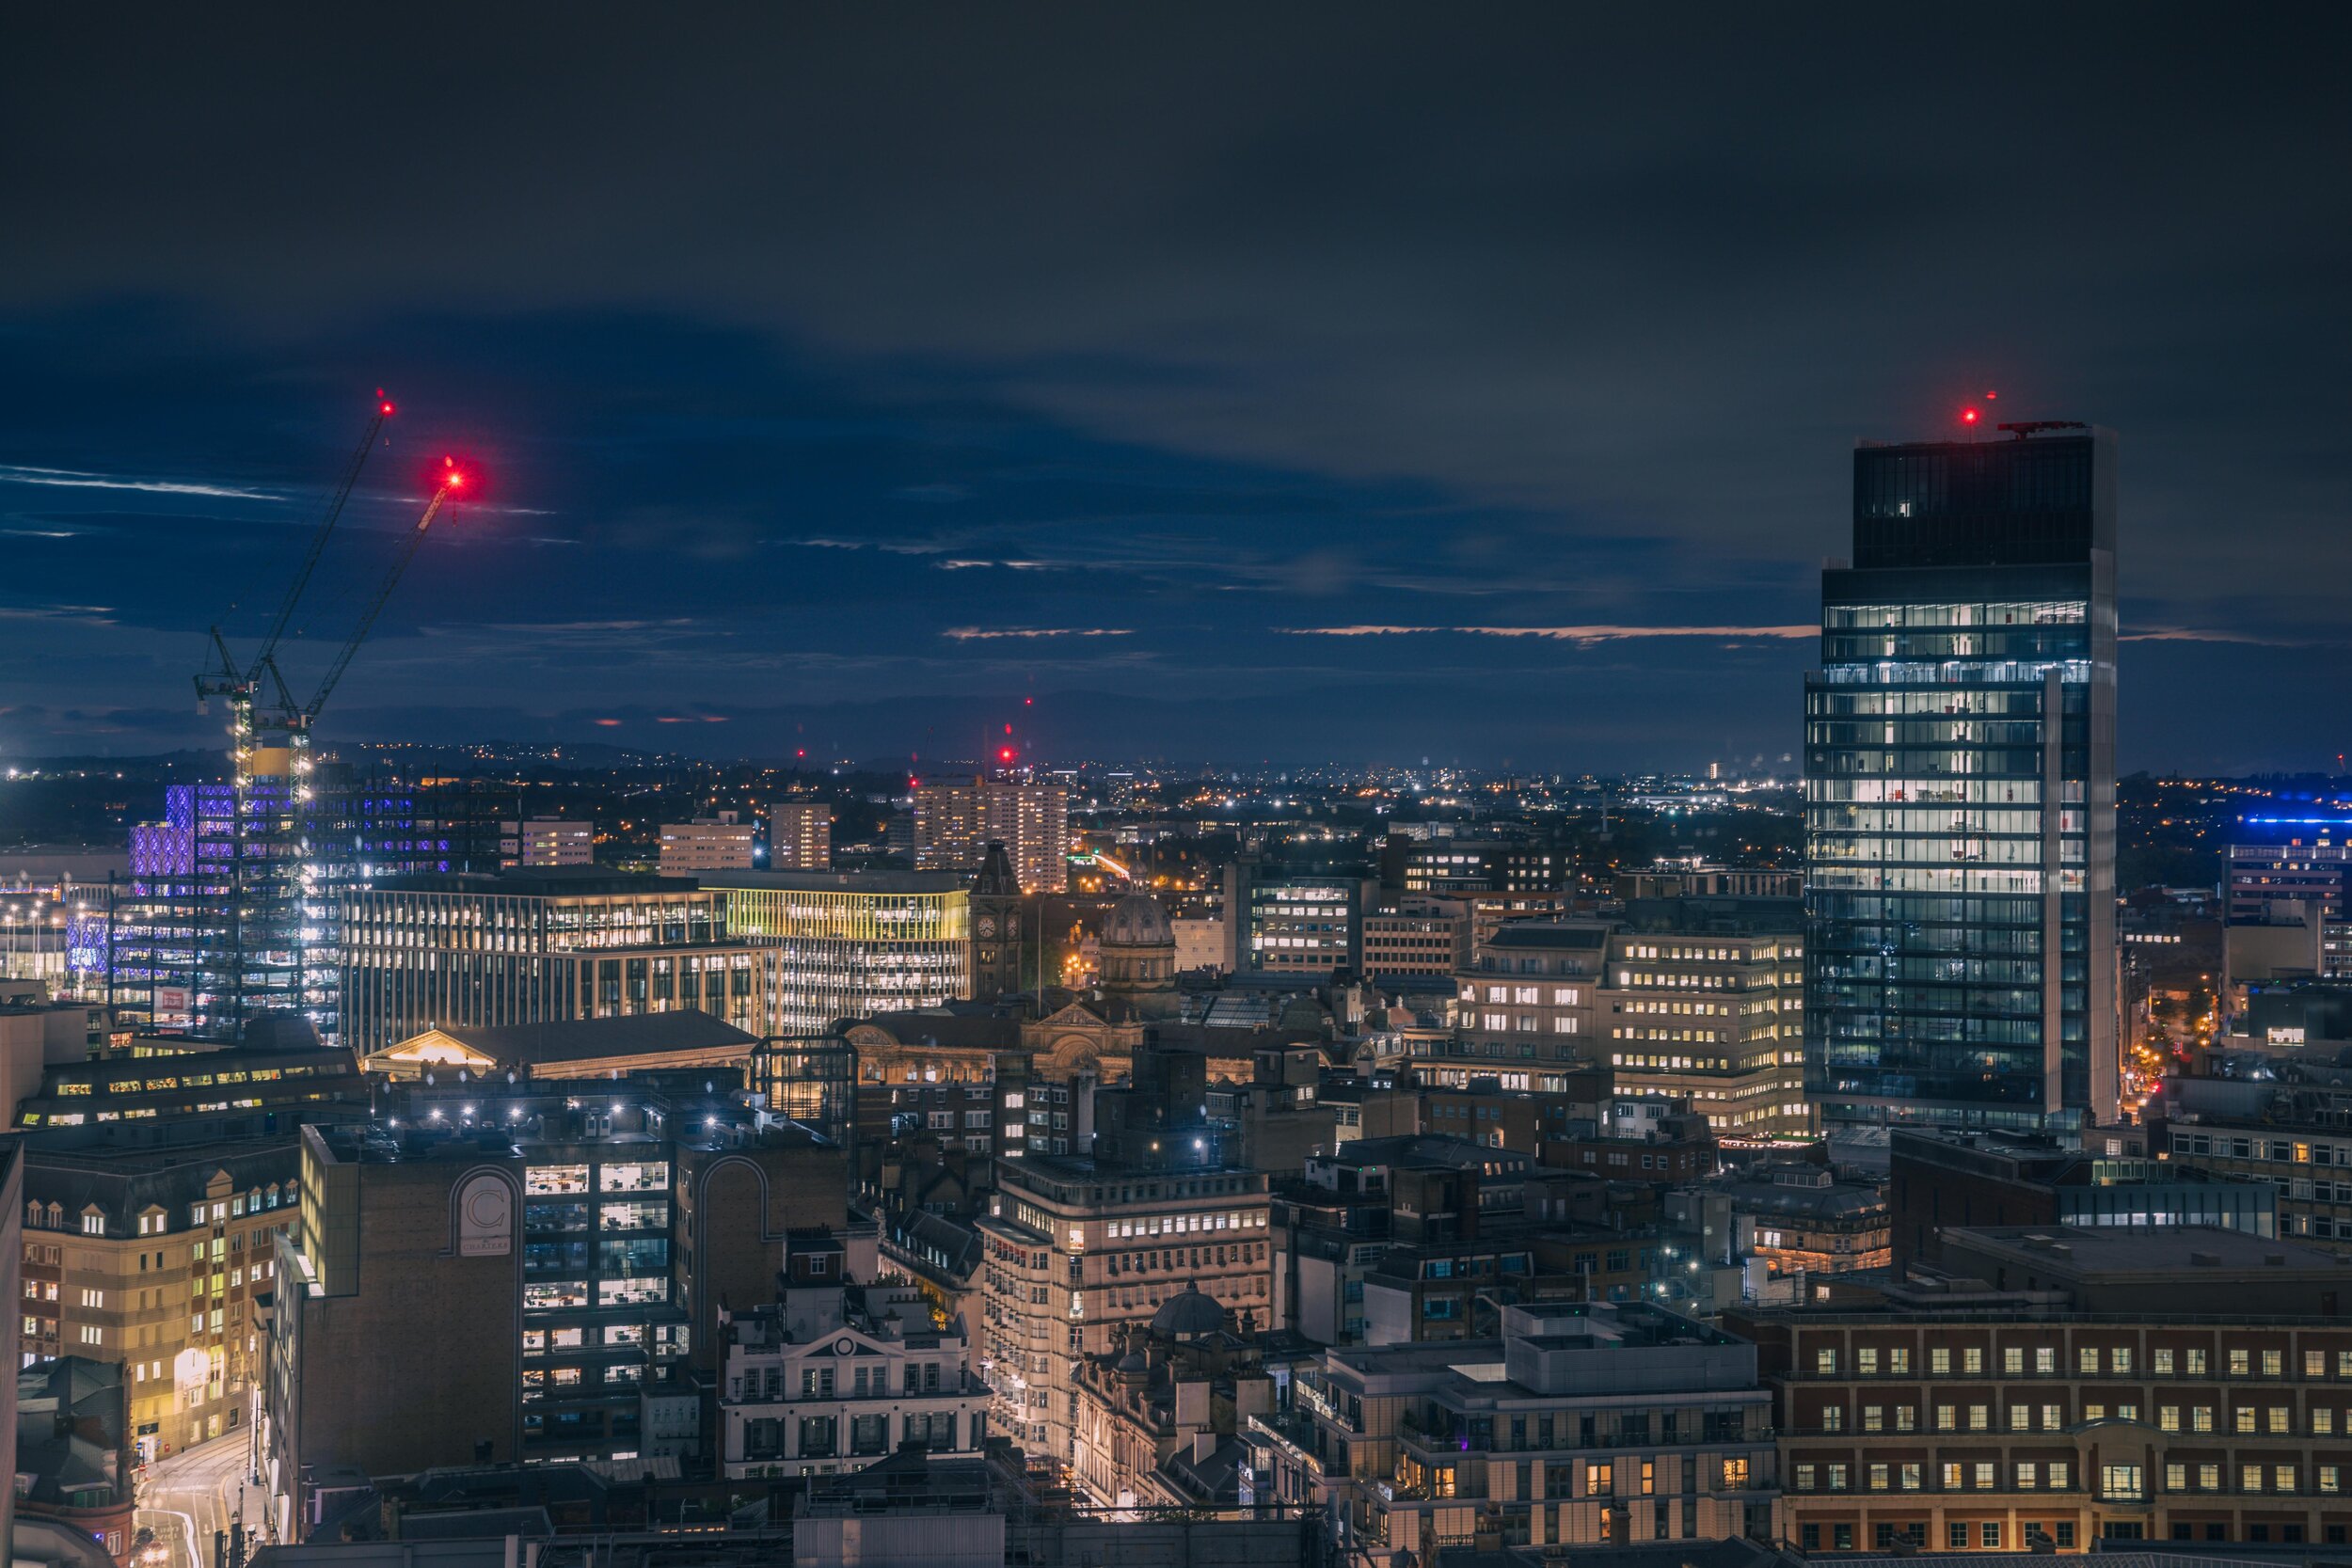
It’s not everyday that you get asked if you would like to take photos from a building with some of the best views in Birmingham! So when the awesome people at Staying Cool at the Rotunda reached out to me, I jumped at the chance! In truth, I’ve shot from here a few times in the past but the opportunity was too good to turn down.

It’s not everyday that you get asked if you would like to take photos from a building with some of the best views in Birmingham! So when the awesome people at Staying Cool at the Rotunda reached out to me, I jumped at the chance! In truth, I’ve shot from here a few times in the past but the opportunity was too good to turn down.
However, as I am pretty much my own worst enemy I decided to make my life even harder by shooting film and not just any film, but Large Format! If this means nothing to you, don’t worry! I’ll save the boring stuff until later but let’s just say it’s a bit tricky at the best of times!
More concerning was that on the day, the weather wasn’t exactly inspiring and having been on a video shoot all day, I didn’t have much time to prep! So after a flying visit home to switch from ‘video mode’ into ‘pretending to know about film photography mode’ - I grabbed a few different cameras and literally ran across town to the Rotunda.
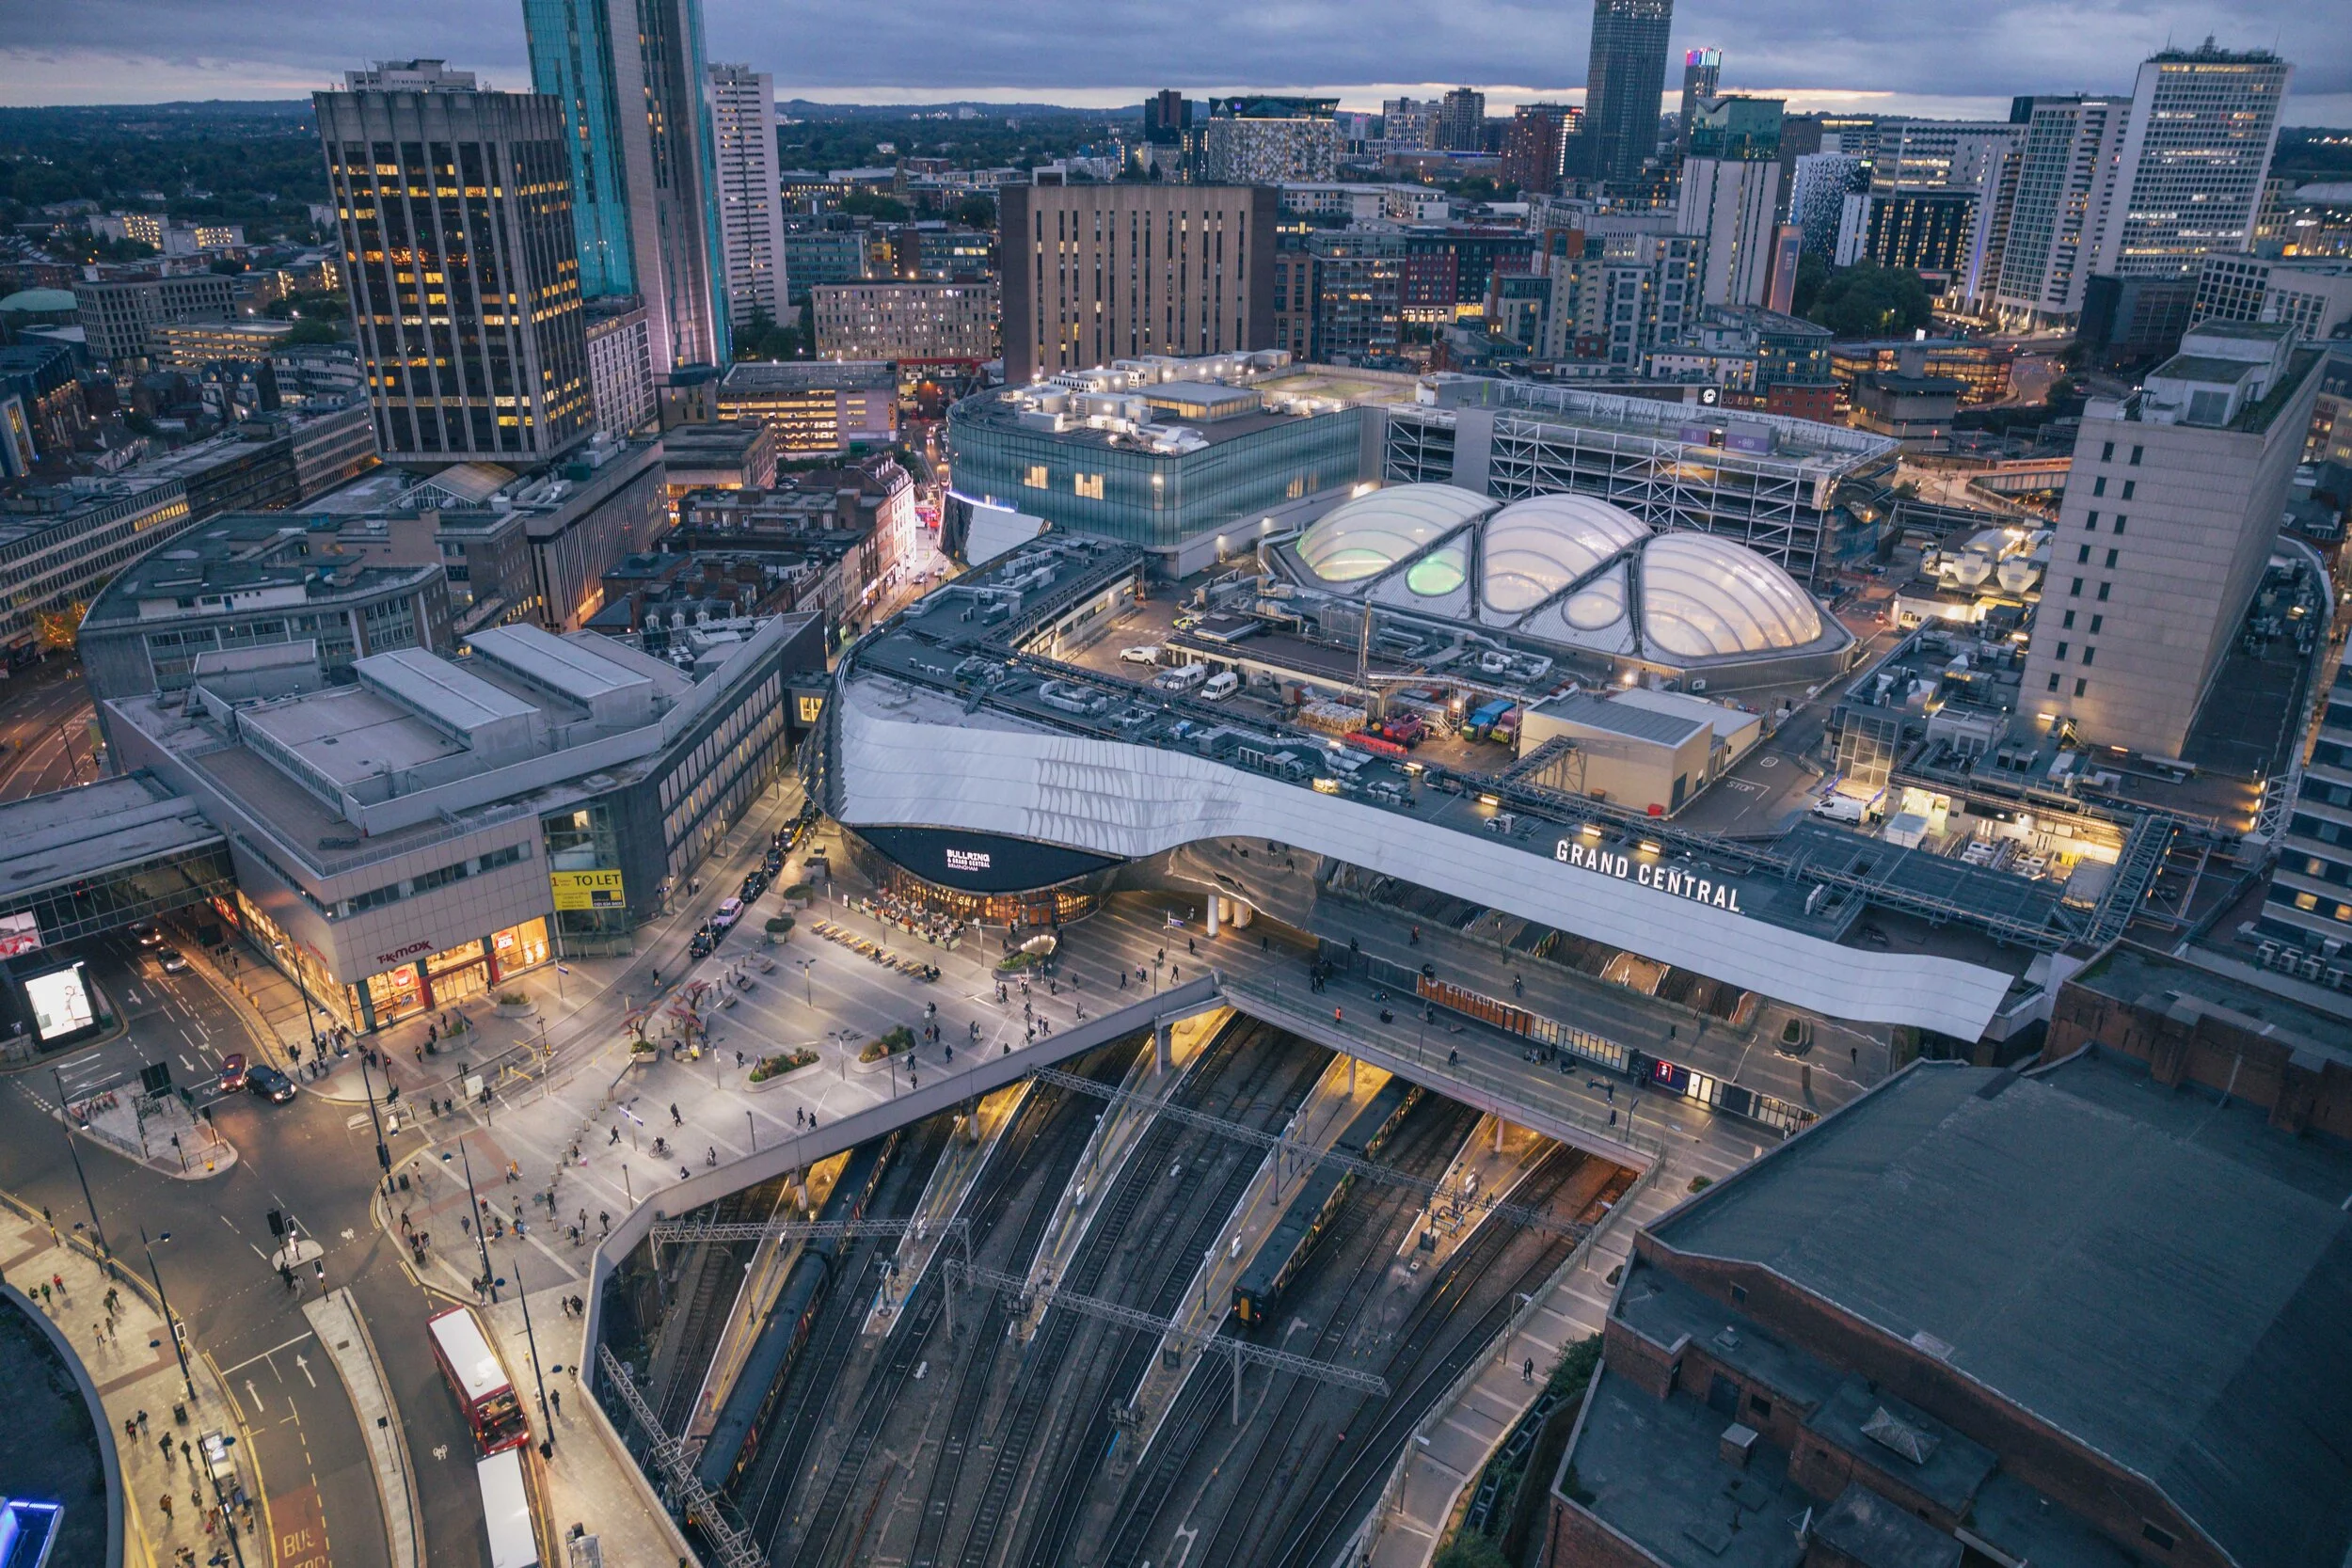
After a very brief ‘hello’ I grabbed the keys to the Penthouse (excuse the flex) and made my way to the 20th floor! Walking into main room, you can’t help but be drawn to the floor to ceiling windows as the view slowly reveals itself. Quite simply, it’s one of the best views in the city, well in my opinion at least… However, there was no time to get all slushy, the light was fading fast and I need to set up the big camera!
Over the course of the next hour or two, I didn’t stop switching between cameras, loading film and basically panicking that I screwed something up and predictably, I did!… If camera stuff interests you, I’ll put some more details below. However, if you’re just here for the pictures, have a little look-see below… Huge thank you to Staying Cool and if you ever get the chance to experience these views in person, it really is a must! Check out their website below…
Digital Images
Shot on Canon Eos-R with 24-105mm lens
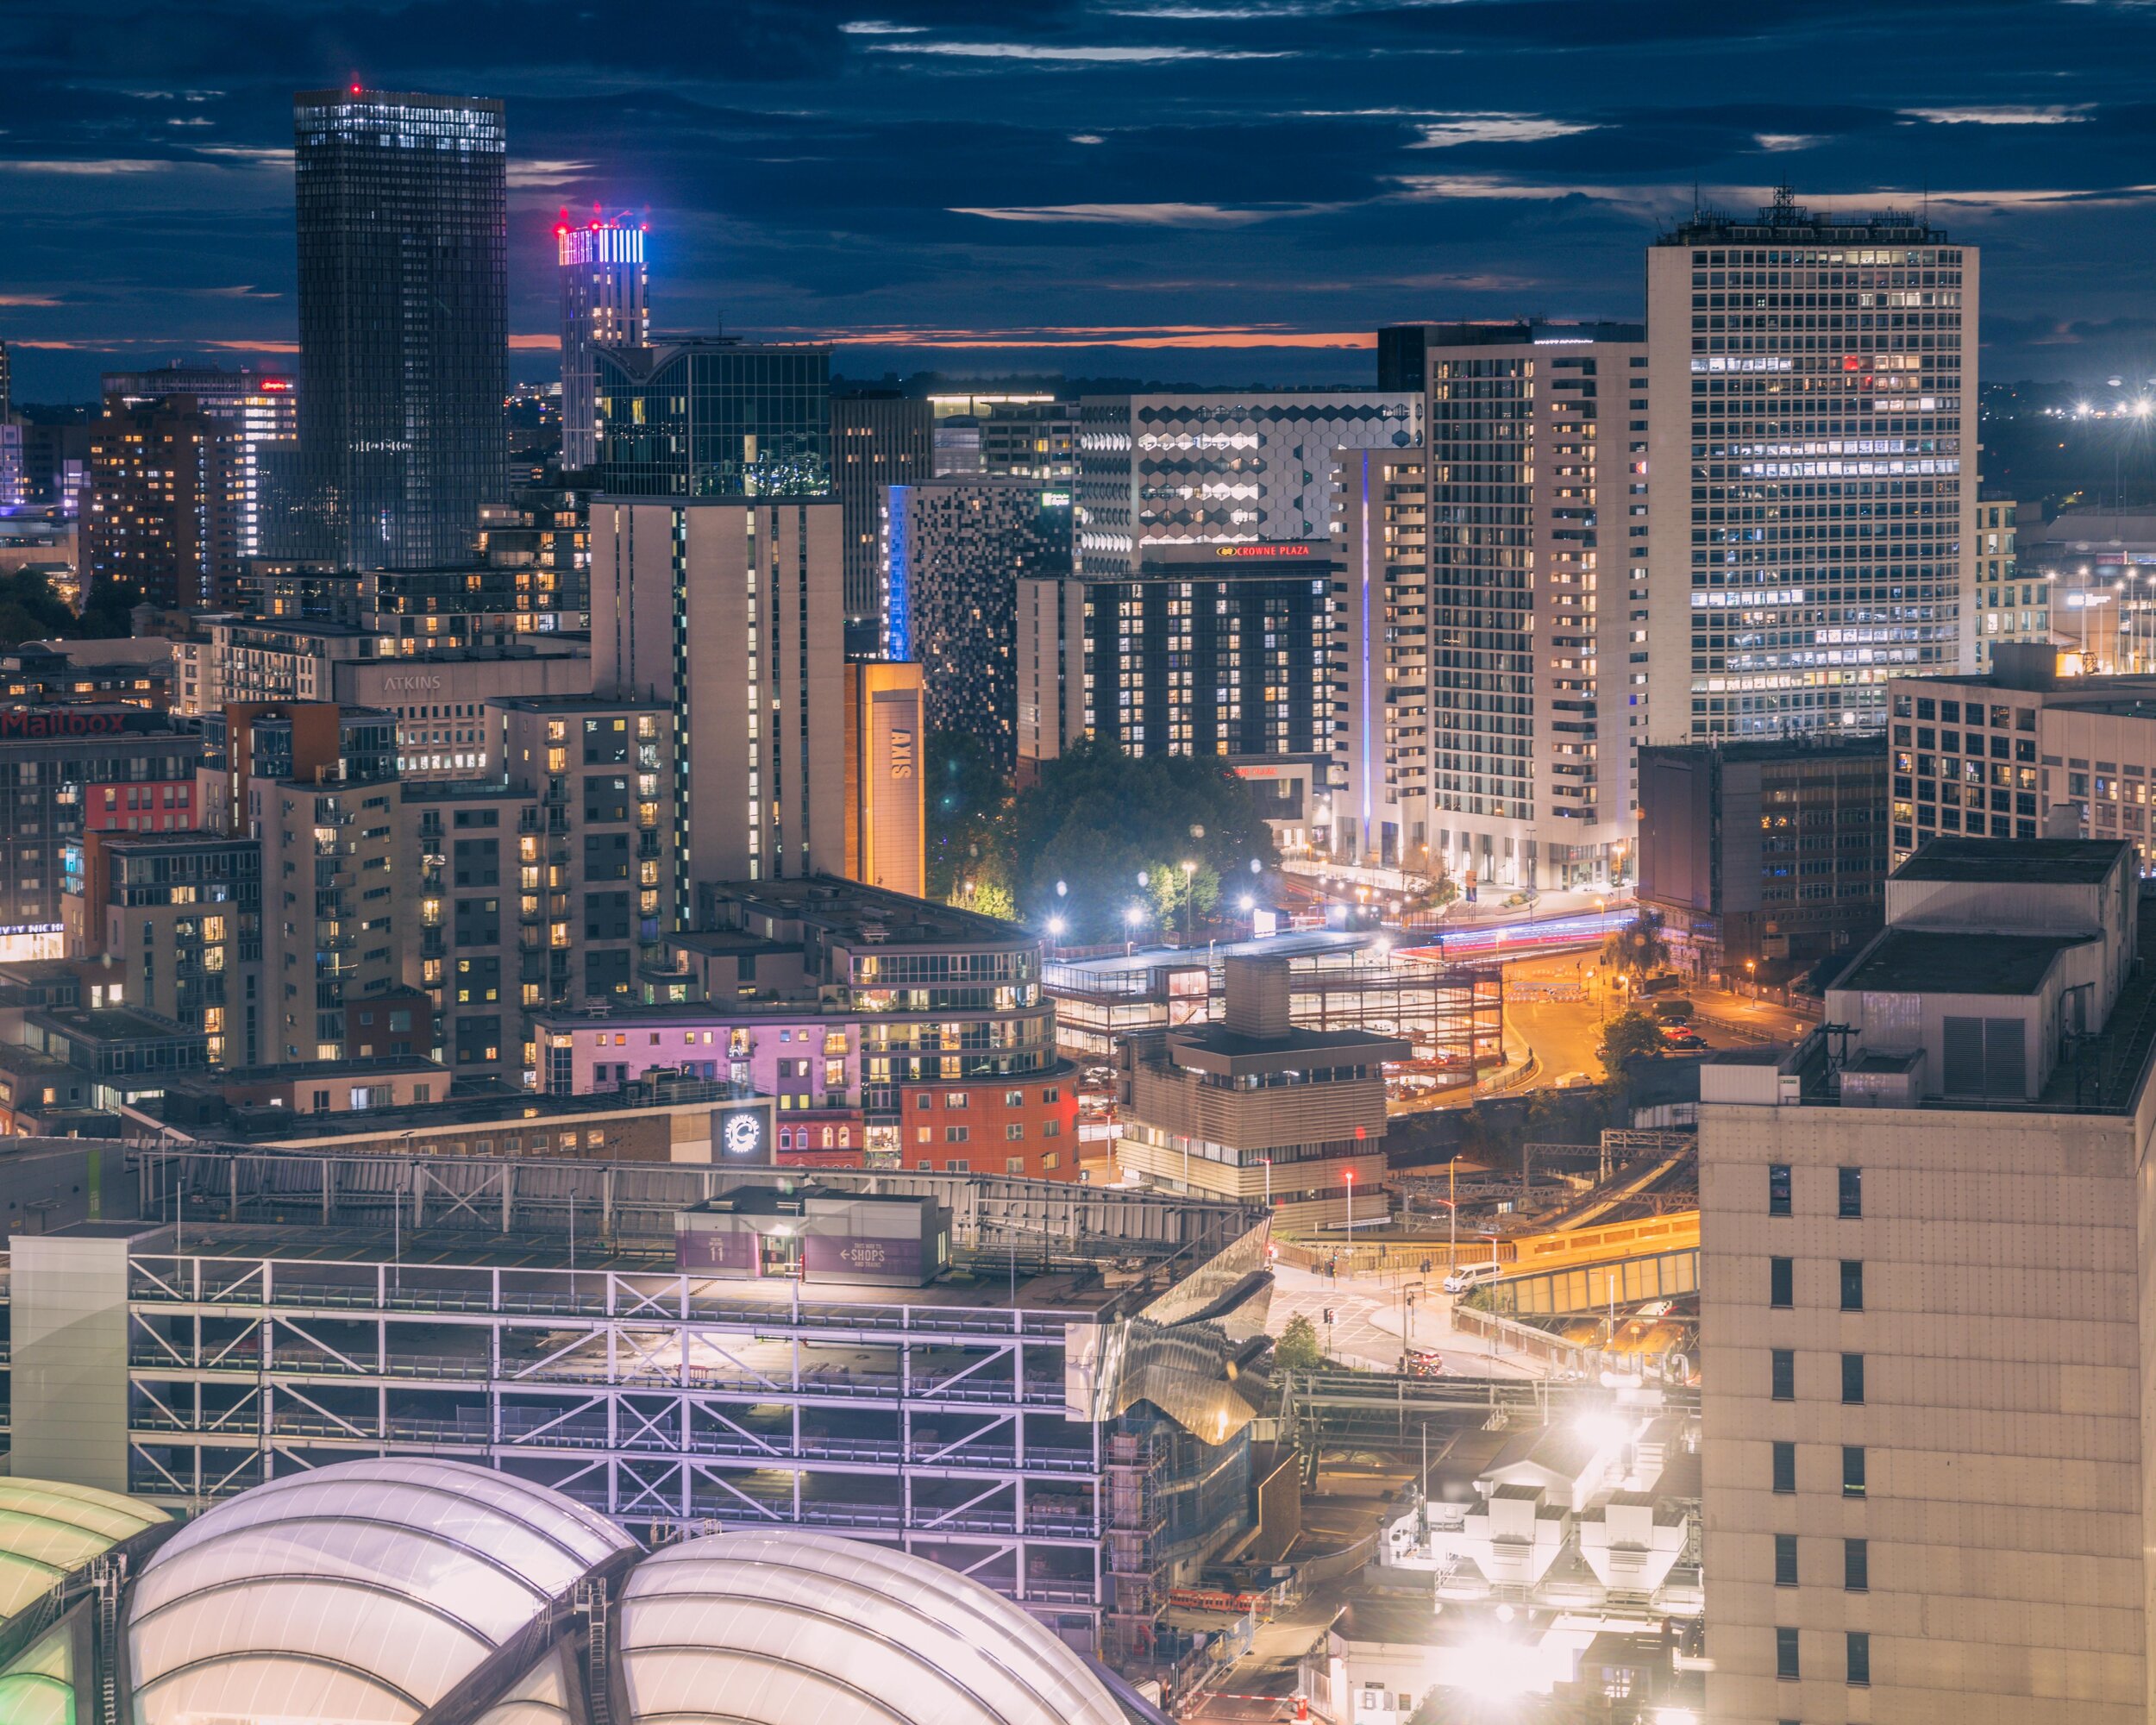
I certainly didn’t feel confident ‘just’ taking film cameras and I’m glad that I took the digital camera as a backup! The early evening shots were a bit uninspiring. However, after sunset, the city lights up and I was really happy with the night shots. It was easy to just concentrate on the ‘big’ view and I certainly ‘filled-my-boots’ with landscape images. However, it was also interesting to pick out little scenes and pockets of light. I wish I’d taken a longer lens as well but this shoot was more about the film photos anyway.
Overall, the digital images are pleasing and apart from the grey weather during the day, I’m happy with how the rest of the images came out.


Medium Format
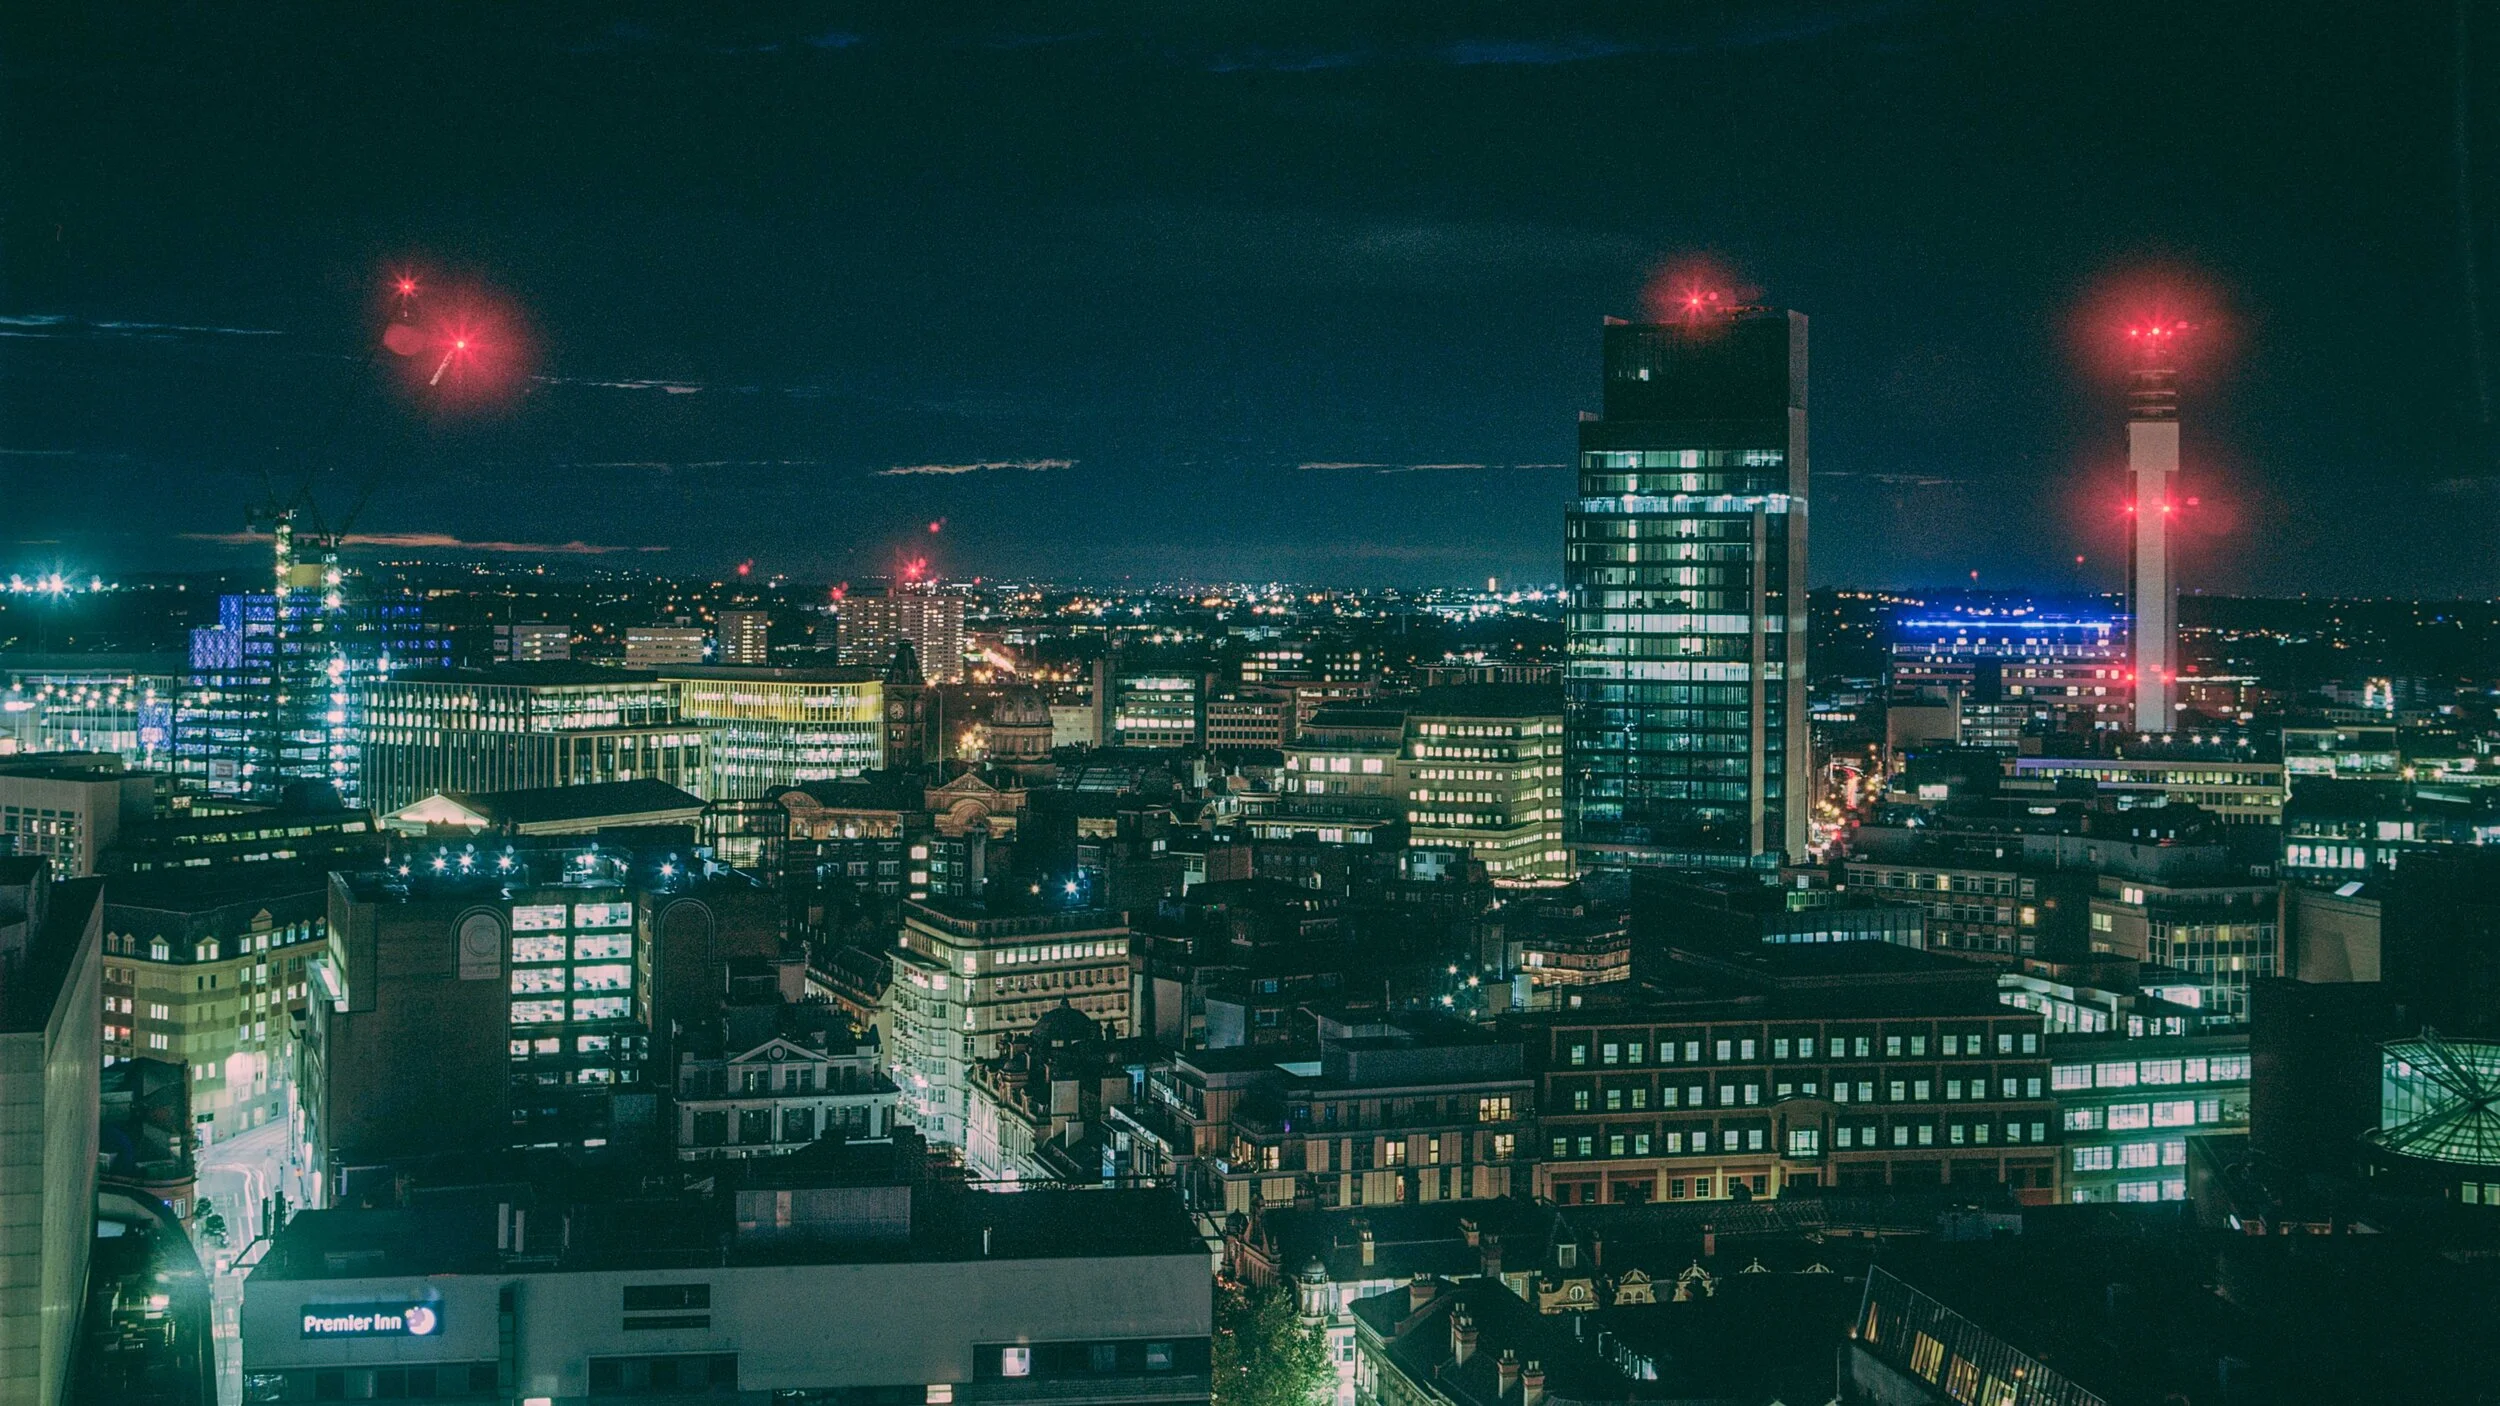
Shot on Mamiya 645 with Kodak Portra 400 and 55-110mm lens // Developed and Scanned at home
This is where the evening started to get interesting. I’m usually pretty confident with metering for film but judging exposures at night can be a bit of a nightmare. All of these images were taken on the Mamiya, a fantastically easy camera to use for Medium Format but even so, there was still plenty of opportunity for me to makes mistakes. I set the camera up on a tripod and set about getting some exposures.
I was a little concerned that the exposure times (with added reciprocity to account for film failure) were only coming out at around 8 seconds. I was convinced that they would be nearly double this and something inside me was screaming out to ‘go longer’. However, I’m glad that I didn’t. I think these images are exposed pretty well and even though they could have done with a bit more light, I kind of like the slightly moodier look in comparison to the digital images!
For those interested in film photography and all that goes with it - I did develop the rolls of film/4x5 sheets at home using a C41 process and then scanned the negatives myself. I’m pretty sure a lab could have got better results but there is something incredibly rewarding about be in control of the entire process!


Large Format
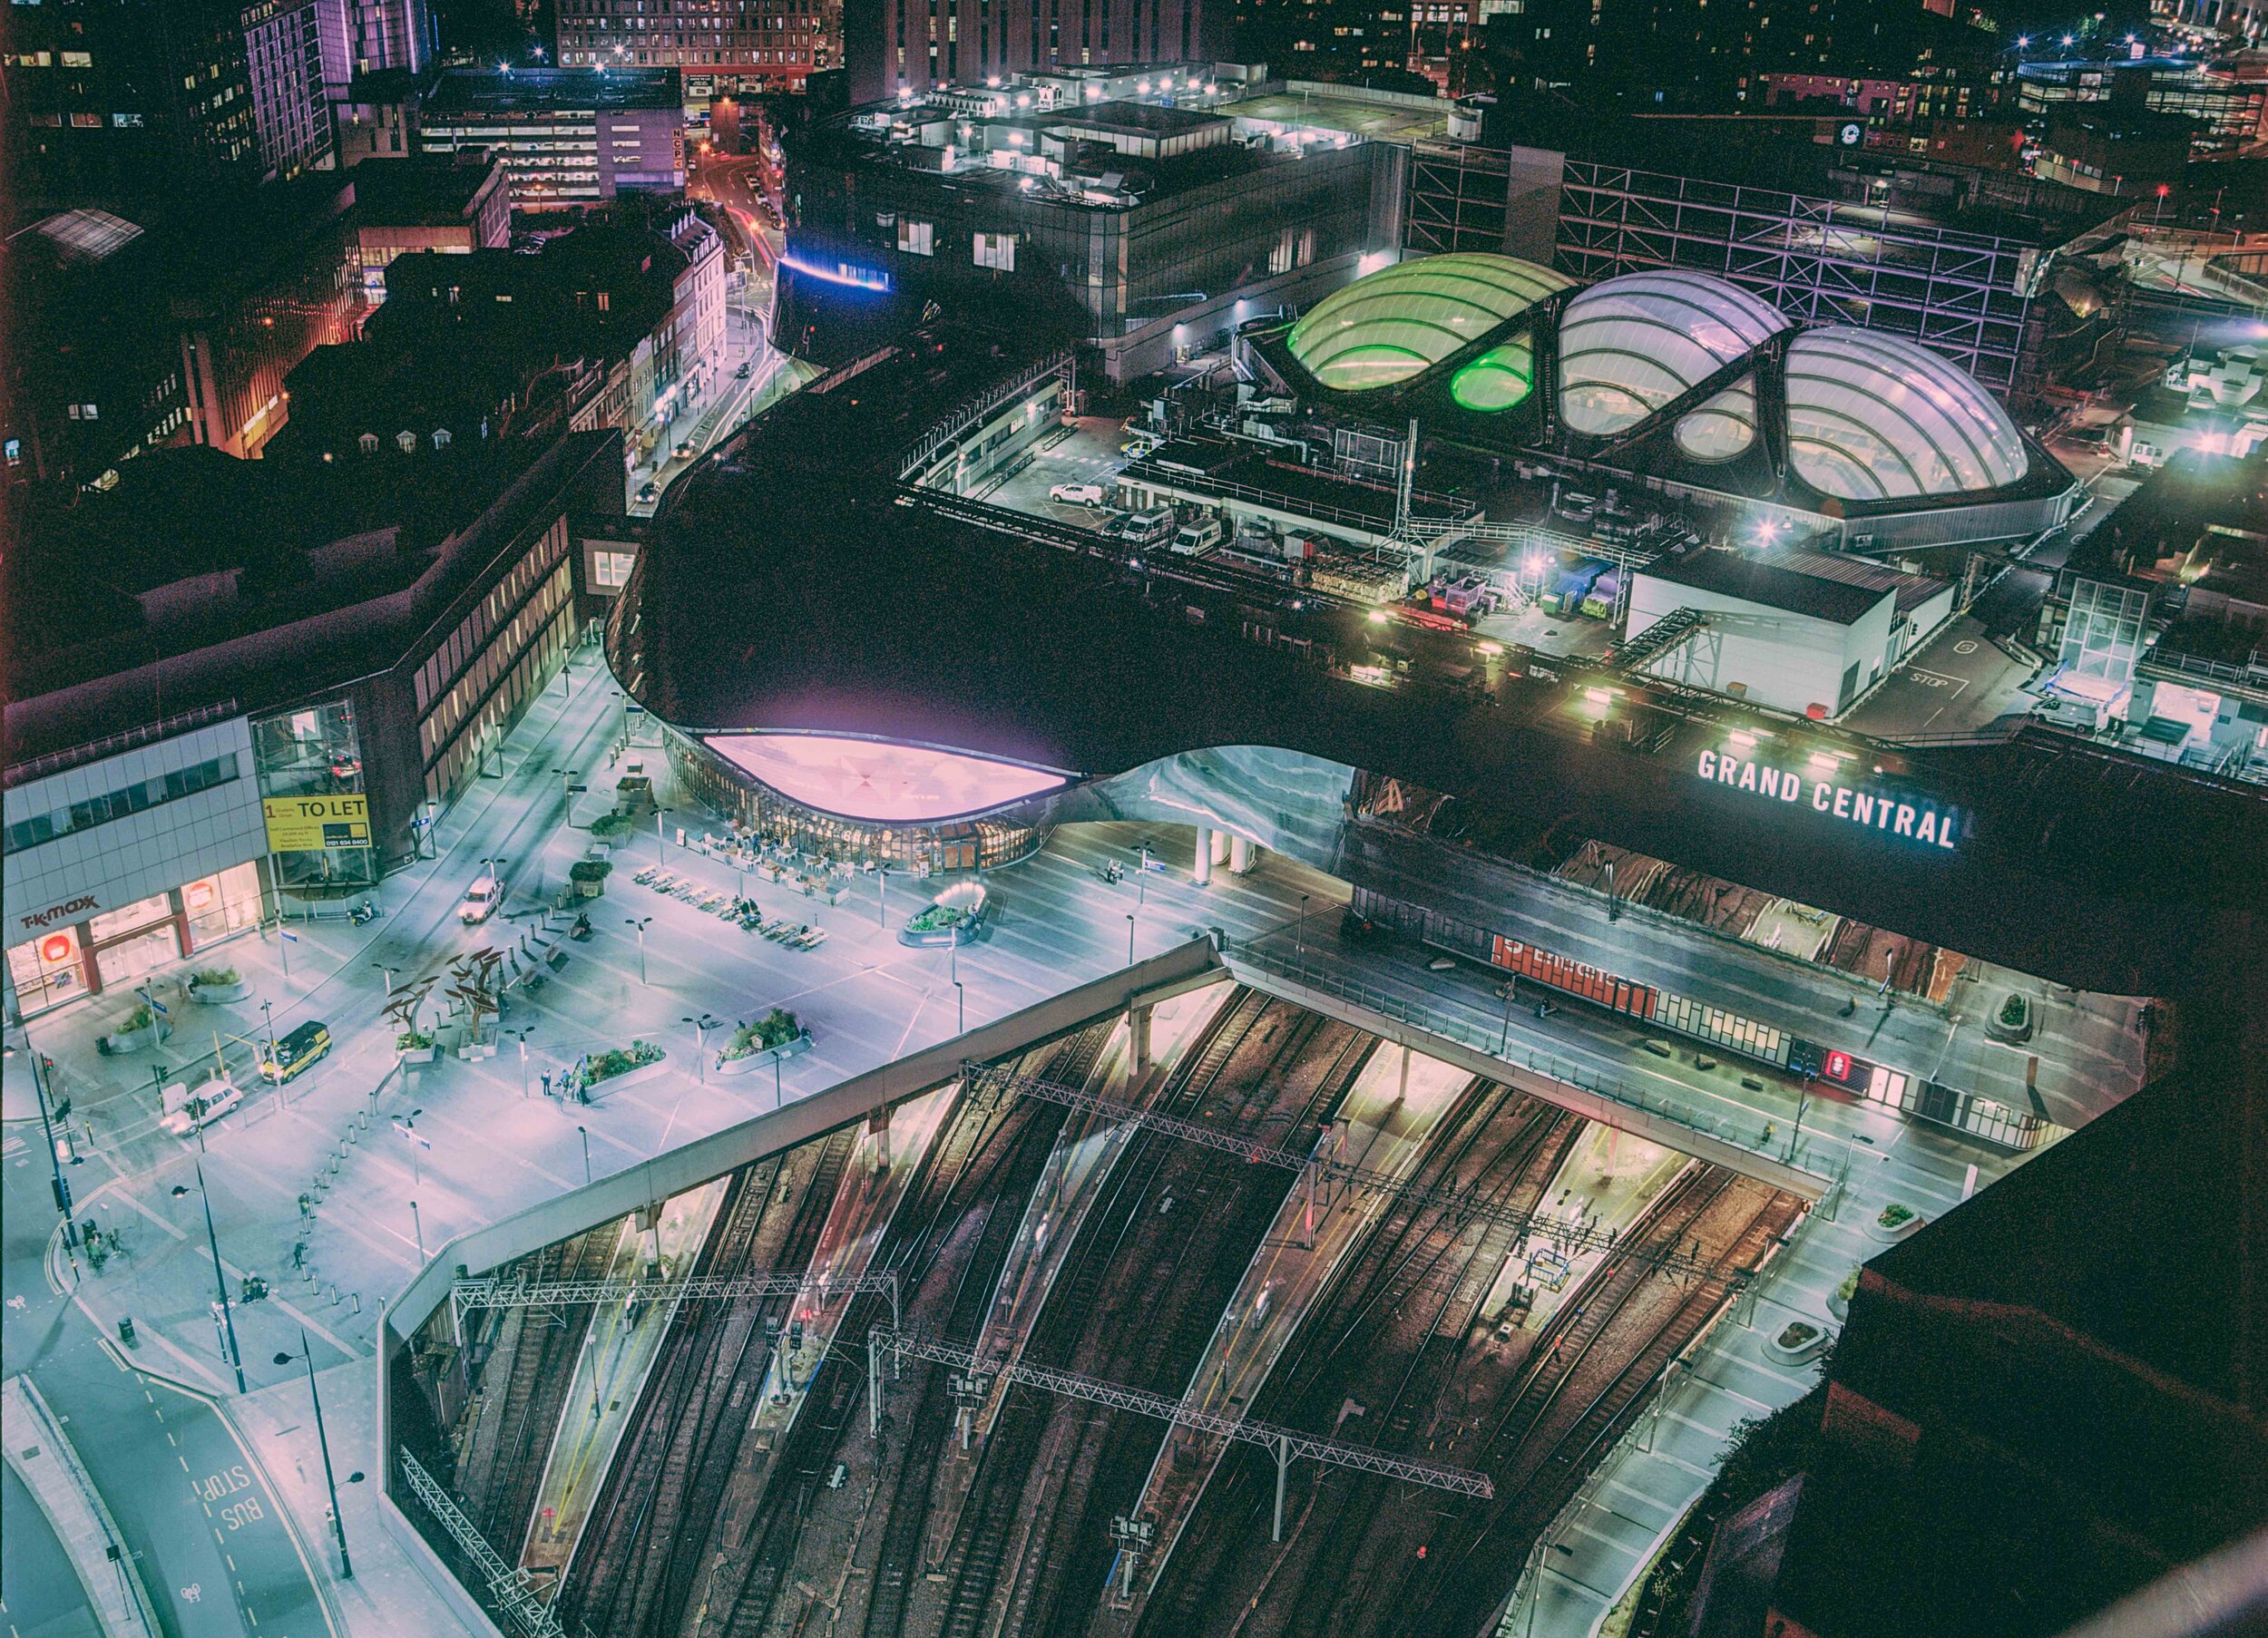
Shot on Intrepid 4x5 Mk iv Black Edition with Kodak Portra 400 and Nikon 90mm lens // Developed and Scanned at home
If the Medium Format shots were where things got interesting, then the Large Format shots were where everything went badly wrong! I have a bit of experience under my belt with the Intrepid 4x5. However, it is also one of the most complex methods of capturing an image that I have ever come across. In good weather, on a flat surface and no wind - it can be a relatively straight-forward process.
However, on the 20th floor of a building in strong wind and dim light… Yeah, it becomes a challenge. I know what you’re thinking, ‘Excuses, excuses…’ But even seeing through the ground glass on the back became a challenge as the light started to dip. With the wind whipping the dark cloth and battering the front of the camera - I was more concerned with trying to keep exposure times short than I was with checking every last detail before taking the shot!
Ultimately, this was my downfall, rushing to get the shot! I had made one major error that I simply hadn’t spotted whilst the camera was set up in front of me. I hadn’t double checked that the front/back standard were angled correctly. This would completely mess up the focus and what I had mistaken for ‘depth of field’ (whilst the lens was wide open to compose the image) was actually just ‘out of focus’.
This was a bit of a schoolboy error and as I developed the images and checked the negatives, my heart instantly sank as I knew they were ruined. Not to worry though, this was just another lesson learnt and something I’ll be more conscious of in future - Happy to share my mistakes though, I’m sure they won’t be the last!
Final Thoughts…
Overall, I’m happy with most of these images and certainly have learnt a few valuable lessons. More importantly, it was just a fantastic experience to take in the views and enjoy watching the city transform from day to night. I can’t imagine there are many better views of our wonderful city than this! To experience it for yourself, follow the link below to check out Staying Cool’s website.
INSIDE JOB: Autocab Event Manchester
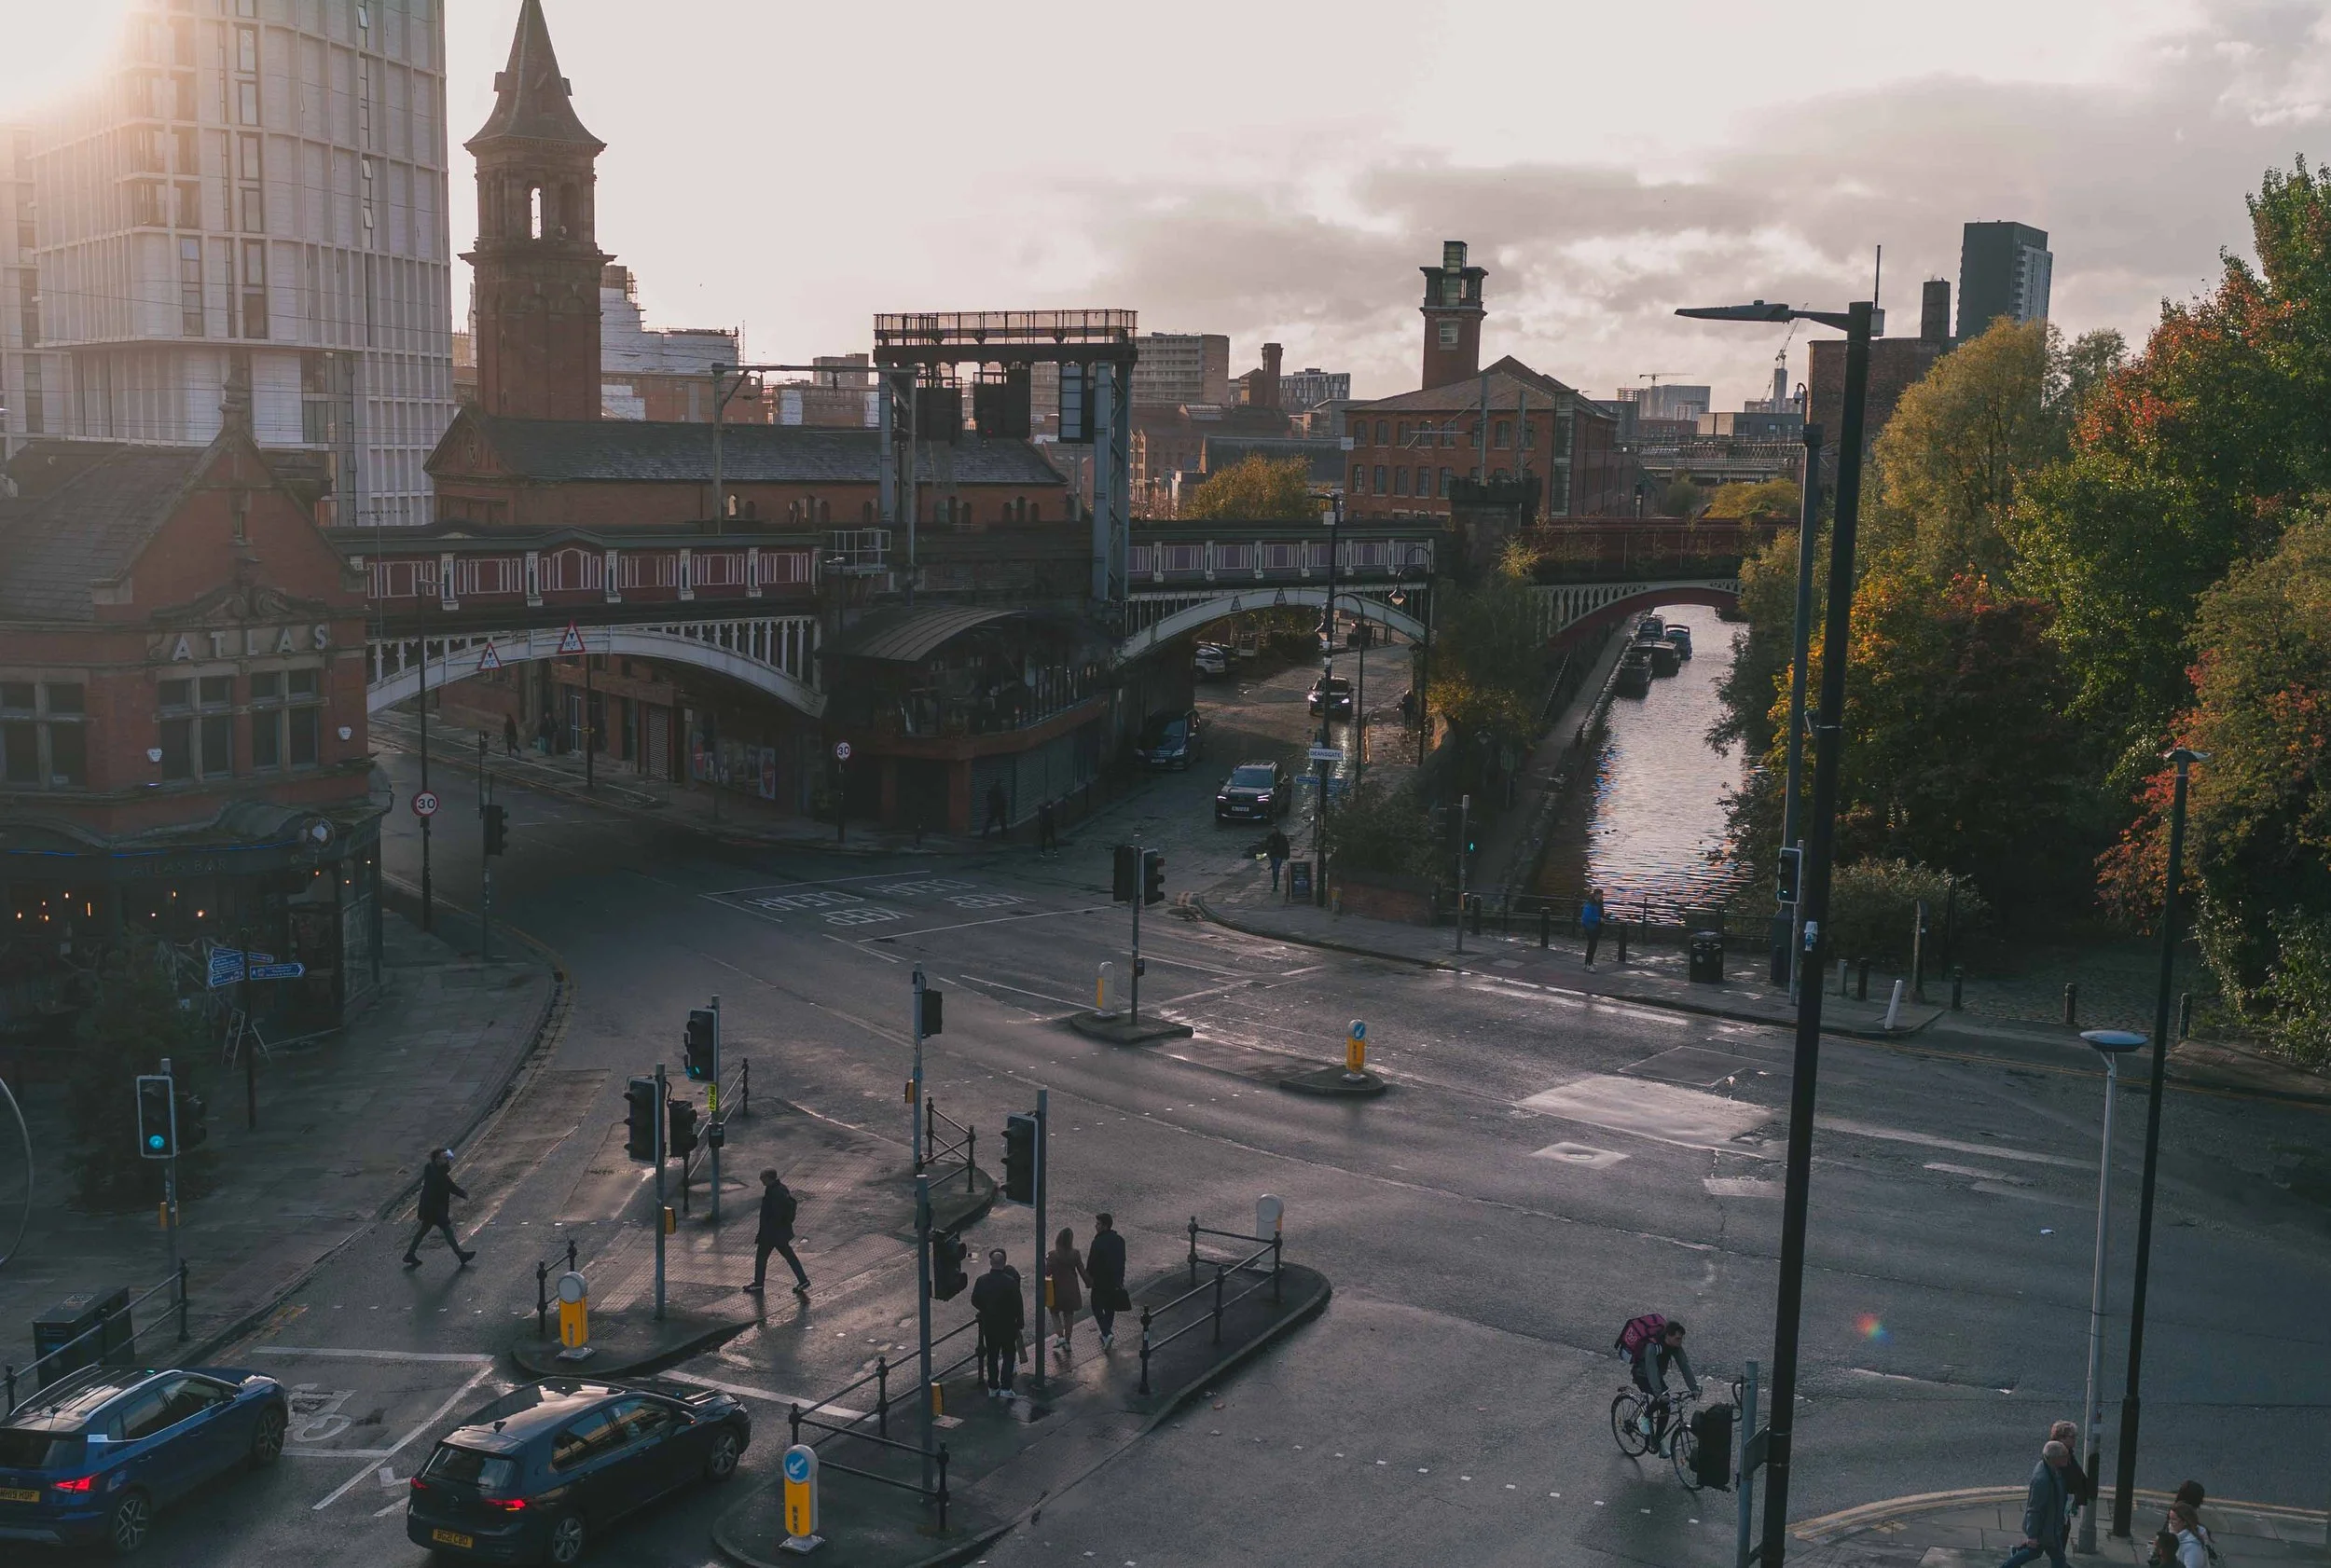
I’m always happy working with new clients and Square Fish Events are one of the latest added to my list. The job itself was a ‘Summer Festival’ for AutoCab - one of the leading Taxi booking and dispatch systems. The client required a short, minute-and-a-half video showcase the event and the day itself. So I hoped on a train, made my way to Manchester and waited for the rain! Well, it is Manchester after all…

Client: AutoCab via Square Fish Events
Location: Manchester
Website: https://www.autocab.com // https://www.squarefishevents.co.uk
So, in a new series of blog posts, I have decided to share some info about commissions that I am either currently working on or recent completed. The hope is that this will give you a little insight in to how I operate, how to overcome certain challenges and if you’re considering hiring me, a look at some of my commercial work. With that said, let’s get into it!
Taxi!
I’m always happy working with new clients and Square Fish Events are one of the latest added to my list. The job itself was a ‘Summer Festival’ for AutoCab - one of the leading Taxi booking and dispatch systems. The client required a short, minute-and-a-half video showcase the event and the day itself. So I hoped on a train, made my way to Manchester and waited for the rain! Well, it is Manchester after all…
The event was great and well organised by Square Fish - which made my life a whole lot easier. There were lot’s of fun activities and a live band etc. which made getting engaging action shots fairly straightforward. More importantly, the attendees were all in high spirits and everyone seemed to be having a great time.
After dodging the occasional thunderstorm, it was time to pack up and head home. Despite the travelling, I got home and was still full of energy so managed to get the bulk of the editing done that night, ready for the client to view the next morning - which, I think was probably a welcome surprise!
After a few minor alterations, the video was signed off by all parties and another job was ticked off. More importantly, a new client was brought on-board and seemed happy with the output - onwards and upwards to the next job!
If you have any questions or would like to hire me, please feel free to Contact Me

The Demolition of Rugeley Power Station
Today I went to photograph the demolition of Rugeley Power Station and it didn’t end well for me or the power station! I’ve never actually witnessed a demolition like this before so when I read about it in the local news, I was excited to make the short trip from Birmingham to Rugeley to witness the spectacle!
Today I went to photograph the demolition of Rugeley Power Station and it didn’t end well for me or the power station! I’ve never actually witnessed a demolition like this before so when I read about it in the local news, I was excited to make the short trip from Birmingham to Rugeley to witness the spectacle!

As with a lot of my recent photography, I decided I wanted to capture the historical moment on film - in particular medium format. It was also pretty obvious to me that I would need to use a camera that had some kind of ‘burst’ mode to fire off multiple shots, as the towers came down! Fortunately, I have a Mamiya 645 Pro with an autowinder which would do just the job!

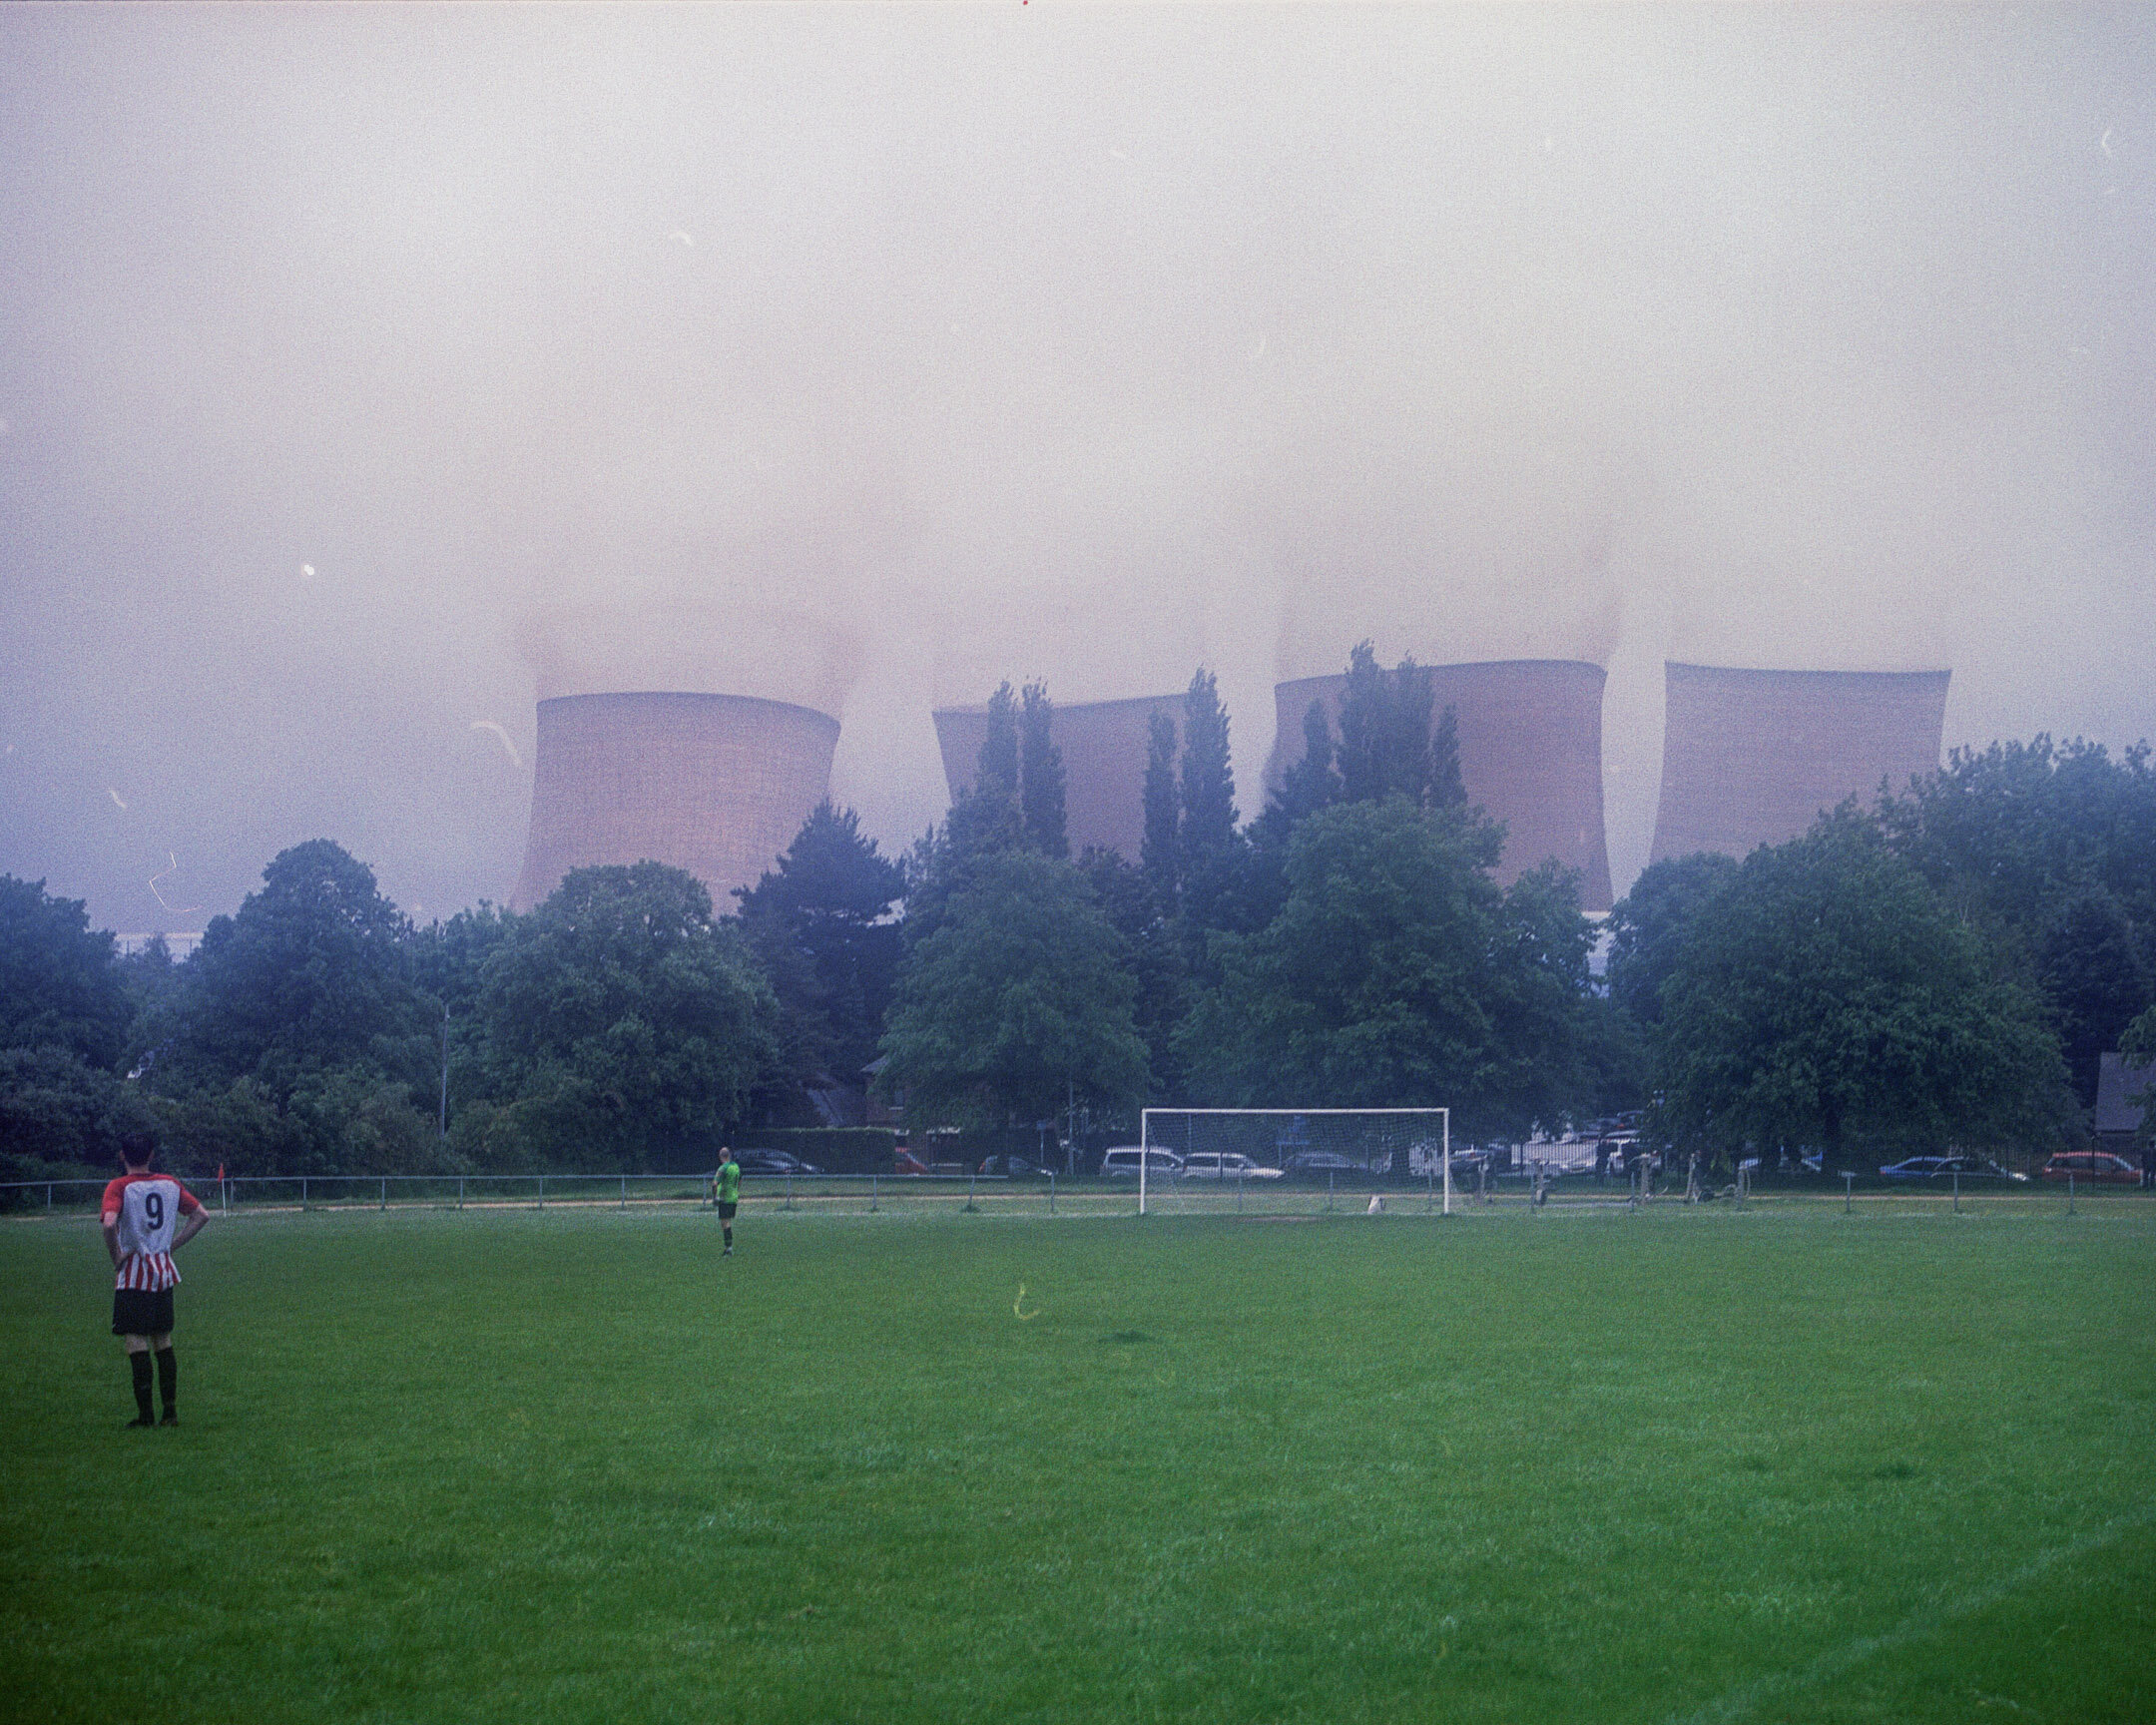
I knew thing were off to a bad start when I arrived in Rugeley and couldn’t even see the huge cooling towers through the thick mist. After a week of glorious sunshine, it was almost comical that the weather would be this bad but also a little predictable. Nonetheless, I wondered the local streets looking for compositions.

I had an idea in my mind that I wanted to place some of the local houses or maybe even a bungalow in the foreground of the shots so that it would add to the scale of the size of the cooling towers. This proved a little more difficult than I first imagined as I just couldn’t find a composition that I was happy with!

With the demolition scheduled for 11.15am and that time fast approaching, I settled on a spot overlooking a local football pitch and much to my surprise, there was even a match on! Brilliant! I thought, this will certainly add to the foreground interest!
As the clock ticked towards the final seconds for the towers, the weather had not improved much and my fears of using an old film camera in the rain were suddenly more prevalent as I desperately tried to hide my camera under my jacket. The problem was, it’s such a manual process in terms of setting the camera for a shot that I really needed to have the camera ready to go - but the weather just wasn’t playing ball!

11.15am came and went. With every passing minute I had the constant battle of trying to keep the camera dry but need to take the camera out at just the right second (and also checking it was set up to shoot!). Then, with a huge bang, the moment was upon us and the towers quickly came down. I fired off multiple shots until the film was finished and so too were the towers. The wait was over and I felt relieved that it was all done and over.


A quick train journey home and straight to developing the film. This part of the process is almost as anxious as the shoot itself as there are still so many things that could go wrong! I was happy to see that there were images on the negatives but on closer inspection, I could seem that something wasn’t right. Later, after scanning the images, my fears were true - all of the ‘action’ shots were dull and hazy… my lens had clearly fogged up and although they were semi usable, I was more disappointed than anything.
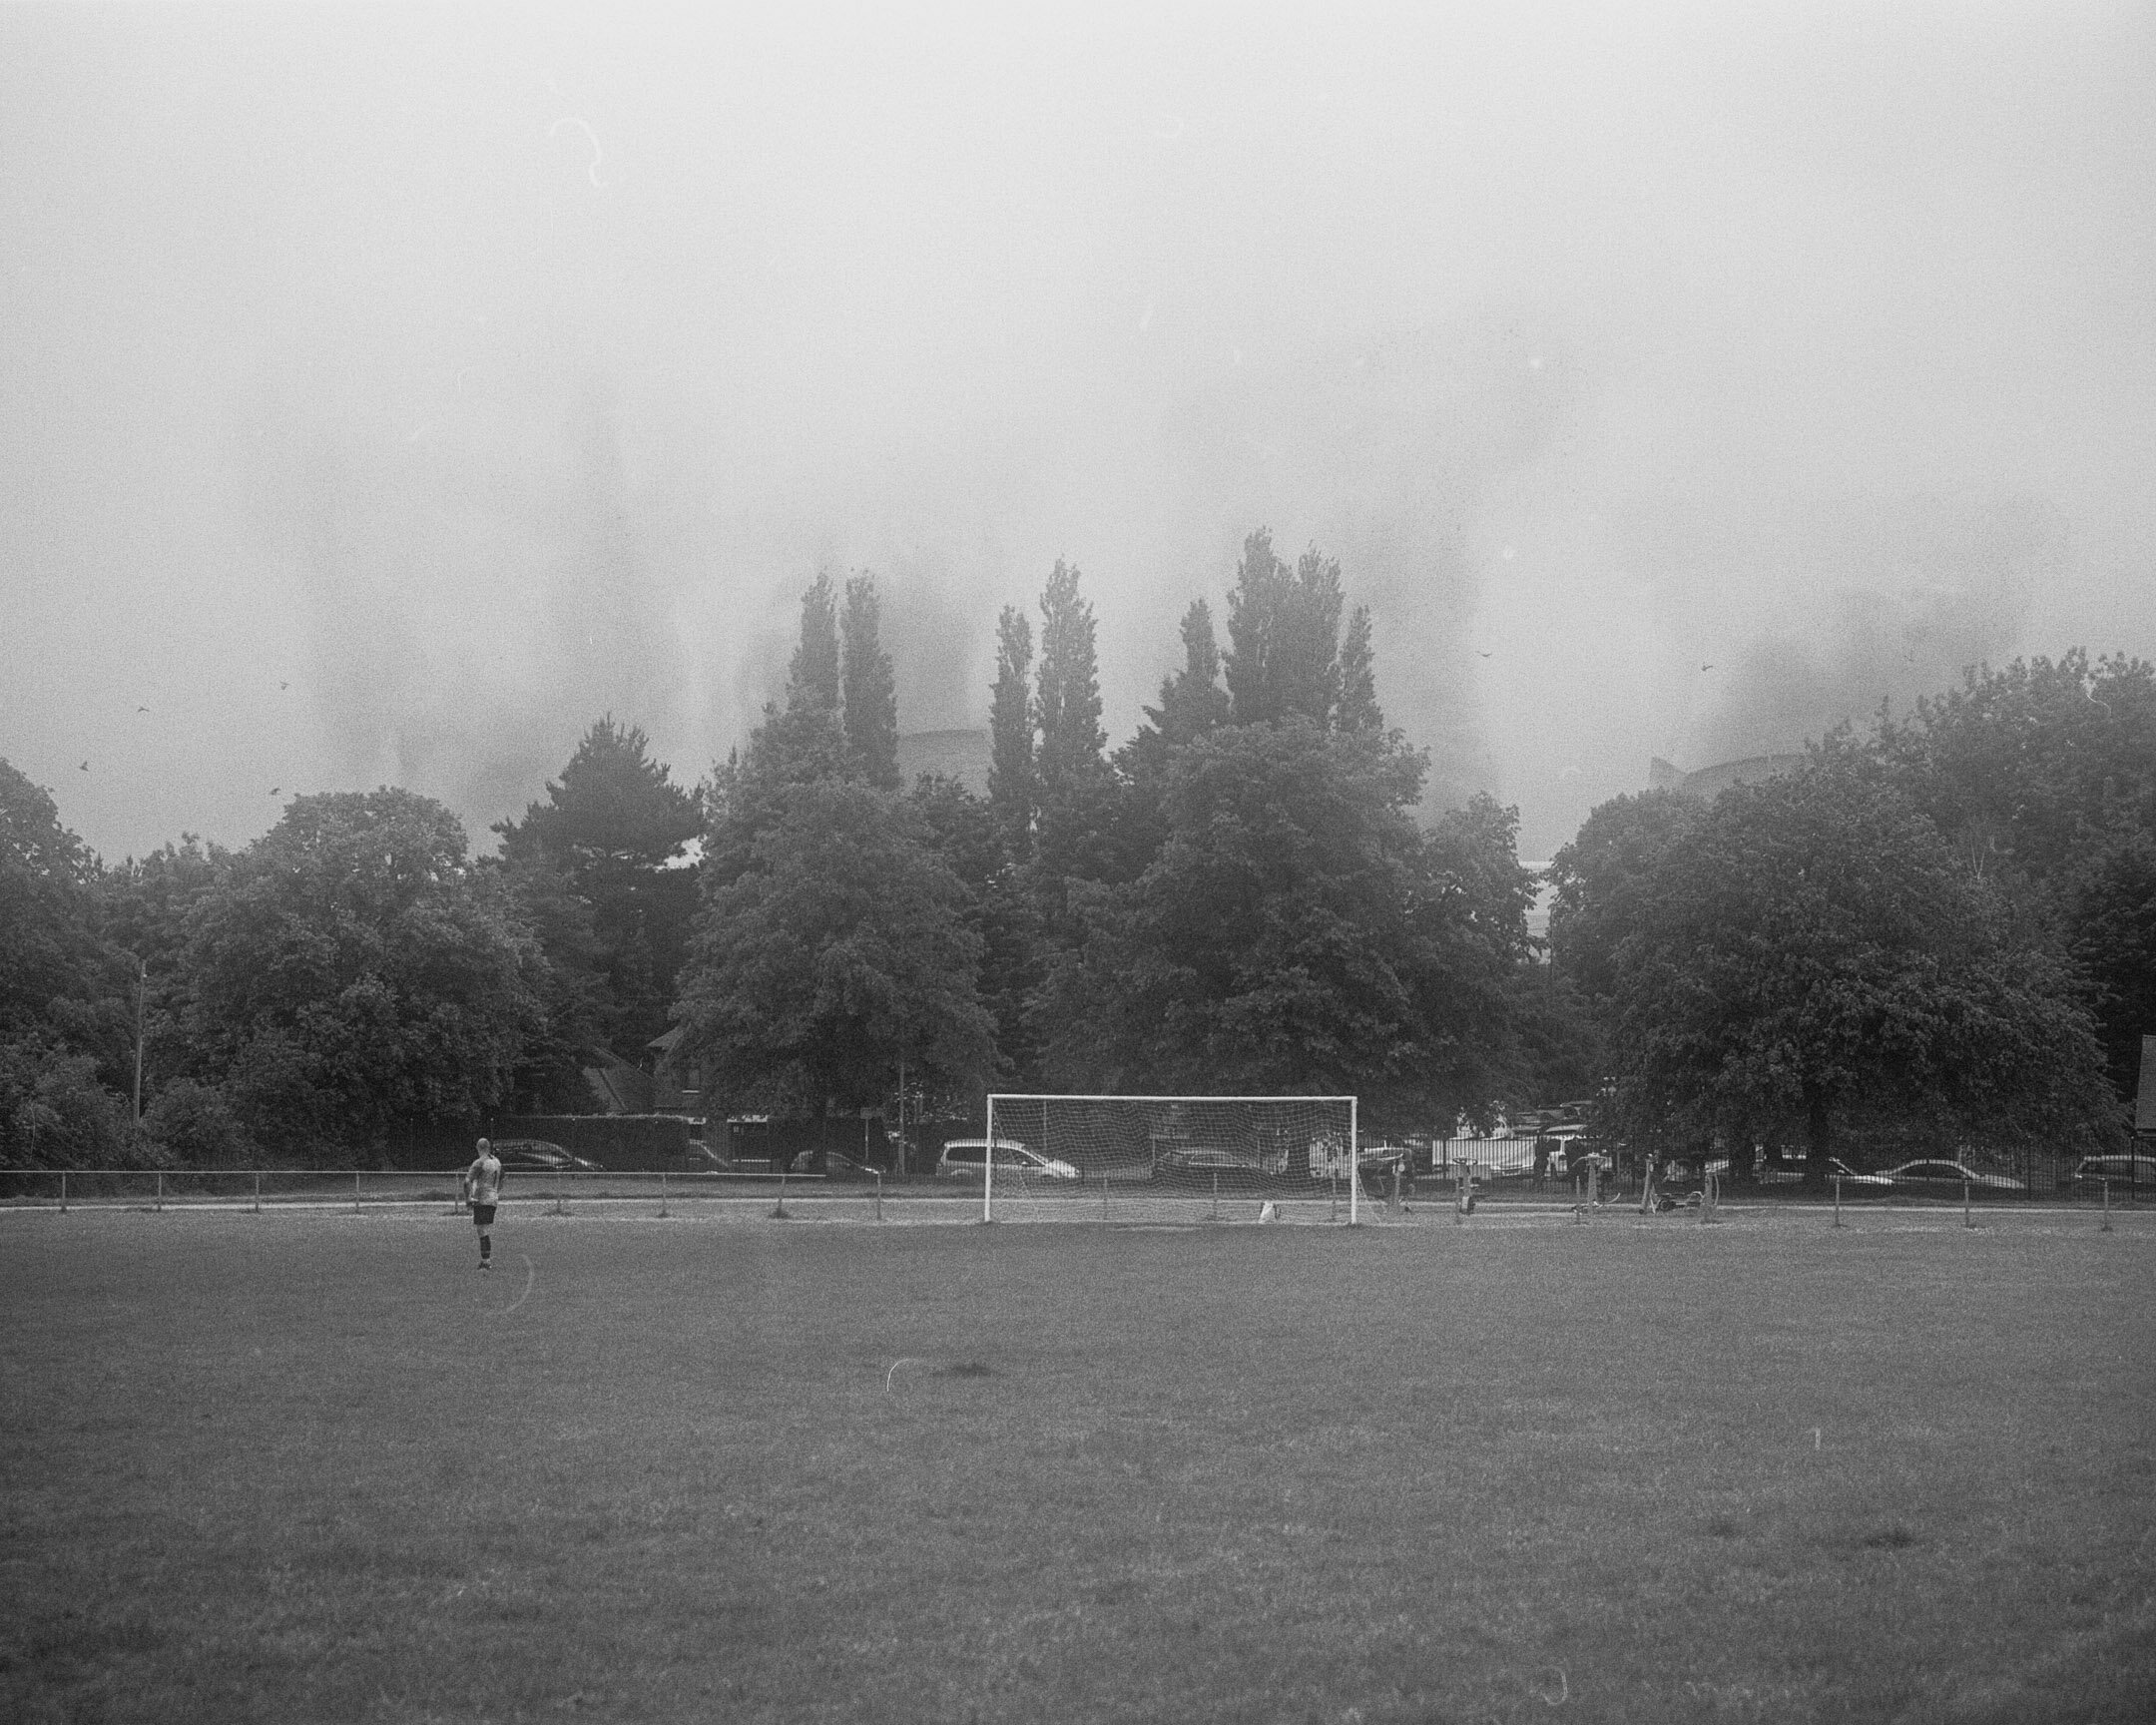
In honesty, it’s one of those things that I should have been able to deal with but between rushing and my outright desire to shoot film - I only really have myself to blame. Fortunately, the final composition never really worked for me and I would have liked more football players to have been at that end of the pitch and obviously, better weather! However, that’s how these things go and more importantly than the images, it was still quite an experience!
My Camera Collection for 2021! Film and Digital!! Have I wasted my Money??
If you’re anything like me, you love cameras! If you have an interest in Photography then you more than likely enjoy looking at and holding cameras, well at least I do… It recently struck me (after finally receiving a couple of my late night eBay purchases in the post!) that I had covered all the major bases with my camera collection so thought it would be fun to share them and to see if you think I’ve got it right, or I should sell up and start again!
WATCH THE VIDEO
If you’re anything like me, you love cameras! If you have an interest in Photography then you more than likely enjoy looking at and holding cameras, well at least I do… It recently struck me (after finally receiving a couple of my late night eBay purchases in the post!) that I had covered all the major bases with my camera collection so thought it would be fun to share them and to see if you think I’ve got it right, or I should sell up and start again!
Now this isn’t a flex, it’s not a ‘look how much stuff I own’ kind of thing. This is the result of years of hard work, saving and sacrificing many other luxuries to buy the ‘tools’ that I use on a regular basis. In fact, I have a very simple criteria when buying it camera, it must do one of the following:
Fill a purpose: Have features and functions that are necessary for me to complete the work that I need to do - basically to be a tool.
Bring me joy: To make me ‘want’ to go out and shoot with it and therefore to further my photography experience.
Film Vs Digital
Around 18 months ago, when the world was a much brighter place and we could leave the house, I decided to start shooting film again. Like many others, the process appealed to me more than the results and what some would consider a waste of money when digital does everything you need it to do, I threw myself back into the format.
In this list you will see that even in that relatively short time, film cameras seem to be dominating my ‘collection’ - I make no apologies for this and in fact, plan to add many more - more on that later. However, it is worth noting that I do see the digital cameras very much as ‘tools’ and the film cameras ‘things of joy’ - almost like the daily driver vs the weekend treat. With that in mind, let’s start with the digital cameras, smallest to largest…
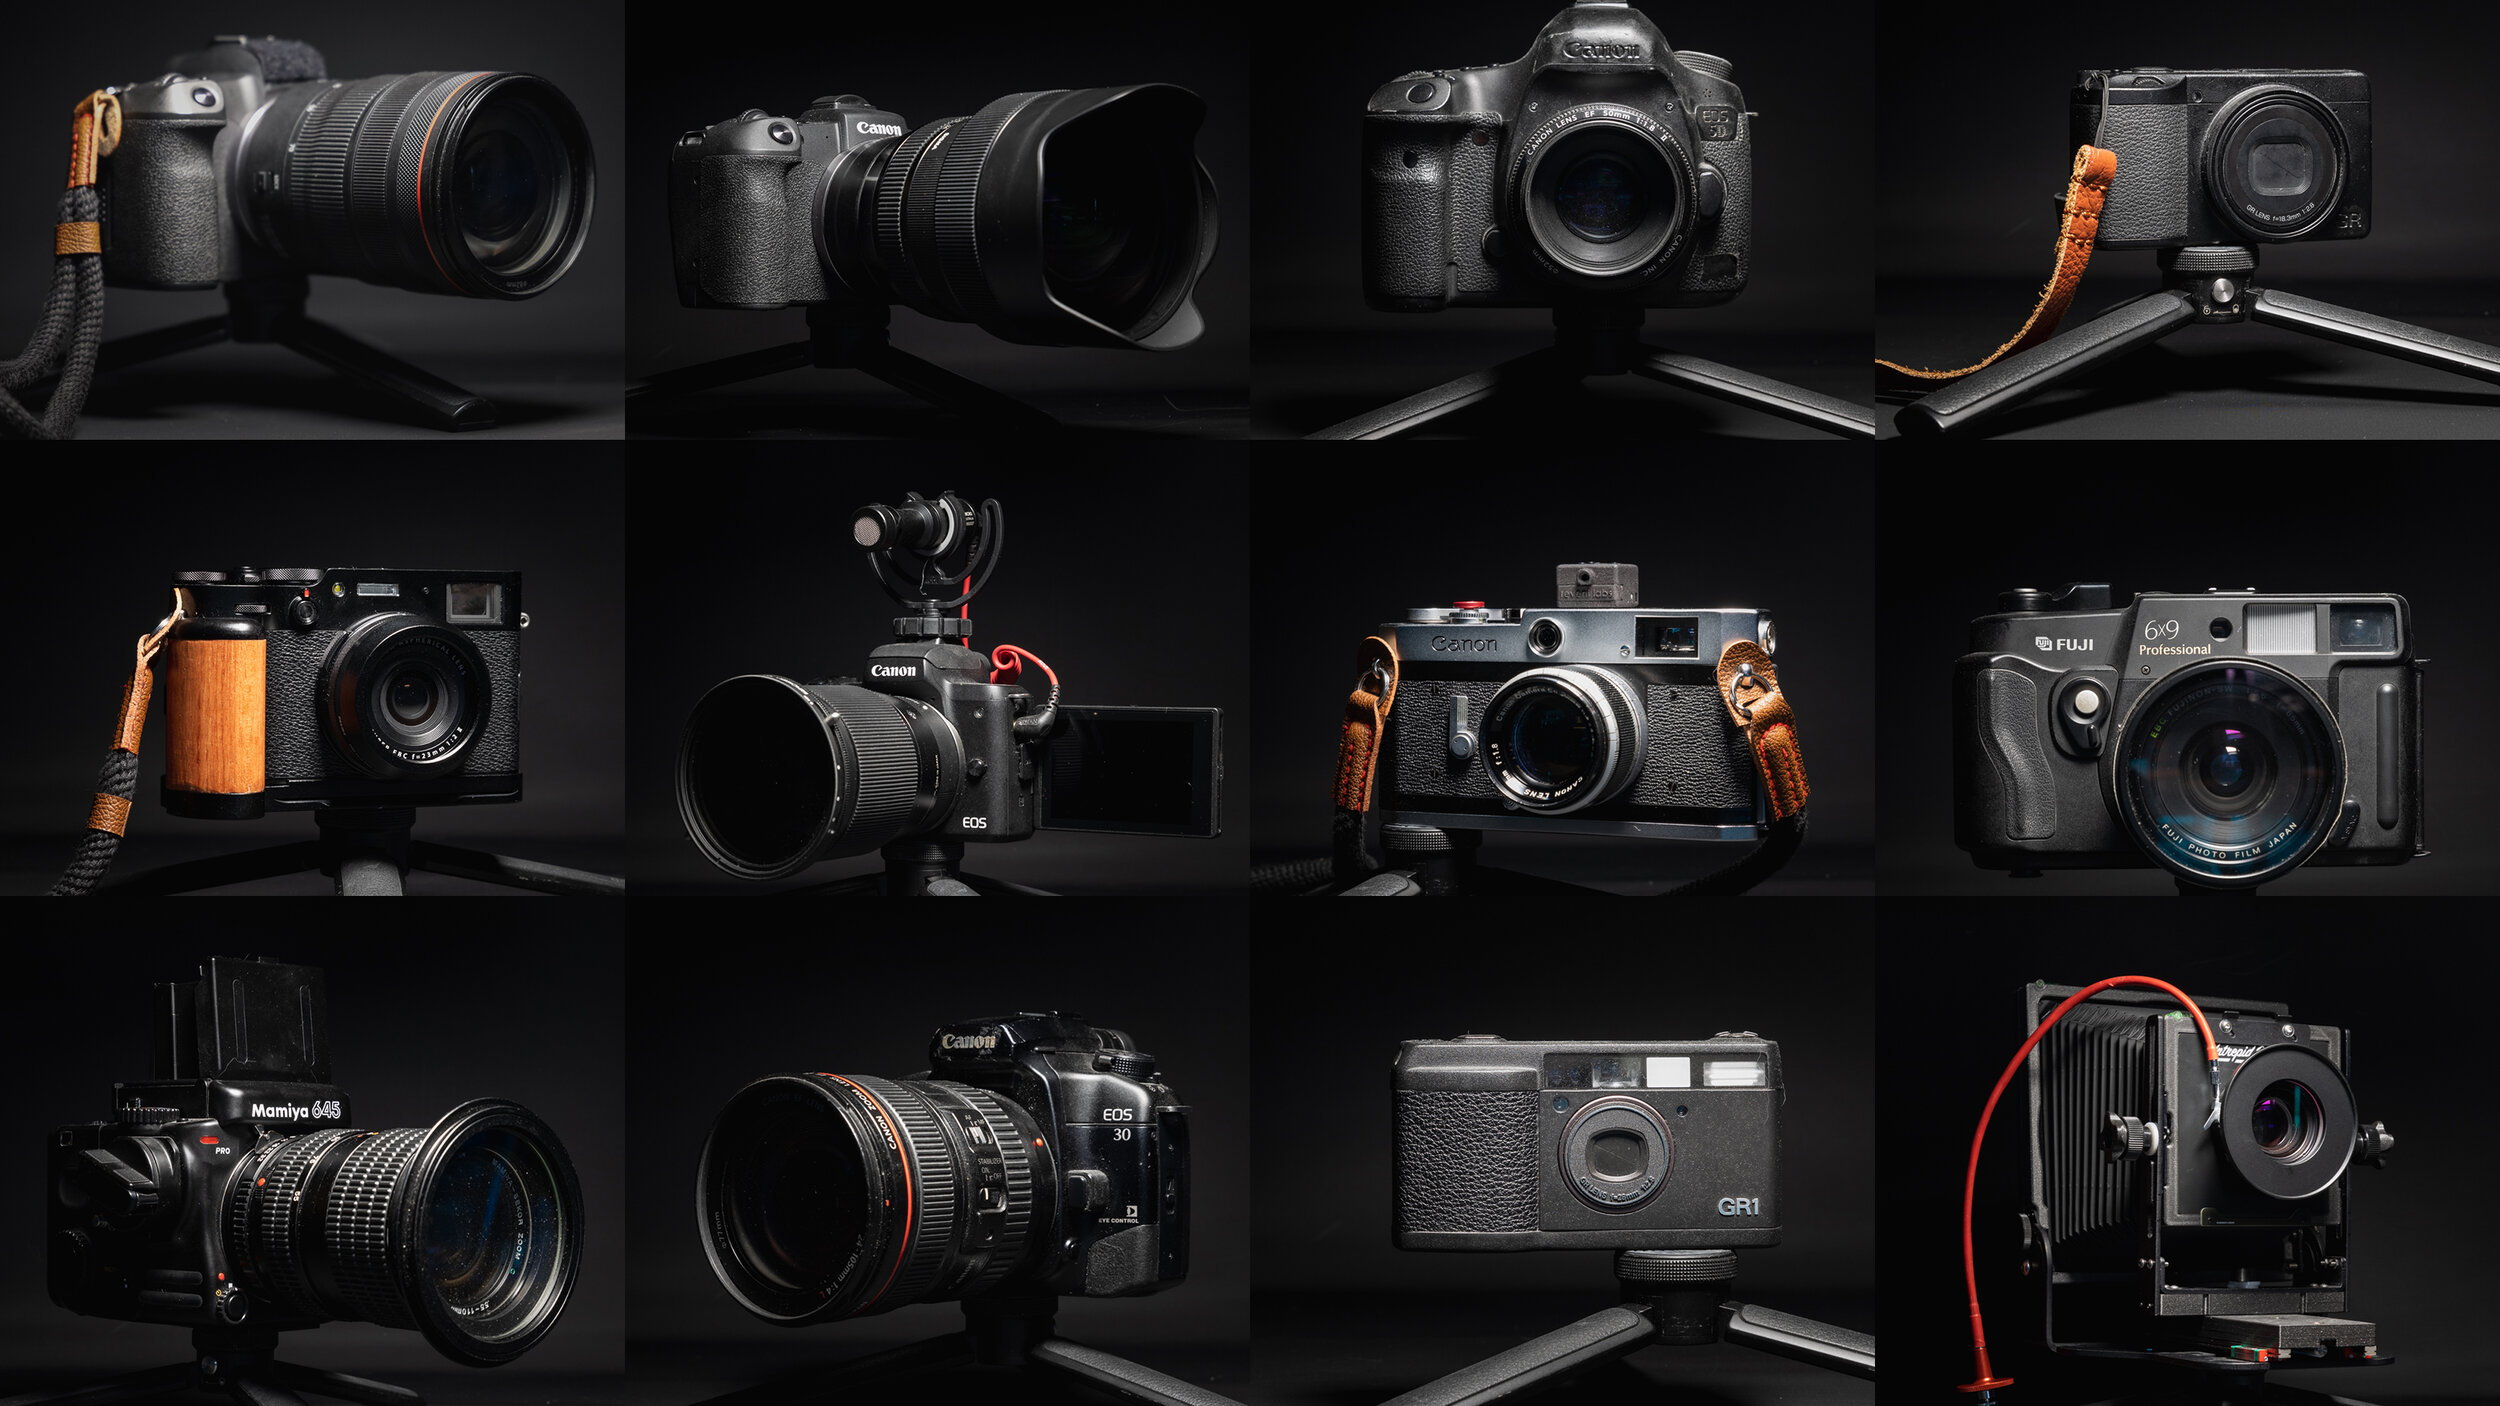
DIGITAL CAMERA COLLECTION

Ricoh GRiii
This little camera is an absolute street photography beast. The tiny form factor allows you to be stealthy in most situations and the virtually silent shooting won’t draw attention. Most importantly for me, it fits easily in a pocket meaning it is really easy to carry it everywhere - and that means more chance of taking photos!
I’ve owned a few of the older generations and always had issues with the lens motors. The build quality of the ‘iii’ seems a lot better but I do worry how it will hold up over time. It really is a great little camera that produces beautiful images and a camera is very easy to fall in love with.

Fuji X100V
One of my more recent purchase, the ‘V’ comes from a great heritage of Fuji’s X-Series cameras and is pretty much the pinnacle of form and function - I mean, it’s great to use, produces stunning images and look at it! It’s a beauty!
Not quite a s pocketable as the Ricoh, it is still easy enough to carry as an everyday camera and as long as you can cope with a fixed focal length, it has all other major functions covered. If I was being picky, I would love in body stabilisation, but I’m not sure what that would do to the form factor. However, it’s an absolute joy to shoot with and I find myself far more likely to reach for this than all of my ‘better’ cameras.

Canon M50
This little Canon is purely here for one thing, vlogging. The small form factor, great autofocus and flippy screen make it perfect for filming yourself when out and about. When pairing it with the right lens, it produces wonderful 1080p video - though I wouldn’t use it for 4k. Canon’s colours always look great and you really don’t need to do much in post to get a good image.
One thing that I feel always get’s overlooked with these cameras are it’s ‘stills’ mode - it takes pretty decent images. I have been in many situations where I wanted to grab a quick shot and have been perfectly fine with using the ‘vlogging’ camera, rather than unpacking my camera just to get to the ‘big boy’.

Canon Eos RP
Like the M50 - the RP serves a purpose - this is my ‘studio’ camera or B camera on bigger shoots. The RP is the ‘lite’ version of the Eos R but like most modern mirrorless cameras, is very capable in most situations. The video looks good and as with all Canon’s, it’s so well laid out and easy to use that shooting with it is never a chore.
This particular camera is most often permanently mounted to a tripod so that I can quickly go into video mode and start filming. However, it’s smaller form factor also makes it great for pairing with a gimbal and grabbing some juicy B-roll - though many will overlook it due to it’s mediocre 4k and slow motion features. For what I need, it does the job.

Canon 5D Mkiii
The camera I’ll never sell… I class myself as a photographer first, then a ‘YouTuber’ or whatever you want to call me… And this is the camera that really elevated my photography from a hobby to a career. I moved up from my first camera, a Canon 650D to the full-frame 5D and never looked back.
Even to this day, in the right hands this is a more than capable camera. However, I really wouldn’t see the point in picking a DSLR over mirorrless these days and advances in autofocus etc. have left this big boy feeling a little bit like old technology. However, if for no other reason than sentimental value, it will never leave my collection.

Canon Eos R
And finally, the workhorse. This is the camera I do most of my shooting on and really is the camera that pays the bills. Whereas it was pretty much attacked at launch for Canon’s excessive use of the ‘cripple hammer’ on their first venture into the world of full-frame mirorless, it has served me very well with pretty much no complaints'.
The stills look amazing with decent dynamic range, the video is good (if you’re not shooting 4k) and the 60 fps is enough to get some nice cinematic shots. The autofocus is great and as always, Canon colours steal the show. However, I’m not saying I would upgrade to an R5 (or even dare I say it, a Sony!) - but in these uncertain times, I really don’t ‘need’ to spend an extra £4-5k on a camera for features I’ll rarely use.
More so, for many amateurs/semi-pro’s - this is more than enough camera for your needs. I pretty much couldn’t live without this camera and paired with the 24-70 f2.8 RF lens - it’s everything I need… for now.
I provide all of this content for free, so if you’d like to support me continue to produce content like this, click the button below ;)
FILM CAMERA COLLECTION

Ricoh GR1
Like it’s digital relative, the biggest selling point of this camera is it’s size, it’s tiny! Barely much taller than a 35mm film canister, this is a truly pocketable little point & shoot! To make it even better, it has pretty decent autofocus and ‘feels’ like you are shooting with a more modern camera than it’s age suggests.
This camera is far from without it’s flaws - mine suffers from the most common issue of a faulty LCD screen - so you are never really sure how many shots you’ve taken. The lens motor always feels like it’s about to pack in and it can be a noisy little thing - so not great in quiet situations - but in everything else - it’s fantastic!

Canon P Rangefinder
This is my most recent film camera purchase so I really haven’t shot with it much - so I can’t say how good it is. However, I sent it off to be CLA’d and can’t wait to get out with it. If nothing else, it’s certainly a looker! As Canon’s crack at a Leics M series, it’s got the look, feel and the heft of a Leica - but will it shoot like one?
My biggest fear with this camera is the manual focusing. I have had the patch cleaned and it seems easy enough to use - but I don’t have the best eyesight and I’m not sure I will be very accurate with it - this is very much a ‘me’ issue and certainly no fault of the camera - but I do hope it doesn’t ruin the experience.

Canon Eos 30
This camera was an absolute bargain at around £30 - and paired with a way more expensive EF 24-105mm lens it’s makes for easy film shooting. It is bulky but it feels every bit a professional film camera with snappy autofocus and plenty of features you won’t find on your vintage 35mm’s!
I think it’s size is it’s only real drawback as it is far from discreet. Most casual passers-by will assume it’s a modern digital camera and it certainly handles like one. This would certainly make a fantastic option for anyone looking to get started with shooting analogue.

Mamiya 645 Pro
My first foray into medium format and this was love at first site. A Japanese import that had been well looked after, it feels like a modern camera and shoots like one too. The large 6x4.5 negatives produce great image quality and I quickly added more lenses, an autowinder and a viewfinder to make the whole experience, well, more enjoyable.
It really is like a baby RZ-67 but without the bulk - it’s not exactly small but if you strip it down to the ‘top down viewfinder’ and remove the autowinder, it’s a more than usable little package. This really is a great place to start with Medium Format photography and is a real pleasure to shoot with.

Fujifilm GSW690III
The beast or as it’s more commonly known, the ‘Texas Leica’ - this thing is huge! However, it’s size is it’s main selling point as it spits out incredible 6x9 negatives that are just packed with detail. The camera itself is a rangefinder which is almost comical to look at when someone is using it, it has a real ‘toy’ camera feel to it.
However, don’t let that fool you, it produces spectacular images. I chose the ‘wide’ version (as I a more of a landscape photographer than anything else) and the lens can produce wonderfully sharp images. It’s not without it’s quirks and shooting long exposures with it is a real faff. However, I absolutely love it and is often the first camera I’ll reach for when I want to go and shoot for fun, rather than necessity.

Intrepid 4X5 MkIV Black Edition
The large format camera. This is probably the one camera I would save in a fire (who am I kidding, I’d be running down the stairs with my arms full of cameras!). I absolutely fell in love with this format the moment I first shot it - the slower process, the technicality of it and the enormous negatives - it really is the most fun camera I have ever shot with.
The camera itself is well made, 3d printed and pretty budget friendly. However, shooting large format is a real challenge and not for the faint hearted, in particular due to the cost of film! That said, it is also one of the most rewarding experiences I have had as a photographer and one that I am pretty much hooked on! I will most certainly be adding more lenses and possibly a new large format camera to the collection in the future!
MISCELLANIOUS CAMERAS
There are a bunch of other cameras that I own that have either been donated to me or I have picked them up from secondhand shops or eBay. Most of these will never be used or at least, not on a regular basis, but they still bring me pleasure to look at and just to have around. Part of the experience of owning cameras like these is just simply taking pleasure in their aesthetic.
Conclusion
Overall, I am very happy with my collection and feel it covers everything I realistically need and want to shoot. However, I do wake up some days and think ‘I’ll sell the lot and buy a digital medium format set-up’ - But I still think I’d be a bit short of cash so I doubt that will happen anytime soon!
On the other hand, having the versatility of a collection like this is great. Being able to pick a camera that suits the style if shooting that I want to do on any given day is a real privilege and something that I highly recommend other photographers aspire to have.
Ultimately though, this collection will continue to chop and change, some will get sold on and undoubtedly, new cameras will be added. Please leave a comment below and let me know what you would keep, what you’d get rid of and what would be next on your shopping list.
Thanks as always, Ross.
Disclaimer: All links to Amazon UK are affiliated links - you will still pay the same price but I will receive a small commission for providing the link. All information provided in this blog is intended either for educational or entertainment purposes and is accurate to the best knowledge of the author. However, further research/professional advice should be sort before making purchases/implementing any advice given and no responsibility is taken by the author or parties mentioned here within.